VPN – Palo Alto GlobalProtect

In this topic, you will learn how to configure Palo Alto GlobalProtect to work together with Portnox™ Cloud and 802.1X RADIUS authentication for VPN connections.

Warning: This topic contains documentation prepared by our support agents more than 12 months ago. It may not cover the newest models or the newest interfaces of NAS devices. We’re working on bringing you updated documentation for NAS devices in the near future. However, the methods of setting up third-party devices may still change when the manufacturers update their firmware or release new models. Therefore, to get the most accurate and current configuration guidance, we strongly recommend that you refer to the documentation provided by the manufacturer. If you need help setting up newer equipment that does not match the description in this topic, contact us at support@portnox.com.
  1. Create a RADIUS server profile by navigating to Device > Server Profiles > RADIUS and clicking Add.
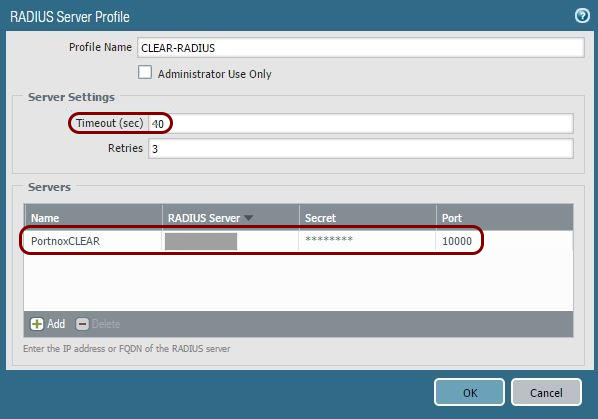
  2. In the RADIUS Server Profile window that appears:

    1. Specify a Name for the RADIUS server profile.
    2. In Server Settings, set Timeout (sec) to 40.
    3. Enter the cloud RADIUS details: the IP address, the authentication port, and the shared secret.
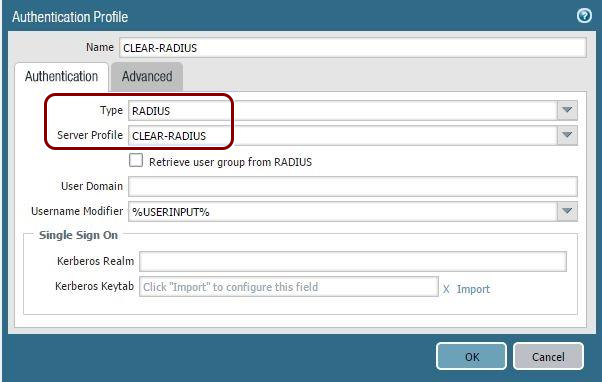
  3. Create a RADIUS authentication profile by navigating to Device > Authentication Profiles and clicking on Add.
  4. In the Authentication Profile window that appears:

    1. Specify a Name for the authentication profile.
    2. In the Authentication tab, in Type, select RADIUS.
    3. In Server Profile, select the RADIUS server profile you created in the previous step.
    4. In the Advanced tab, add All to the Allow List.

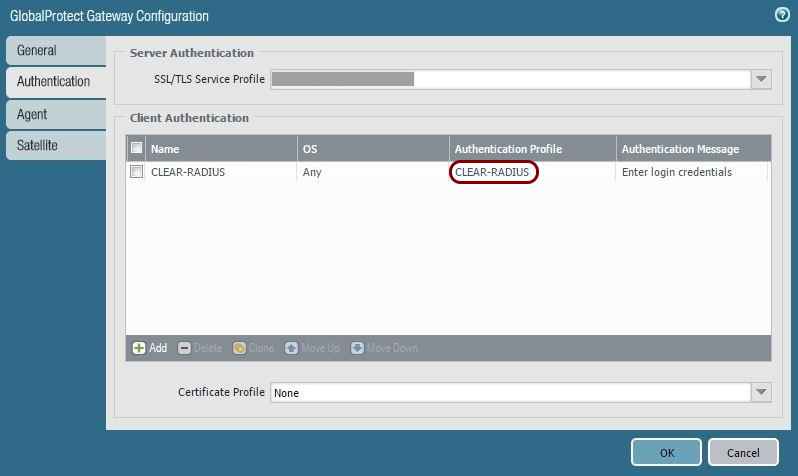
  5. Add the new RADIUS authentication profile to the GlobalProtect gateway, as follows:

    1. Navigate to Network > GlobalProtect > Gateways.
    2. Select the relevant gateway, that is, the gateway that will be communicating with Portnox Cloud.
    3. In the Authentication tab, select Add.
    4. Specify the RADIUS authentication profile you created in the previous steps.
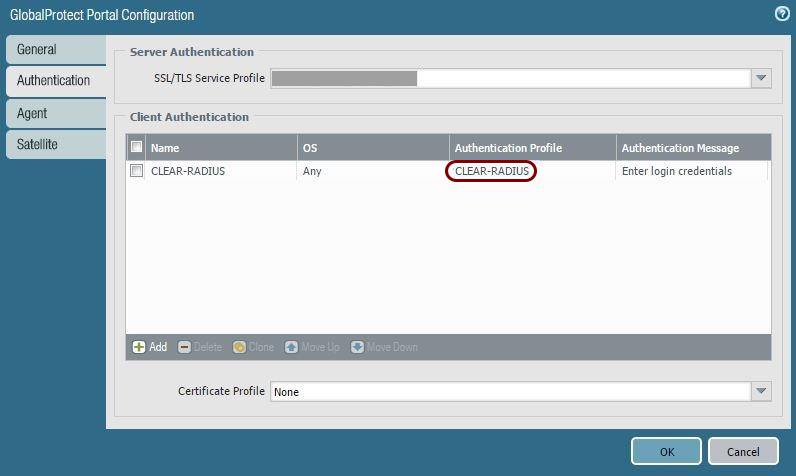
  6. Add the new RADIUS authentication profile to the GlobalProtect portal, as follows:

    1. Navigate to Network > GlobalProtect > Portals.
    2. Select the relevant portal, that is, the portal that will be communicating with Portnox Cloud.
    3. In the Authentication tab, select Add.
    4. Specify the RADIUS authentication profile you created in the previous steps.
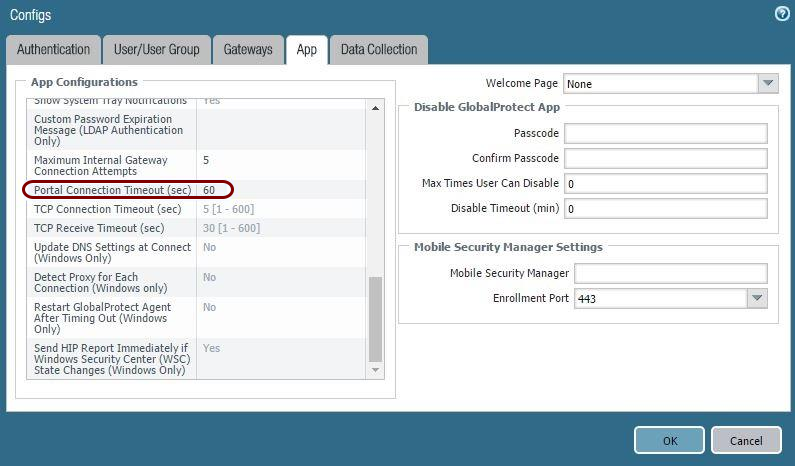
  7. Update the Portal connection timeout, as follows:

    1. Navigate to Network > GlobalProtect > Portals.
    2. Select the relevant portal, that is, the portal that will be communicating with Portnox Cloud.
    3. In the Agent tab, select the VPN gateway.
    4. Select the App tab.
    5. Set the Portal Connection Timeout to 60 seconds.
  8. Add additional information to RADIUS attributes by logging in to the Palo Alto CLI and running the following commands:
    set authentication radius-vsa-on client-source-ip
    set authentication radius-vsa-on client-osu
    set authentication radius-vsa-on client-hostname
    set authentication radius-vsa-on user-domain
    set authentication radius-vsa-on client-gp-version
    Note: These commands may be removed after a device reboot, in which case they will need to be run again.

Set the authentication override

If you do these steps, users will not be required to log in to both the portal and the gateway in succession, nor enter multiple OTPs for authenticating to each.

  1. Set the authentication override settings for the gateway, as follows:

    1. Navigate to Network > GlobalProtect > Gateways.
    2. Select the relevant gateway, that is, the gateway that will be communicating with Portnox Cloud.
    3. In the Agent tab, select Client Settings.
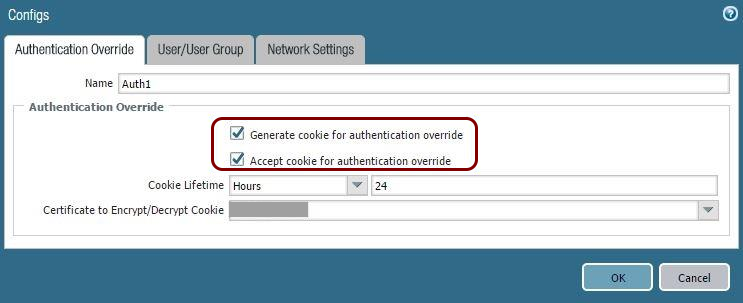
    4. Select the relevant configuration, and in the Authentication Override tab, select: Generate cookie for authentication override and Accept cookie for authentication override.
  2. Set the authentication override settings for the portal, as follows:

    1. Navigate to Network > GlobalProtect > Portals.
    2. Select the relevant portal, that is, the portal that will be communicating with Portnox Cloud.
    3. In the Agent tab, select the relevant configuration.
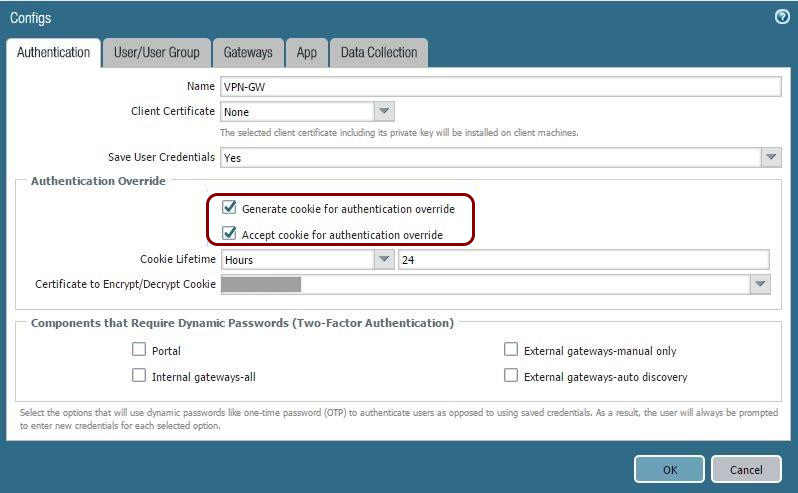
    4. In the Authentication tab, select: Generate cookie for authentication override and Accept cookie for authentication override.