Using Conditional Access for Applications on mac computers with macOS 14 (Sonoma)
Read this page to learn how to access your company applications if they are protected by Portnox™ Conditional Access for Applications.
To access your protected company applications, you must do the following:
-
Download and install Portnox AgentP on your device.
-
Log in to Portnox AgentP using your company credentials.
-
Select your certificate when accessing the company application through the browser.
These steps are described in detail in the sections below:
Download and install Portnox AgentP
First, you must download and run the installer for the Portnox AgentP application, which will communicate with Portnox Conditional Access and generate the certificate for your computer.
-
Click on the following link or open your browser and type the following address in the Web address field: clear.portnox.com/agentinstall.
Result: Your browser opens the page that lets you download the Portnox AgentP application to your computer.
-
Scroll down the Download Portnox AgentP page to the tile for the
Mac OSX operating system and click on the tile to download the macOS installer.
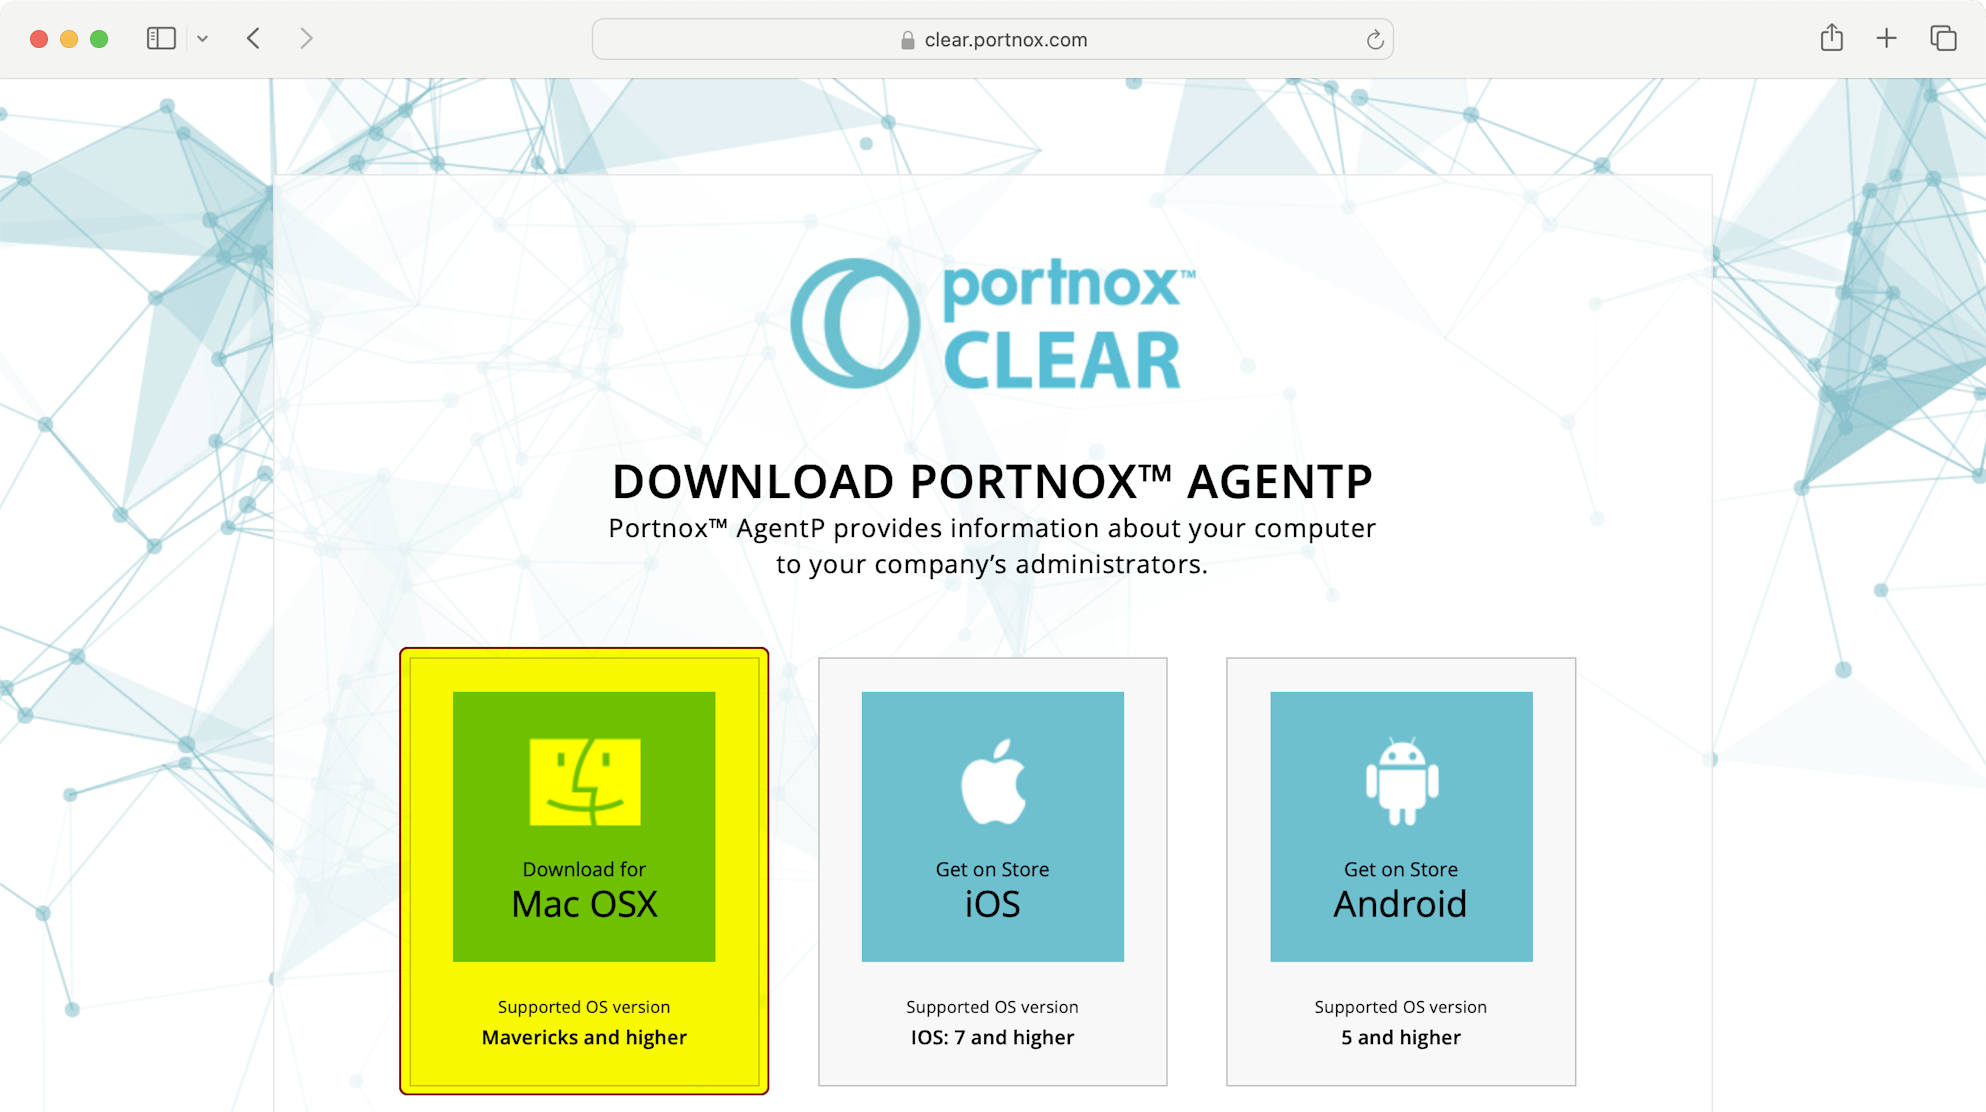 Note: The screenshot above and further screenshots show the Safari browser, which is the default browser in macOS. The page will look very similar in any other browser. You can use the browser of your choice.
- Optional:
If Safari displays a warning asking if you want to allow downloads from this website, click on
the Allow option.
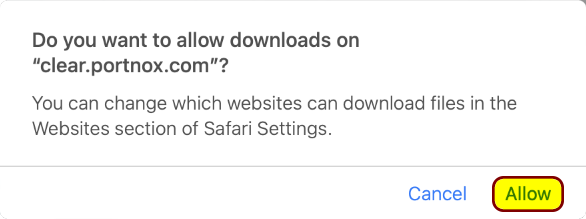
Result: Your browser downloads the Portnox AgentP application installer to your browser’s default download folder.
- Optional:
If Safari displays a warning asking if you want to allow downloads from this website, click on
the Allow option.
-
Click on the Downloads stack on the right side of the Dock and then click on
the downloaded installer package (PortnoxAgentP.pkg).
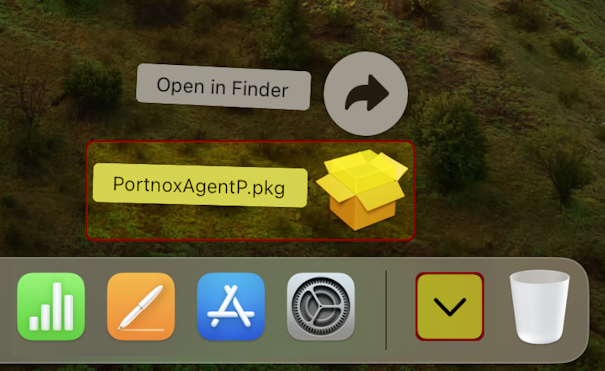
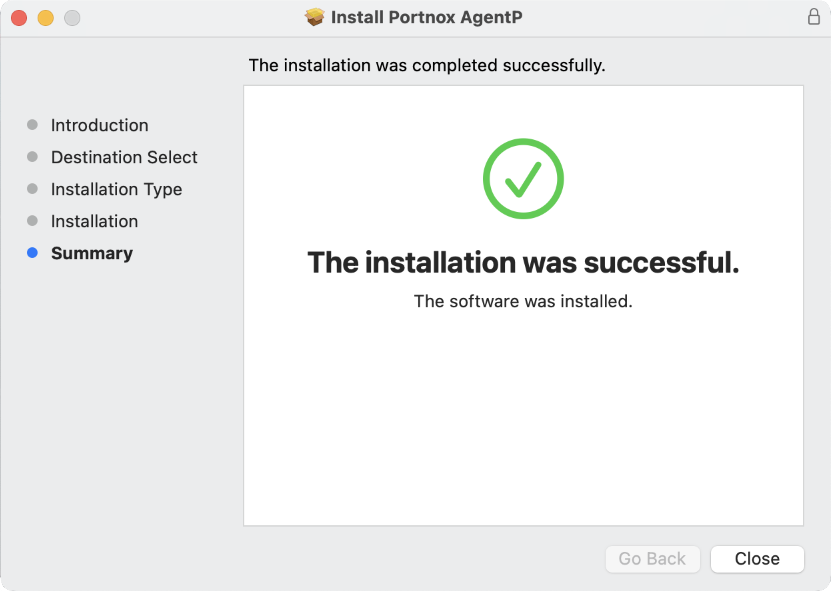
Result: The Install Portnox AgentP Assistant opens.
-
In the Introduction step of the Install Portnox AgentP
Assistant, click on the Continue button.
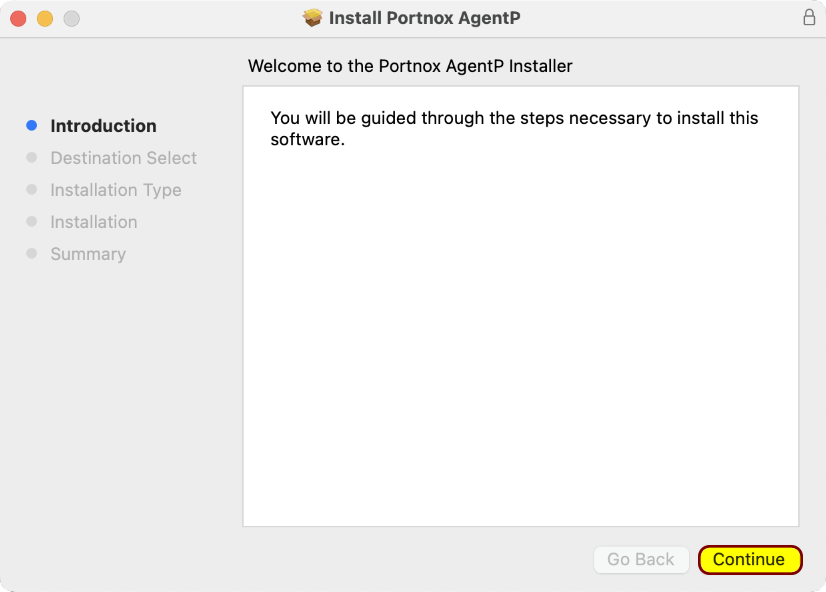
Result: The Assistant proceeds to the Destination Select step.
-
In the Destination Select step of the Install Portnox AgentP Assistant,
click on the Continue button.
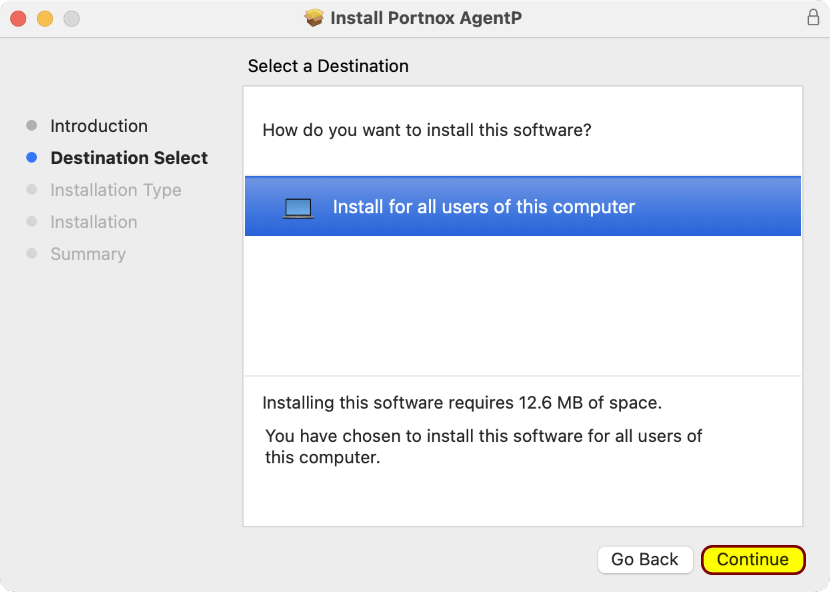
Result: The Assistant proceeds to the Installation Type step.
-
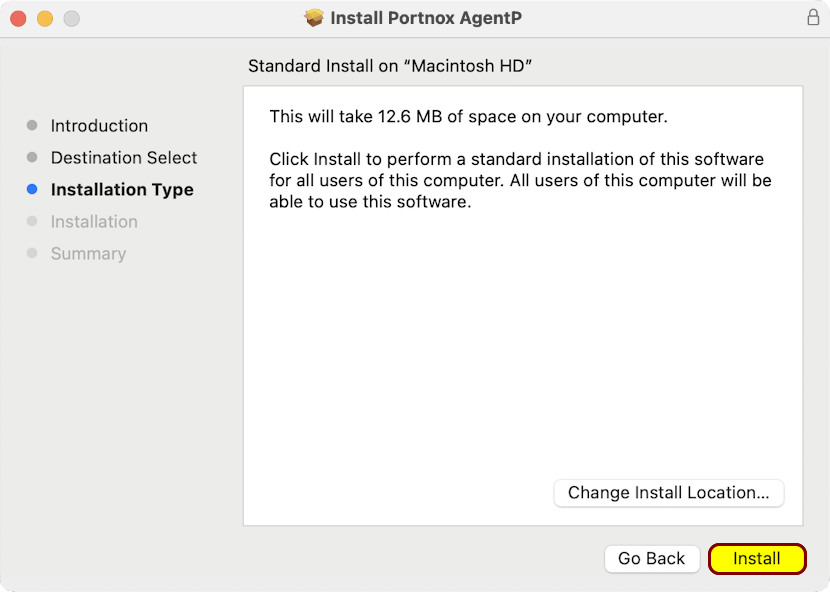
In the Installation Type step of the Install Portnox
AgentP Assistant, click on the Install button.
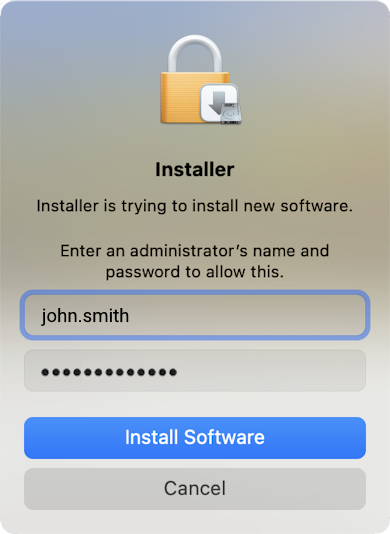
- Optional:
If the operating system displays the Installer window requesting administrator
credentials, and you have administrative privileges on your computer, follow the steps in the window: enter
the administrator’s username and password, and then click on the Install Software
button. If you don’t have administrative privileges on your computer, ask your company’s IT support staff
for assistance.
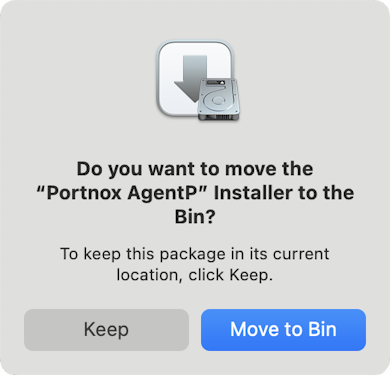
- Optional:
If the operating system suggests to move the Installer package to the Bin, you can choose either option
depending on your preferences. The Installer will not be needed anymore so we recommend that you follow the
operating system suggestion and move it to the Bin.
- Optional:
If the operating system displays the Installer window requesting administrator
credentials, and you have administrative privileges on your computer, follow the steps in the window: enter
the administrator’s username and password, and then click on the Install Software
button. If you don’t have administrative privileges on your computer, ask your company’s IT support staff
for assistance.
Result: Portnox AgentP is installed on your computer.
Log in to Portnox AgentP using your company credentials
After you download and install the Portnox AgentP application, run it and log in to it using your regular company credentials.
By default, macOS will run the Portnox AgentP application as soon as it is installed. If not, you can run it manually.
-
If the Portnox AgentP application is not running, run it manually: click on the
Launchpad and then click on the Portnox AgentP icon.

Result: If you haven’t configured AgentP before or if you configured and deactivated it, it opens the AgentP configuration wizard.
-
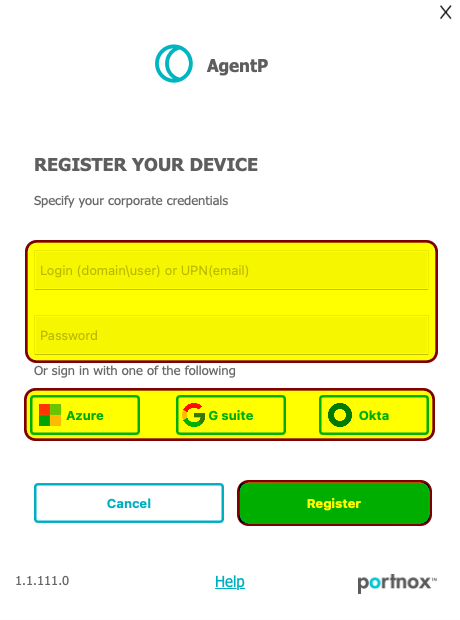
In the Welcome to Portnox AgentP window of the AgentP configuration wizard, click on the
Corporate credentials button.

-
On the Corporate credentials screen, follow the steps depending on how you
normally log in to your company applications.
- If your company uses Microsoft Azure for its employees, tap on Azure.
- If your company uses Google Workspace for its employees, tap on G Suite.
- If your company uses Okta Workforce Identity for its employees, tap on Okta.
- If you don’t recall hearing any of these platform names before when logging in to your company apps, consult with your company’s IT support staff or enter your company email and password in the Domain\username or email and Password fields and then tap on Activate.
 Important: The following steps and screenshots assume that your company uses Microsoft Azure, which is the most popular platform. These steps will look similar if your company uses other platforms.
 -
If your company uses Azure, in the Sign in window, enter your business email
address. Then, click on the Next button.
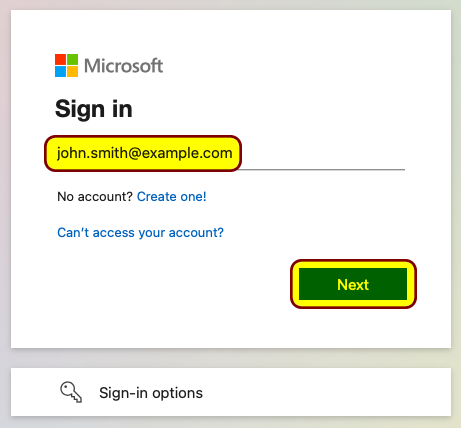 Note: The screenshot above is an example, where your company name is Example and your company domain is example.com. Use your real business email address instead.
Troubleshooting: If you see a button with your email address on it, it means you are already logged in to Microsoft Azure. Click on that button instead of entering your email address.
-
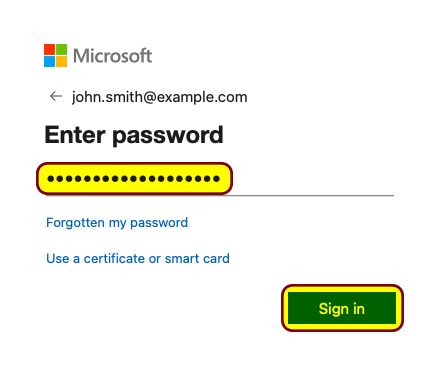
If your company uses Azure, in the Enter password window, enter the password
that you normally use to access your company email and applications. Then, click on the Sign
in button.
Troubleshooting: If you cannot log in, and you are sure that your password is correct, go back to the Register your device step and try a different choice or ask your company’s IT support staff what platform your company uses to authenticate the employees.
-
If your company uses Azure, and a Stay signed in? window
appears, follow the company policy and/or your preferences to choose Yes or
No.
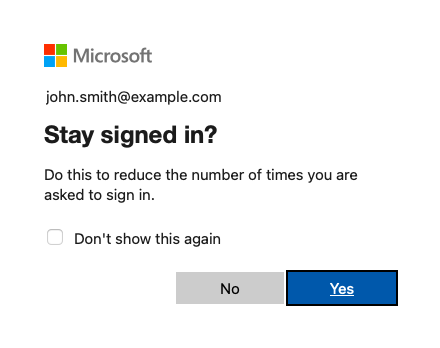 Note: Your choice will not affect your access to applications but if you choose No, you may have to log in again the next time you will be accessing the applications.
 -
In the Please install Wi-Fi configuration profile window, click on the
Install button.
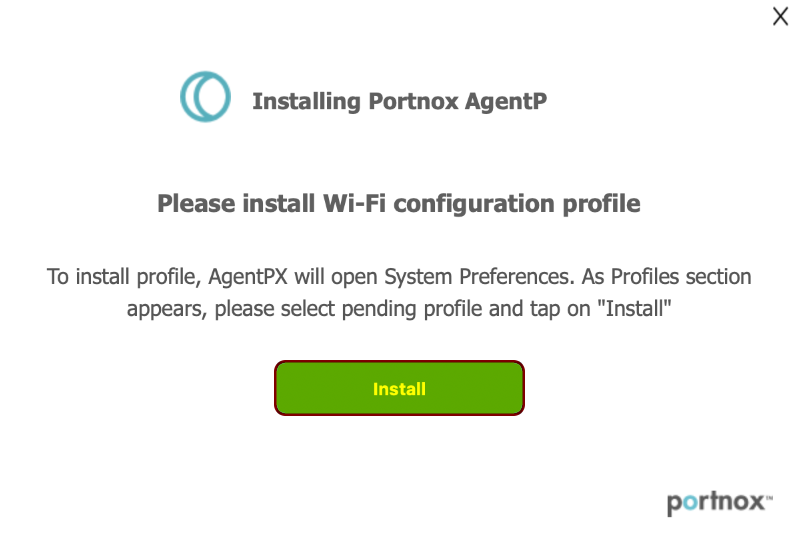
Result: The Privacy & Security window opens.
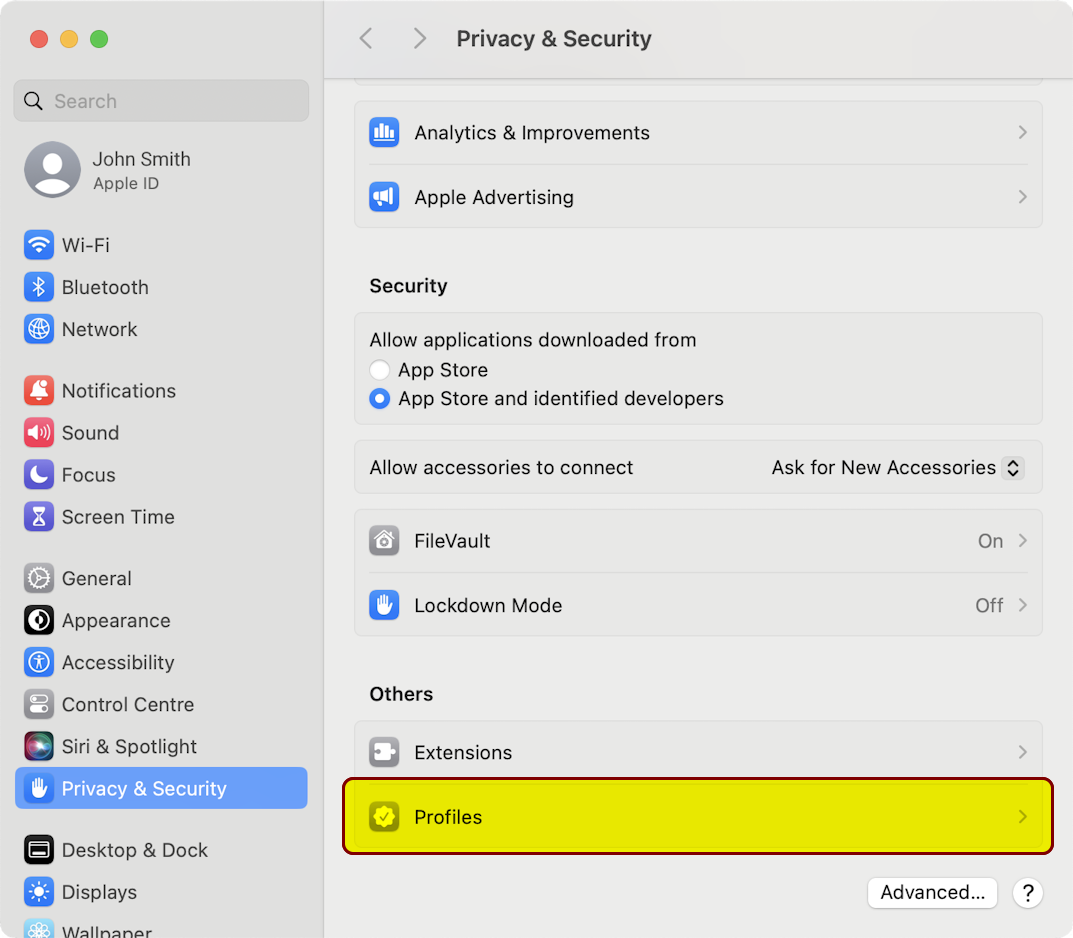
Troubleshooting: If the Privacy & Security window does not open automatically, open the Apple menu and click on the System Settings option. Then, in the System Settings window, select the Privacy & Security option on the left-hand side.
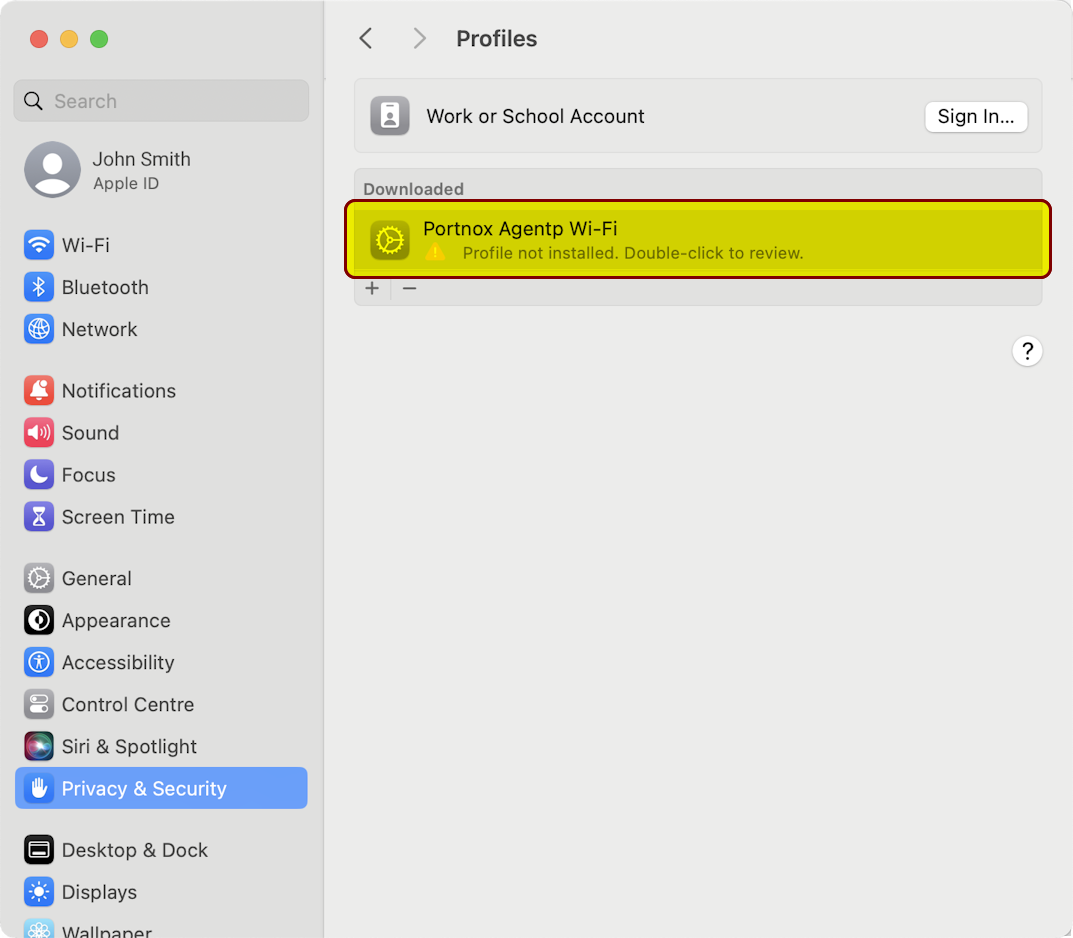
-
In the Privacy & Security window, scroll all the way down on the right-hand side, and then
click on the Profiles row.
-
In the Profiles window, double-click on the Portnox Agentp Wi-Fi
profile in the Downloaded section to review and install it.
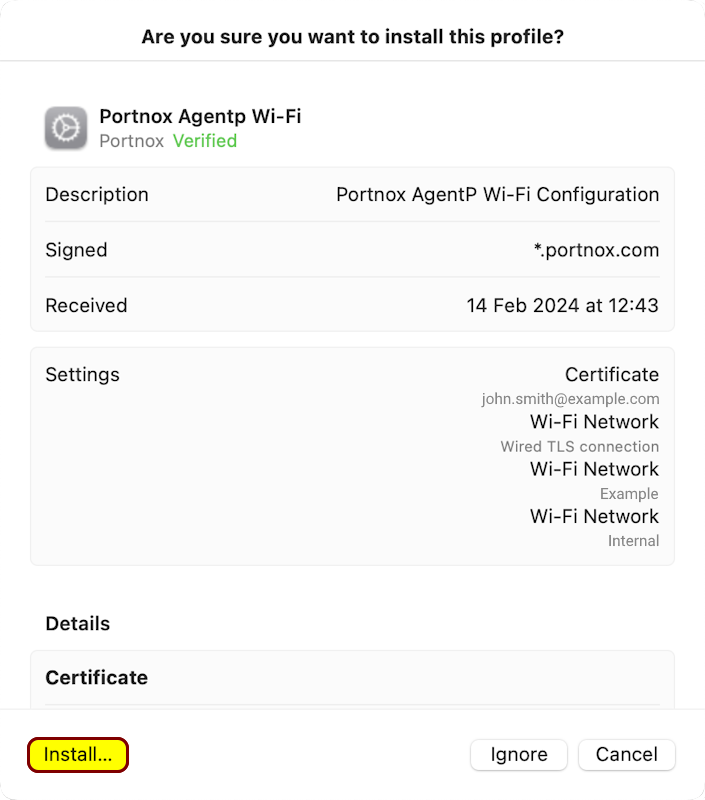
-
In the Are you sure you want to install this profile? window, click on the
Install... button.
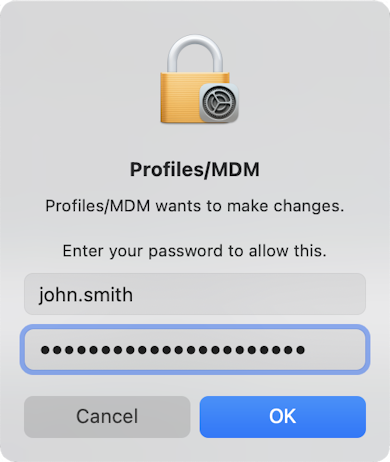
- Optional:
If the operating system displays the Profiles/MDM window requesting administrator
credentials, and you have administrative privileges on your computer, enter your name and password, and then
click on the OK button. If you don’t have administrative privileges on your computer,
ask your company’s IT support staff for assistance.
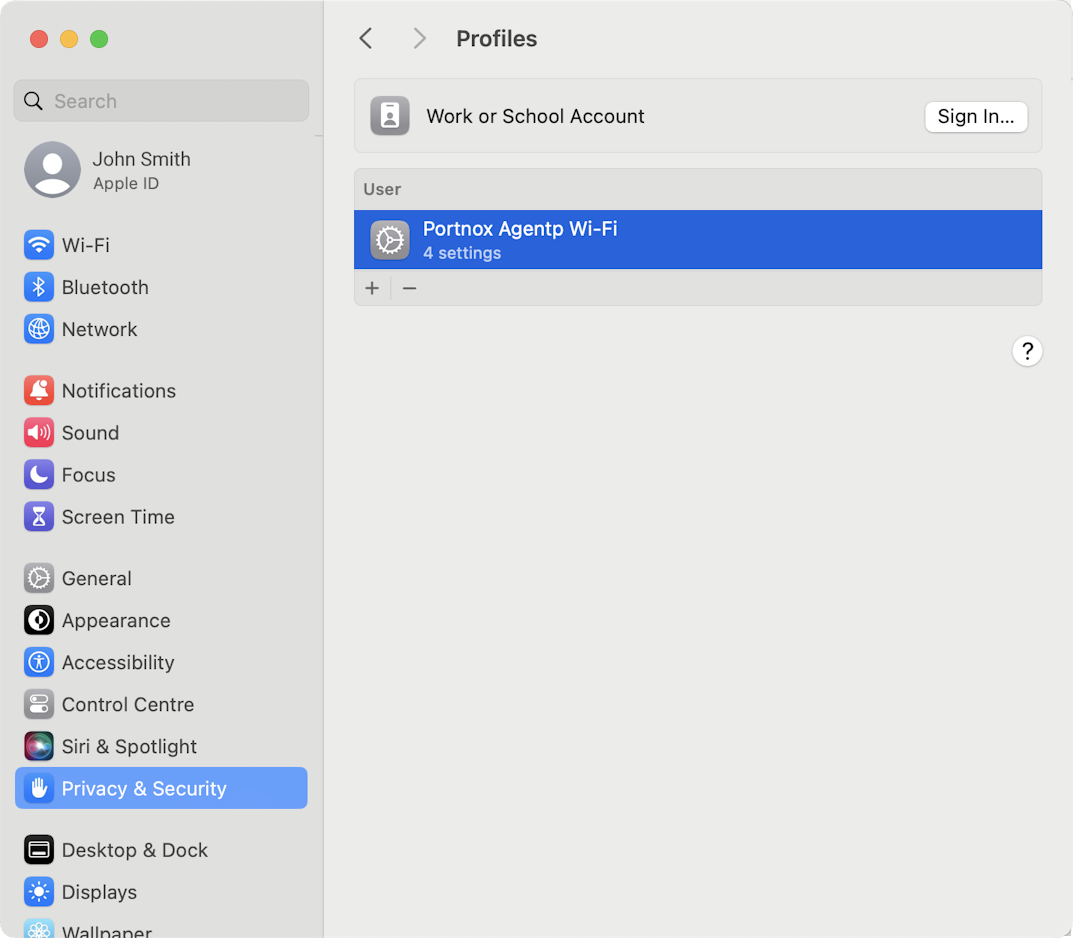
Result: The Portnox AgentP profile is installed.
 Note: The profile mentions Wi-Fi networks because in addition to letting you access your company applications, the certificate could also be used to access internal Wi-Fi networks. This functionality is beyond the scope of this guide. For more information, consult your IT support department.
 - Optional:
If the operating system displays the Profiles/MDM window requesting administrator
credentials, and you have administrative privileges on your computer, enter your name and password, and then
click on the OK button. If you don’t have administrative privileges on your computer,
ask your company’s IT support staff for assistance.
Result: You are logged in to Portnox AgentP. AgentP silently requested and downloaded the certificate for your device, which you will later use to log in to applications.
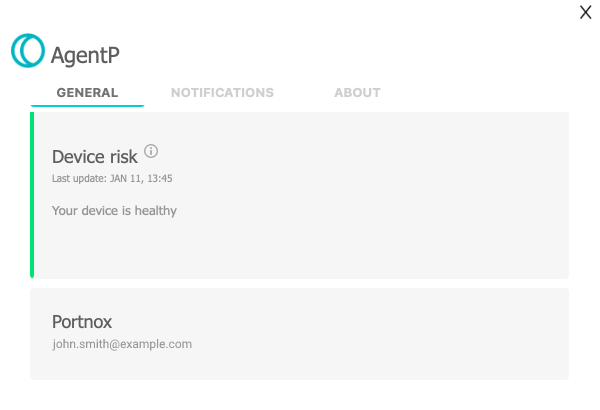

Access the application using your certificate
After you log in to the Portnox AgentP application, you can access your online company resources that are protected by Portnox Conditional Access.
-
Open your company application.
Proceed normally as if you were opening the application before it was protected using Portnox Conditional Access. For example, for Atlassian Confluence, you could type your_company.atlassian.net in your browser address field, where your_company is your company name.
-
Enter your company email address or click on the Conditional Access
button. Choose one of the following options:
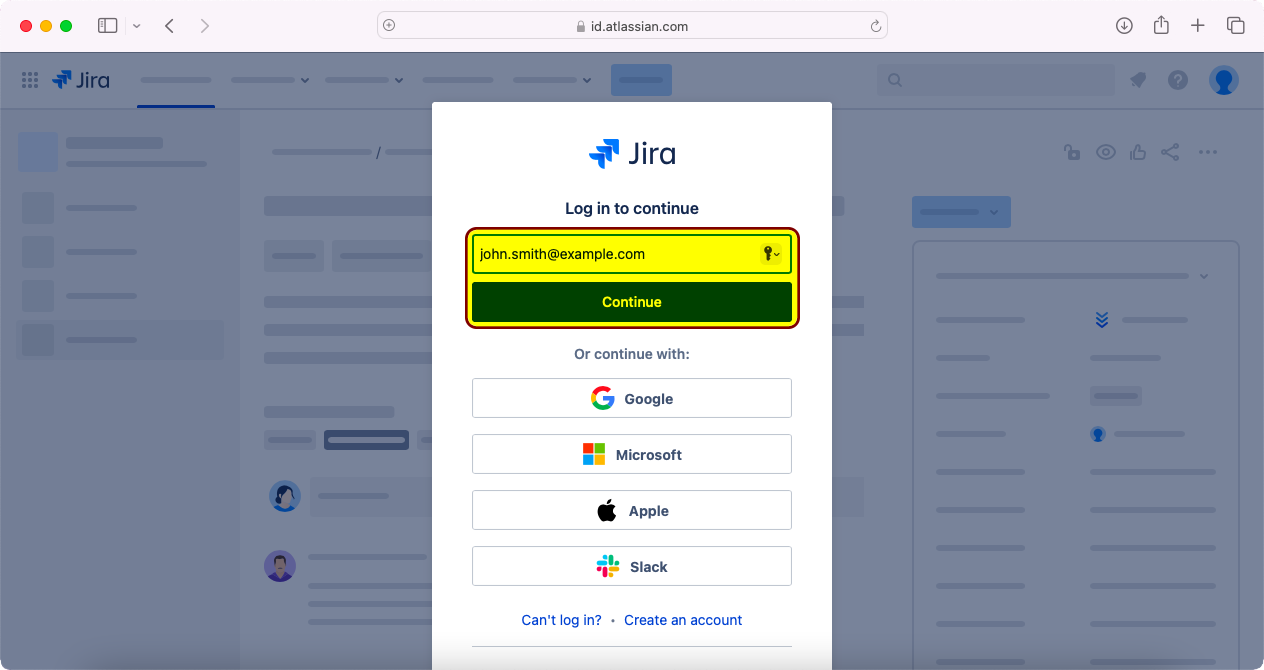
-
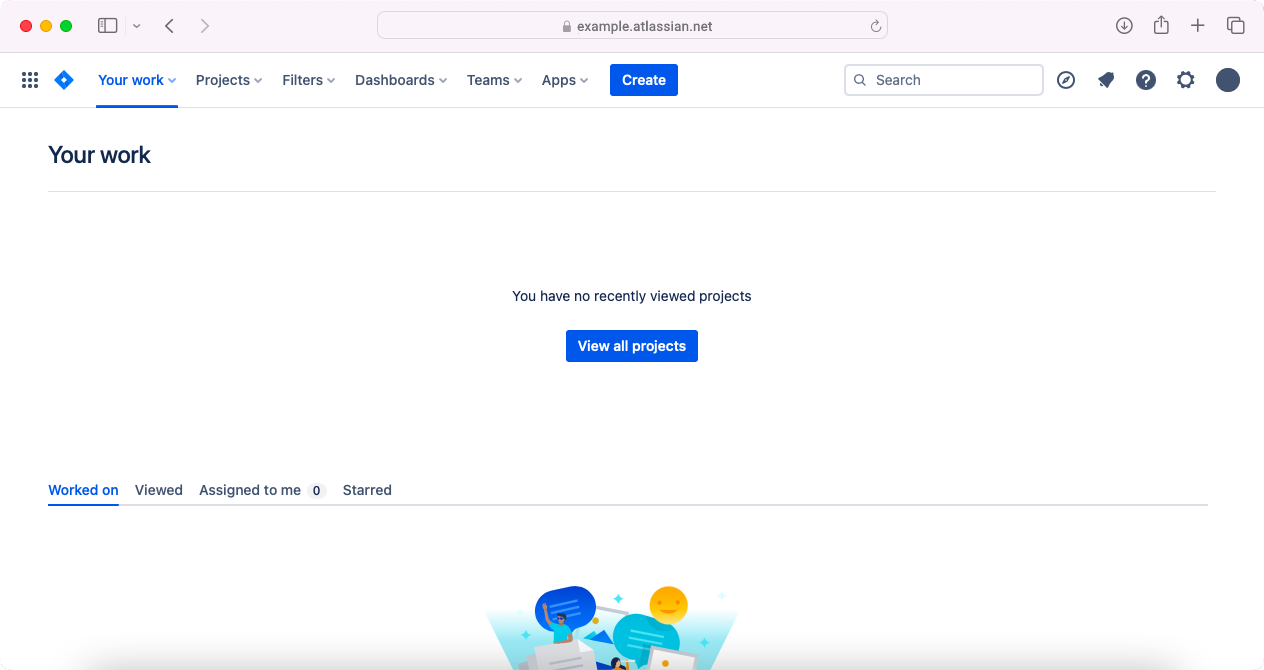
If the application login screen does not have a button that says Log in with Conditional Access or Log in with your company name, enter your business email address. This is an example for Atlassian Confluence/Jira:
-
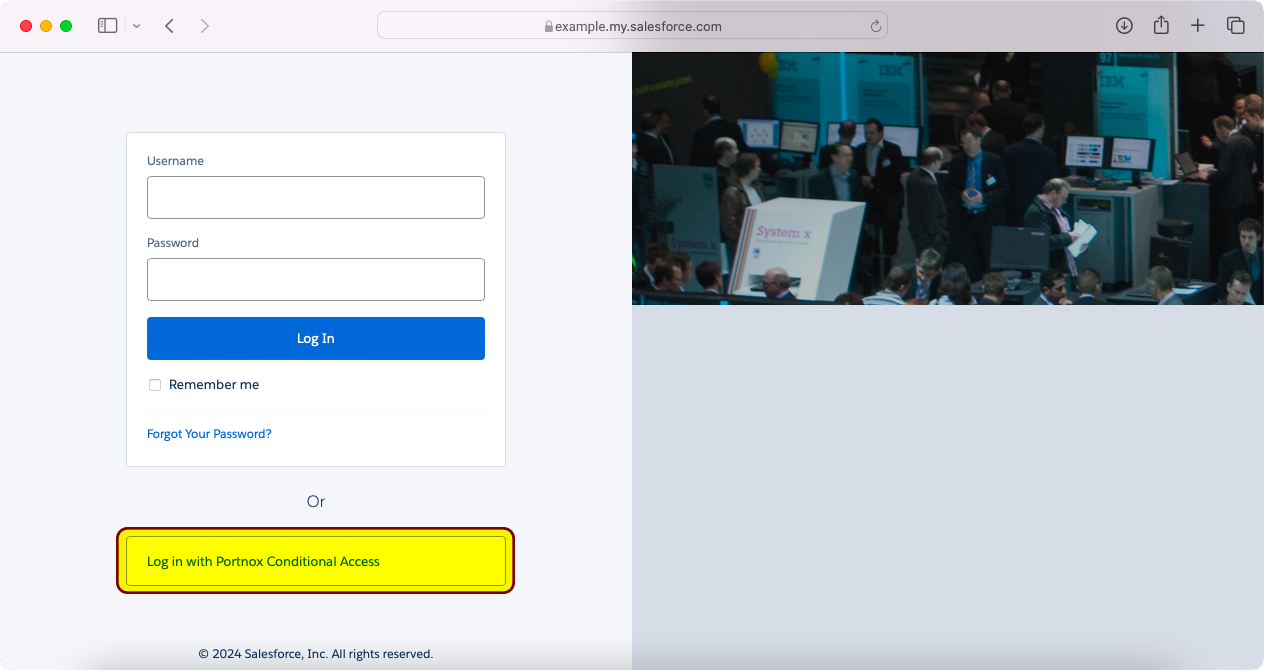
If the application login screen has a button that says Log in with Portnox Conditional Access or similar, such as: Log in with your company name, click on this button. This is an example for Salesforce:
-
If the application has a button that says SSO, click on this button. This is an example for Zoom:

Result: Your browser may show a window asking you to select a certificate.
-
-
In the certificate selection window, click on the certificate, and then click on the
Continue button.
Note: Our application always attempts to select the certificate automatically so this window may not appear for you. If it appears, it means that our application was not able to select the certificate automatically, for example, due to there being more than one certificate or due to operating system or browser restrictions.
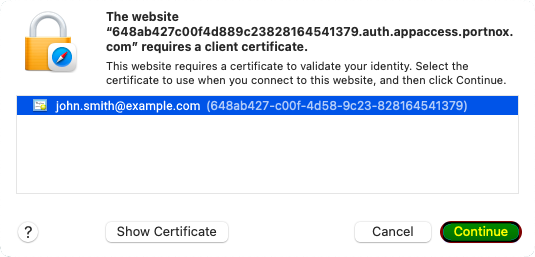
Troubleshooting: You must click on the certificate before you can click on the Continue button. If you have more than one certificate, try different certificates, or consult with your company’s IT support staff. If there are any errors, close all your browser windows and restart your browser. If that does not help, consult our troubleshooting guide.
-
When asked to enter your password to access the certificate, enter the password that you use to log in to your mac
computer and click on the Always Allow button.
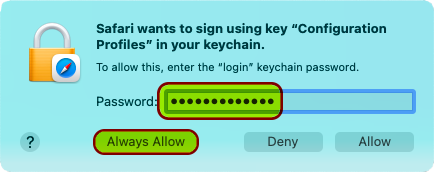
Troubleshooting: You can also click on the Allow button, but if so, the dialog may appear again. If it appears again, click on the Always Allow button to mitigate.
Result: You can now access your company applications that are protected using Portnox Conditional Access for Applications.