Set up a local RADIUS server using a virtual machine
In this topic, you will learn how to install and run local RADIUS servers that work together with Portnox™ Cloud using virtual machines.
For information about how the Cloud RADIUS servers work, see the following topic: How do RADIUS servers work in Portnox Cloud?.
-
In the Cloud portal top menu, click on the Settings option.

-
In the Cloud portal left-hand side menu, click on the option.
-
Under the Local RADIUS images heading, click on the relevant link to download the local RADIUS
server virtual machine file:
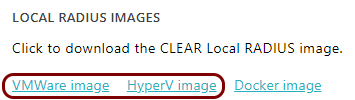
- Click on the VMware image link, if you use one of the following hypervisors: VMware Workstation, VMware Fusion, VMware ESXi.
- Click on the HyperV image link, if you use one of the following hypervisors: Microsoft Hyper-V, Oracle VirtualBox, Citrix Hypervisor, Proxmox Virtual Environment, Xen Project.
Save the downloaded file locally, you will use it later, after you prepare the configuration.
-
Under the Local RADIUS instance heading, click on the Add new RADIUS profile
(VM) link to begin the configuration process for the new local server instance.

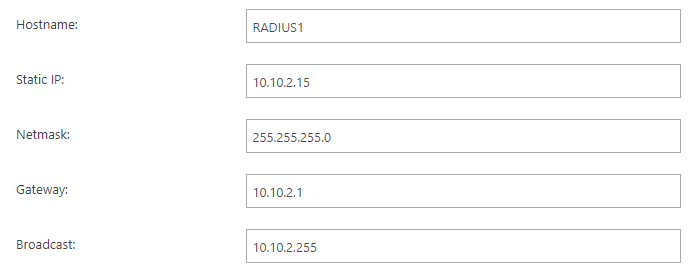
Your browser will display the Add new Local RADIUS cluster heading with configuration fields for the new local server instance.
-
In the Broadcast field, enter the broadcast IP address for the subnet of the entered static IP
address.
-
Add DNS servers:

-
Copy the value of the Shared Secret field to use it when configuring NAS devices to contact this
local RADIUS server.

If you want to generate a different shared secret, click on the Regenerate link on the right-hand side.
Note:You can also display and copy this value later. - Optional:
In the Syslog Destination field, enter the IP and port of a local syslog server, if you want to
stream logs from the virtual machine to a syslog server.

If you leave this field empty, Portnox Cloud will not send syslog streams. If you omit the port number, Cloud will use the default port 514.
- Optional:
In the SNMP Configuration section, click on the Enable SNMP v1 and v2c
checkbox to enable support for SNMP v1/v2 protocols on the local RADIUS server.
-
In the Community string field, enter the community string for this local RADIUS
server.

Write down this community string, so you can use it later to configure other devices. The community string acts like a password/shared secret and lets other devices authenticate via SNMP v1 or v2 with the local RADIUS server.
-
In the Community string field, enter the community string for this local RADIUS
server.
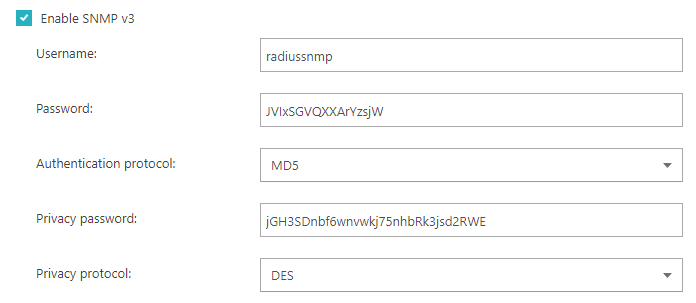
- Optional:
In the SNMP Configuration section, click on the Enable SNMP v3 checkbox
to enable support for the secure SNMP v3 protocol on the local RADIUS server and provide the configuration
information.
- Optional:
In the Fast reauthentication section, click on the Enable EAP session
resumption checkbox to turn on the fast reconnect
functionality. Then, if needed, change the default Session lifetime (hours) value.

If this setting is on, and the device supports EAP session resumption as defined in RFC 5216, then if that device loses connection to the local RADIUS server and reconnects within the session lifetime, it can authenticate quickly by providing a valid connection session ID.
Note:The session lifetime counts from the last successful connection, not the disconnection.Important:Fast reconnect must also be configured on client devices. If it is not configured on client devices, it will not work even if it is configured in Portnox Cloud. For information on how to configure fast reconnect on different operating systems and using UEM/MDM solutions, see the following topic: How to re-enable fast reconnect (EAP session resumption) on client devices. - Optional:
In the Fast reauthentication section, click on the Enable Local cache
checkbox to let the local RADIUS server authenticate devices on the basis of cached MAC addresses. Then, if needed,
change the default Cache lifetime (hours) value.

If this setting is on, if a device loses connection to the local RADIUS server and reconnects within the cache lifetime, it is automatically authenticated if the local RADIUS server recognizes the MAC address. We recommend using this setting, along with higher priority for the local RADIUS server, for devices that need fast reconnection. The cache lifetime counts from the last successful connection, not the disconnection.
Warning:Authenticating devices from the cache on the basis of the MAC address is less secure than a full authentication with the Cloud back-end, as MAC addresses can be spoofed. If your devices support EAP session resumption described above, we recommend using that instead of the local cache, as it provides faster reconnection while remaining significantly more secure – the TLS session key used in EAP session resumption is much harder to compromise than a MAC address. For more information, see the following topic: How do local RADIUS servers work?. - Optional:
If you want to access the local RADIUS instance using SSH, click on the Enable SSH
checkbox.
 Note:To learn how to troubleshoot the RADIUS instance using the PuTTY application and Linux commands, see the following topic: How to access virtual machine logs using SSH.
 -
Click on the Save and Download button to save the configuration and download the configuration
ISO image.
Important:The downloaded ISO image is required to configure the virtual machine file downloaded earlier.
