Onboard devices using your own root certificate authority
In this topic, you will learn how to onboard devices using device certificates signed by your own root certificate authority.
If you have your own certificate authority (CA) that you use to sign device and user certificates, you can use this CA with Portnox Cloud.
Upload your CA certificate
In this section, you will upload your own tenant CA certificate and any intermediate CA certificates to Portnox™ Cloud. This will let Cloud recognize and authenticate your devices that have user/device certificates, which you generated using your own root CA.
We recommend uploading the root CA on its own, and uploading each intermediate CA together with all of its parent certificates up to and including the root CA in the same chain file. This ensures that no CA certificate in Portnox Cloud is missing its parent, which is required for CRL validation to work correctly.
Before you begin, make sure that you have your certificate file in the X.509 DER encoded binary format (usually with a .der, .cer or .crt extension), the PKCS #12 format (usually with a .pfx extension), or the PKCS #7 format (usually with a .p7b extension). If you want to upload a certificate chain, use the PKCS #12 (.pfx) or PKCS #7 (.p7b) format. Use X.509 DER encoded certificates only for single certificates.
-
In the Cloud portal top menu, click on the Settings option.

-
In the Cloud portal left-hand side menu, click on the option.

-
In the Trusted Root Certificates section, click on the Upload trusted root
certificate generated by “Your organization” link. Then, select the certificate file using the
↥ button and click on the Save button to
upload the file.

Allow certificates for agentless devices
In this section, you will turn on the option that lets you onboard agentless devices using device certificates. This will let Portnox Cloud automatically create accounts for new devices, not associating them with any users.
-
In the Cloud portal top menu, click on the Settings option.
-
In the Cloud portal left-hand side menu, click on the option.
-
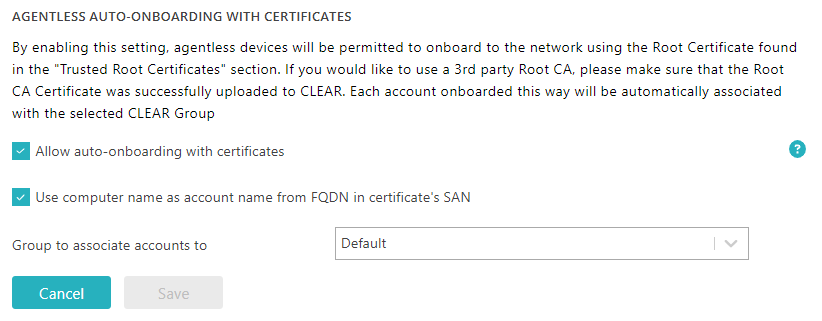
In the Agentless auto-onboarding with certificates section, click on the
Edit link. Then, select the Allow auto-onboarding with
certificates checkbox.
Generate a certificate
In this section, you will generate a certificate for your device and sign it using the private key paired with your root CA certificate.
Prerequisites: You must have your own certificate authority (CA) configured.
Follow the procedure specific to your operating system and your CA software. The following is an example of how you can generate a device certificate using OpenSSL.
-
The User Principal Name (UPN) of the device must be present in the SAN field in the following format: machine_name$@domain.ext.
For example:openssl req -new -key mail_server.key \ -out mail_server.csr \ -subj "/C=Homeworld/L=Capital/O=Council/OU=Naranek/CN=mailserver" \ -addext "subjectAltName = email:mailserver$@vorlon.com" -
The Fully Qualified Domain Name (FQDN) of the device must be present in both the Subject and the SAN fields, and you must select the option Use computer name as account name from FQDN in certificate’s SAN explained above.
For example:openssl req -new -key mail_server.key \ -out mail_server.csr \ -subj "/C=Homeworld/L=Capital/O=Council/OU=Naranek/CN=mailserver.vorlon.com" \ -addext "subjectAltName = DNS:mailserver.vorlon.com"
Optional: Allow AgentP to use your own certificates
In this section, you will configure a specific Portnox™ Cloud group, so that AgentP can use your own certificates instead of default certificates generated by Cloud.
-
The Subject Alternative Name (SAN) of the certificate must contain the UPN of the device, for example, sigma957@vorlon.com, or
-
The Subject of the certificate must contain the FQDN of the device, for example, sigma957.vorlon.com.
-
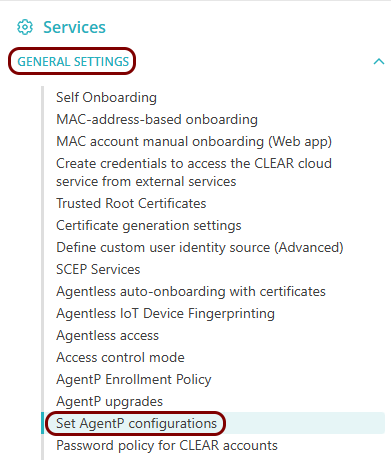
In the Cloud portal top menu, click on the Settings option.
-
In the Cloud portal left-hand side menu, click on the option.
-
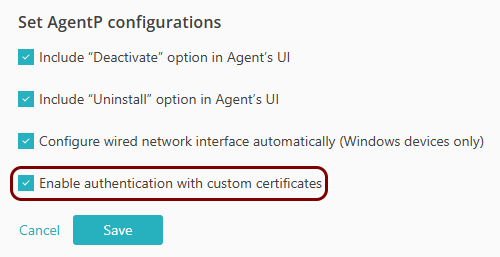
Enable custom certificate support in AgentP:
- Click on the Edit link.
- Activate the Enable authentication with custom certificates checkbox.
- Click on the Save button.
-
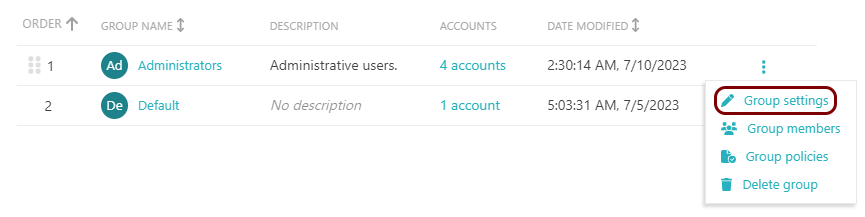
In the Cloud portal top menu, click on the Groups option.

-
Click on the ⋮ icon on the right-hand side of the selected group name and
select the Group settings option from the pop-up menu to begin the process of editing the
selected group.
-
Scroll down to the Authentication certificate section, and select the Issued by
custom trusted root certificate option. Then, in the drop-down menu field that appears, select your
custom root certificate.
 Important:If you sign your user/device certificates using an intermediate CA, you can select either your intermediate CA or your root CA here. However, if you sign your user/device certificates using several intermediate CAs under the same root, you must select your root CA here.
 -
To save your group settings, click on the Save button on the bottom right of the page.

Connect the device to the network
In this section, you will configure the network connection for the device.