Onboard Windows devices with certificates using Microsoft Intune and SCEP
In this topic, you will learn how to deploy Portnox™ Cloud certificates to Windows devices via Microsoft Intune SCEP.
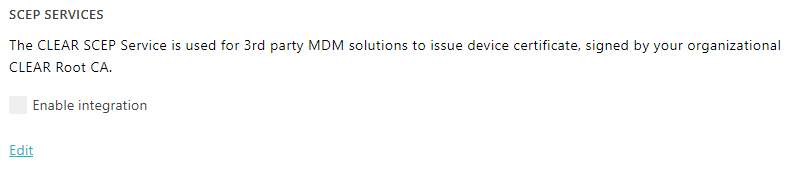
Turn on the Portnox Cloud SCEP services
In this section, you will configure Portnox™ Cloud to provide SCEP services to your devices.
If you have previously turned on the Portnox Cloud SCEP services, skip to the step in which you get the Cloud SCEP URL for Microsoft Intune.
Portnox Cloud SCEP services let devices contact the Cloud SCEP server and get a unique certificate for the device or for the specific user of the device.
-
In the Cloud portal top menu, click on the Settings option.

-
In the Cloud portal left-hand side menu, click on the option.
-
Enable integration with SCEP services.

- Click on the Edit link.
- Activate the Enable integration checkbox.
- Click on the Save button.
-
Click on the ⧉ icon next to the SCEP URL for MS
Intune field to copy the SCEP URL, and paste it in a text file for later use.

Download the root CA certificate from Portnox Cloud
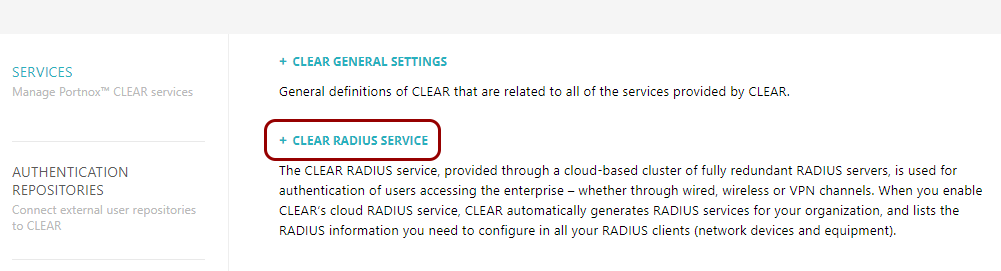
In this section, you will download the Portnox™ Cloud root CA certificate from the Cloud portal.
You need the root CA certificate so that your managed devices can verify the validity of Cloud RADIUS servers, which have certificates signed by this root CA certificate. If the root CA certificate is not distributed to managed devices, some devices may show a security warning each time that the user connects to networks managed by Portnox Cloud.
-
In the Cloud portal top menu, click on the Settings option.
-
In the Cloud portal left-hand side menu, click on the option.
The right-hand pane shows the list of active servers.

-
Click on the Download root certificate link to download the root CA certificate.
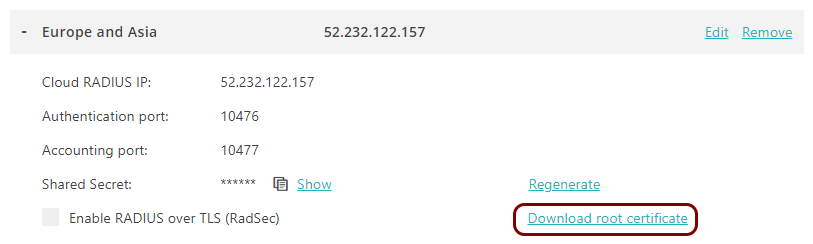
Save the file on your disk to use it later. The default name of the file is rootCertificate.cer.
Download the tenant CA certificate from Portnox Cloud
In this section, you will download the Portnox™ Cloud tenant CA certificate from the Cloud portal.
You need the tenant CA certificate from Portnox Cloud so that your managed devices can verify the validity of individual SCEP certificates, which are signed using the tenant CA certificate.
-
In the Cloud portal top menu, click on the Settings option.
-
In the Cloud portal left-hand side menu, click on the option.

-
In the Trusted Root Certificates section, click on the Download
CER link, then save the downloaded file.
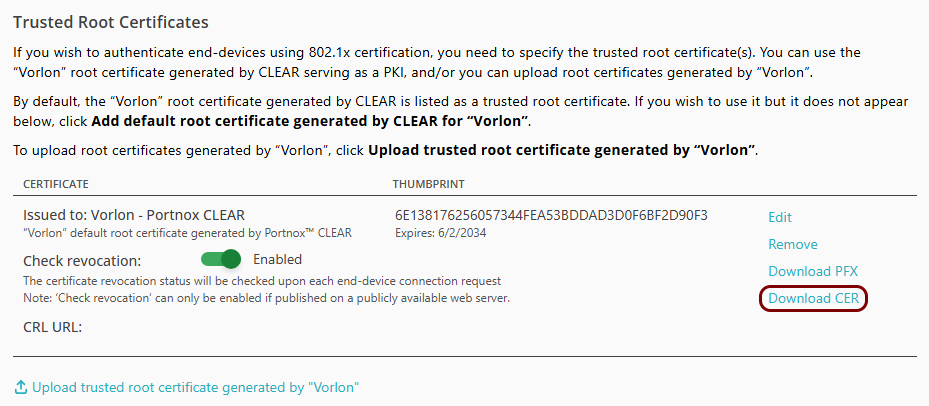
The default name of the file is Your_tenant_name - Portnox CLEAR.cer, for example, Vorlon - Portnox CLEAR.cer.
Optional: Hand over information from the Portnox Cloud team to the Intune team
In this section, you will learn what information was collected in previous steps from Portnox Cloud, which is needed to configure Microsoft Intune to work with Portnox Cloud.
If different people are responsible for managing Portnox Cloud and Intune, here is the information you need to hand over:
-
The URL of the Portnox Cloud SCEP server for Intune. For example, https://scep.portnox.com/b2973887-1274-45d4-91d0-4a342a861c76/intune.
-
The root CA certificate file in the X.509 format. For example, rootCertificate.cer.
-
The tenant CA certificate file in the X.509 format. For example, tenantCertificate.cer.
Create a profile for the root CA certificate
In this section, you will create a profile in Microsoft Intune for the downloaded Portnox™ Cloud root CA certificate.
-
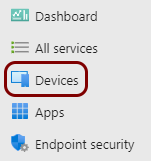
In the left-hand menu, select the Devices option.
-
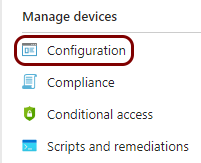
In the left-hand menu of the Devices pane, select the Configuration
option.
-
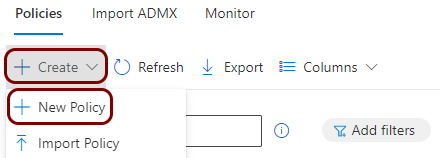
In the Devices | Configuration pane, in the Policies tab, click on the
Create button and select the New Policy option.
-
In the Create a profile pane:
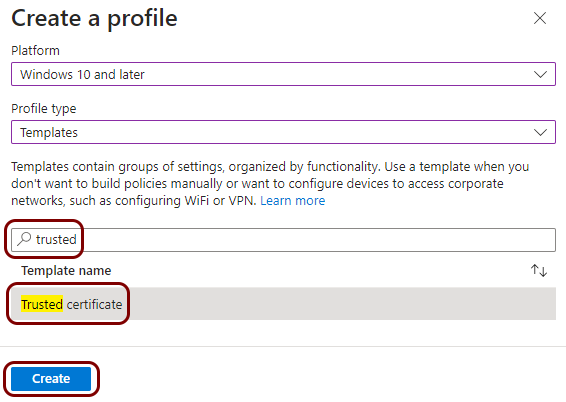
- In the Platform field, select Windows 10 and later.
- In the Profile type field, select Templates
- In the search bar, type trusted.
- In the Template name field, click on the Trusted certificate option.
- Click on the Create button.
-
In the Basics step of the Trusted certificate wizard, in the
Name field, type a name for this profile, optionally fill in the
Description field, and click on the Next button.
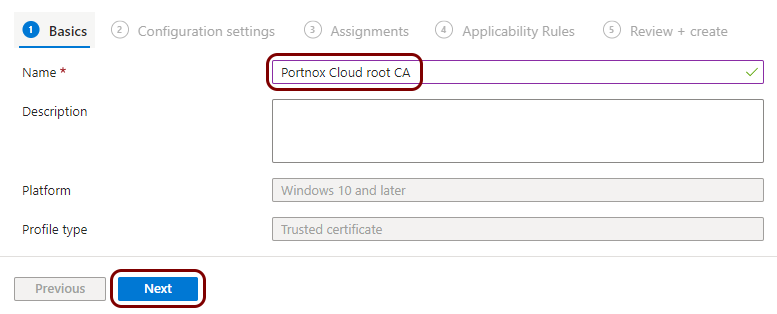
In this example, we used the name Portnox Cloud root CA, but you can use any name you like.
-
In the Configuration settings step of the wizard, click on the 🗀 icon to open the downloaded root CA file, leave the default value of the
Destination store field, and click on the Next button.

In this example, the file has the default name rootCertificate.cer.
-
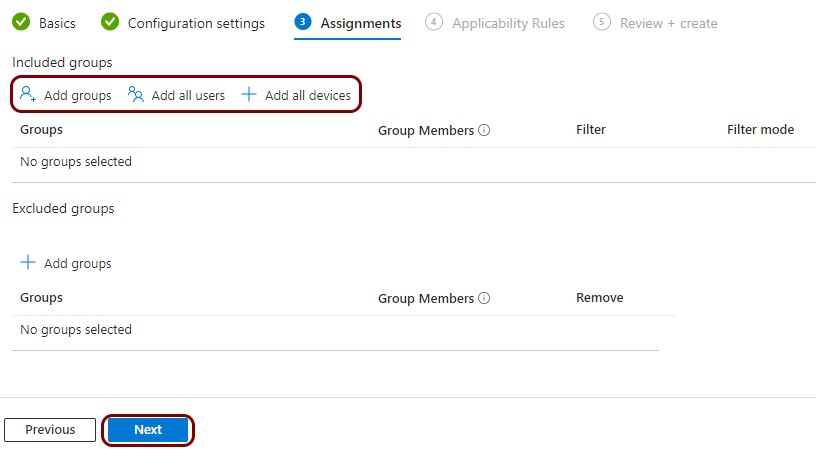
In the Assignments step of the wizard, use relevant options to assign this profile to
specific groups or all users/devices, and then click on the Next button.
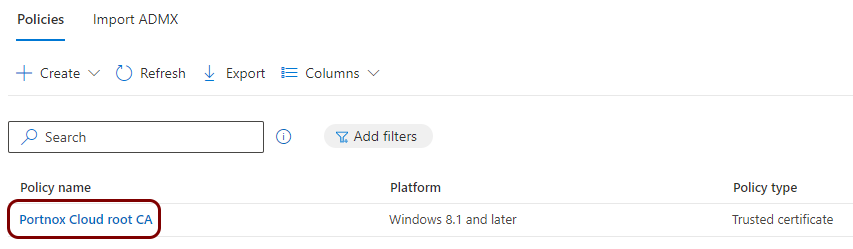
Result: You created a trusted certificate profile for the Portnox Cloud root CA certificate.
Create a profile for the tenant CA certificate
In this section, you will create a profile in Microsoft Intune for the downloaded Portnox™ Cloud tenant CA certificate.
-
In the left-hand menu, select the Devices option.
-
In the left-hand menu of the Devices pane, select the Configuration
option.
-
In the Devices | Configuration pane, in the Policies tab, click on the
Create button and select the New Policy option.
-
In the Create a profile pane:
- In the Platform field, select Windows 10 and later.
- In the Profile type field, select Templates
- In the search bar, type trusted.
- In the Template name field, click on the Trusted certificate option.
- Click on the Create button.
-
In the Basics step of the Trusted certificate wizard, in the
Name field, type a name for this profile, optionally fill in the
Description field, and click on the Next button.
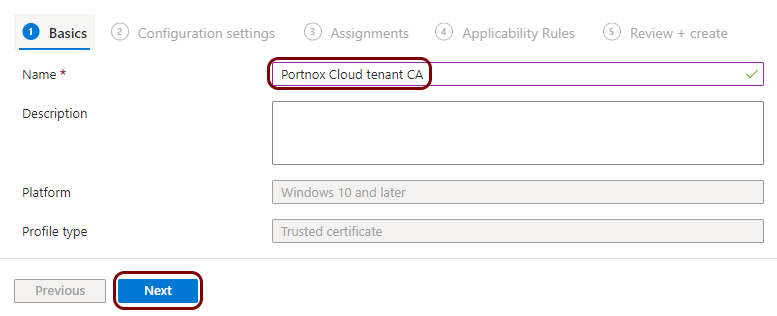
In this example, we used the name Portnox Cloud tenant CA, but you can use any name you like.
-
In the Configuration settings step of the Trusted certificates wizard,
click on the 🗀 icon to open the downloaded tenant CA file, leave the
default value of the Destination store field, and click on the Next
button.
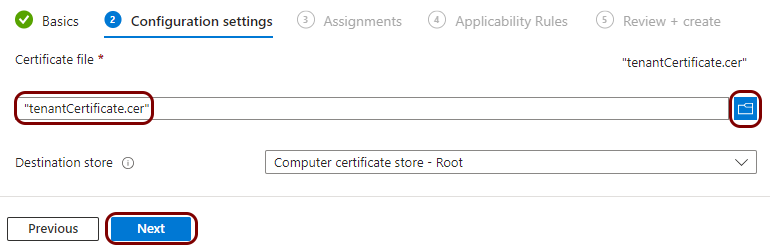
In this example, the file has the name tenantCertificate.cer.
-
In the Assignments step of the wizard, use relevant options to assign this profile to
specific groups or all users/devices, and then click on the Next button.
Result: You created a trusted certificate profile for the Portnox Cloud tenant CA certificate.

Create a profile for SCEP device certificates
In this section, you will create a profile in Microsoft Intune for unique device certificates, which are generated by Portnox™ Cloud for the devices, and obtained through SCEP requests.
-
In the left-hand menu, select the Devices option.
-
In the left-hand menu of the Devices pane, select the Configuration
option.
-
In the Devices | Configuration pane, in the Policies tab, click on the
Create button and select the New Policy option.
-
In the Create a profile pane:
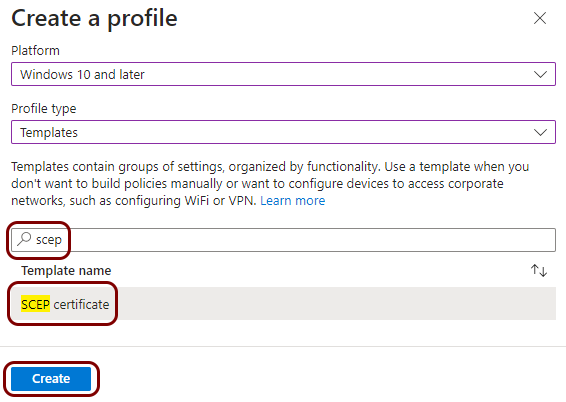
- In the Platform field, select Windows 10 and later.
- In the Profile type field, select Templates
- In the search bar, type scep.
- In the Template name field, click on the SCEP certificate option.
- Click on the Create button.
-
In the Basics step of the SCEP certificate wizard, in the
Name field, type a name for this profile, optionally fill in the
Description field, and click on the Next button.
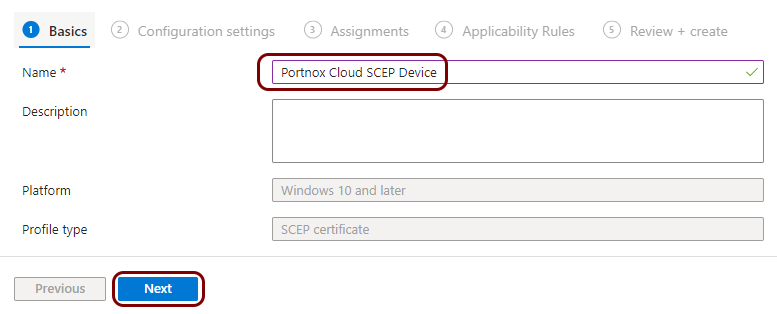
In this example, we used the name Portnox Cloud SCEP Device, but you can use any name you like.
-
In the Configuration settings step of the SCEP certificates wizard,
fill in the fields as follows, and then click on the Next button.
Adjust the proposed values to your requirements and your environment, if needed.
-
In the Certificate type field, select Device.

-
In the Subject name format field, enter the variables that Intune will use to fill
the Subject name field of the certificate.
Use the following format: CN={{DeviceId}}, which generates the subject name on the basis of the Intune device ID. This is the value that you must use. Otherwise, Cloud will be unable to recognize the devices. To understand how Portnox Cloud matches the identity in the certificates with the authentication repository, read the following section: Certificate identity information.

For information on other variables available in Intune, consult Intune documentation.
-
In the Subject alternative name section, select the attributes and the values that
Intune will use to fill the SAN fields of the certificate.
Use the attribute URI with the value https://intunedeviceid/{{DeviceId}}, which is the required value for device certificates. To understand how Portnox Cloud matches the identity in the certificates with the authentication repository, read the following section: Certificate identity information.

-
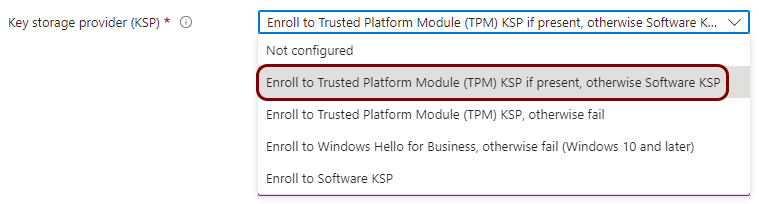
In the Key storage provider (KSP) field, select the following option:
Enroll to Trusted Platform Module (TPM) KSP if present, otherwise Software
KSP.
-
In the Key usage field, select both available values.

-
In the Key size (bits) field, we recommend that you select the
2048 option.
 Note:If you’re likely to experience network packet fragmentation due to the structure of your network, for example, due to firewalls, choose 1024 instead to prevent issues due to fragmentation. If such problems occur, see the following topic: Certificate fragmentation issues.
 -
In the Hash algorithm field, select SHA-1.

If you are sure that all your device operating systems support newer and safer SHA-2 algorithm, you can select SHA-2 instead.
-
In the Root Certificate section, click on the Root
Certificate link and select the tenant CA certificate profile that you created in the
earlier task.
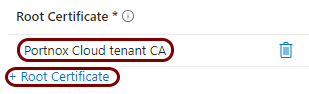 Important:The name root certificate in Intune may be misleading because it does not refer to the root CA certificate in Portnox Cloud but to the tenant CA certificate. Do not select the Portnox Cloud root CA certificate profile here. Select the tenant CA certificate profile.
 -
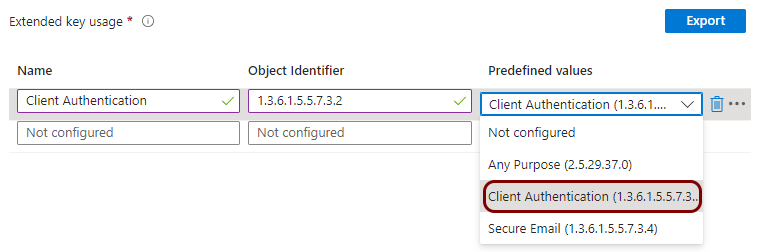
In the Extended key usage section, in the Predefined values
column, select the Client Authentication option.
-
In the SCEP Server URLs section, copy and paste the SCEP URL that you saved in the
first task in this series.

-
In the Certificate type field, select Device.
-
In the Assignments step of the wizard, use relevant options to assign this profile to
specific groups or all users/devices, and then click on the Next button.
Result: You created a profile for device certificates obtained through SCEP.

Create a profile for SCEP user certificates
In this section, you will create a profile in Microsoft Intune for unique user certificates, which are generated by Portnox™ Cloud for the users of devices, and obtained through SCEP requests.
-
In the left-hand menu, select the Devices option.
-
In the left-hand menu of the Devices pane, select the Configuration
option.
-
In the Create a profile pane:
- In the Platform field, select Windows 10 and later.
- In the Profile type field, select Templates
- In the search bar, type scep.
- In the Template name field, click on the SCEP certificate option.
- Click on the Create button.
-
In the Basics step of the SCEP certificate wizard, in the
Name field, type a name for this profile, optionally fill in the
Description field, and click on the Next button.
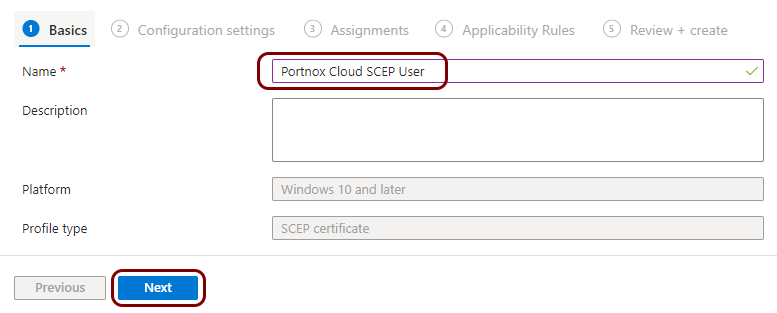
In this example, we used the name Portnox Cloud SCEP User, but you can use any name you like.
-
In the Configuration settings step of the SCEP certificates wizard,
fill in the fields as follows, and then click on the Next button.
Adjust the proposed values to your requirements and your environment, if needed.
-
In the Certificate type field, select User.

-
In the Subject name format field, enter the variables that Intune will use to fill
the Subject name field of the certificate.
For information on variables that you can use, consult Intune documentation.

In this example, we used the format CN={{UserPrincipalName}}, which generates the subject name on the basis of the user’s principal name.
-
In the Subject alternative name section, select the attributes and the values that
Intune will use to fill the SAN fields of the certificate.
The attribute User principal name (UPN) with the value {{UserPrincipalName}} is mandatory. The attribute URI with the value https://intunedeviceid/{{DeviceId}} is highly recommended (see note below).
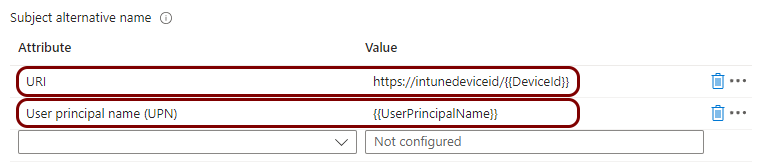 Note:By default, Portnox Cloud checks for user identity information in the SAN UPN field. To understand how Portnox Cloud matches the identity in the certificates with the authentication repository, read the following section: Certificate identity information.Important:We strongly recommend adding the URI SAN with the https://intunedeviceid/{{DeviceId}} value, which is the device identifier. This allows Portnox Cloud to recognize situations where one device has multiple network interfaces (a Wi-Fi interface, an Ethernet interface, etc.), so that it is treated as a single device and consumes only one license. Without this attribute, agentless devices with multiple interfaces will consume separate licenses for each interface. This attribute is also used for risk assessment policies in Portnox Cloud – it lets Portnox Cloud assess the device risk and apply suitable actions.
 -
In the Key storage provider (KSP) field, select the following option:
Enroll to Trusted Platform Module (TPM) KSP if present, otherwise Software
KSP.
-
In the Key usage field, select both available values.
-
In the Key size (bits) field, we recommend that you select the
2048 option.
Note:If you’re likely to experience network packet fragmentation due to the structure of your network, for example, due to firewalls, choose 1024 instead to prevent issues due to fragmentation. If such problems occur, see the following topic: Certificate fragmentation issues.
-
In the Hash algorithm field, select SHA-1.
If you are sure that all your device operating systems support newer and safer SHA-2 algorithm, you can select SHA-2 instead.
-
In the Root Certificate section, click on the Root
Certificate link and select the tenant CA certificate profile that you created in the
earlier task.
Important:The name root certificate in Intune may be misleading because it does not refer to the root CA certificate in Portnox Cloud but to the tenant CA certificate. Do not select the Portnox Cloud root CA certificate profile here. Select the tenant CA certificate profile.
-
In the Extended key usage section, in the Predefined values
column, select the Client Authentication option.
-
In the SCEP Server URLs section, copy and paste the SCEP URL that you saved in the
first task in this series.
-
In the Certificate type field, select User.
-
In the Assignments step of the wizard, use relevant options to assign this profile to
specific groups or all users/devices, and then click on the Next button.
Result: You created a profile for user certificates obtained through SCEP.

Create a profile for a wired network managed by Portnox Cloud
In this section, you will create a profile in Microsoft Intune for the connection of devices to the Ethernet network managed by Portnox™ Cloud.
-
In the left-hand menu, select the Devices option.
-
In the left-hand menu of the Devices pane, select the Configuration
option.
-
In the Devices | Configuration pane, in the Policies tab, click on the
Create button and select the New Policy option.
-
In the Create a profile pane:

- In the Platform field, select Windows 10 and later.
- In the Profile type field, select Templates
- In the search bar, type wired.
- In the Template name field, click on the Wired network option.
- Click on the Create button.
-
In the Basics step of the Wired network wizard, in the
Name field, type a name for this profile, optionally fill in the
Description field, and click on the Next button.
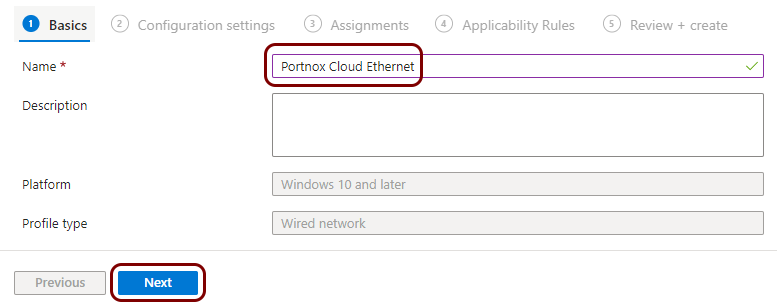
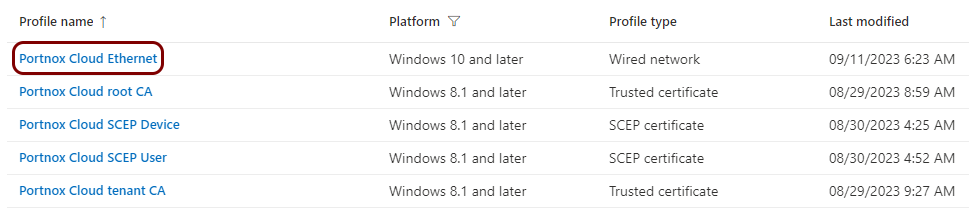
In this example, we used the name Portnox Cloud Ethernet, but you can use any name you like.
-
In the Configuration settings step of the wizard, fill in the following fields, and then
click on the Next button.
Adjust the proposed values to your requirements and your environment, if needed.
-
In the Authentication mode field, select the authentication mode that matches the
type of SCEP profile you want to use.
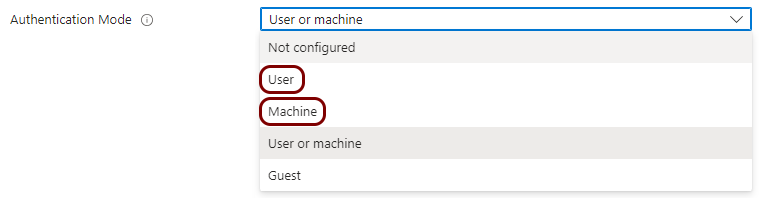
- If you want to use the device SCEP profile, select Machine.
- If you want to use the user SCEP profile, select User.
-
In the 802.1X field, select the Do not enforce option.

If you select the Enforce option, managed devices will not work with other wired networks that do not use 802.1X authentication, for example, the users’ home networks.
-
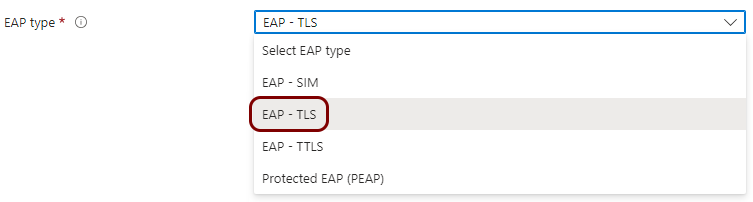
In the EAP type field, select the EAP-TLS option.
-
In the Certificate server names field, type
clear-rad.portnox.com.
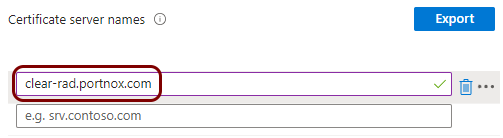 Note:To learn more about this option, read the following topic: Trusted certificate server names.
 -
In the Root certificates for server validation section, click on the
Select one or more certificate profiles link and select the root CA
profile you created in the earlier task.
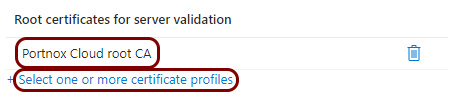 Note:This root certificate is used to validate the RADIUS server. Do not select the tenant CA certificate here. The tenant CA certificate is used in SCEP profiles to verify the validity of SCEP certificates.
 -
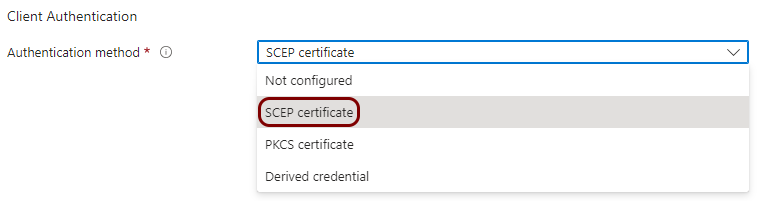
In the Client Authentication section, in the Authentication
method field, select the SCEP certificate option.
-
In the Client certificate for client authentication (Identity certificate) section,
click on the Select a certificate profile link and select the profile you created
earlier, which matches the Authentication Mode that you selected in this Wi-Fi
profile.

-
In the Authentication mode field, select the authentication mode that matches the
type of SCEP profile you want to use.
-
In the Assignments step of the wizard, use relevant options to assign this profile to
specific groups or all users/devices, and then click on the Next button.
Result: You created a profile for Windows devices and the Ethernet network managed by Portnox Cloud.
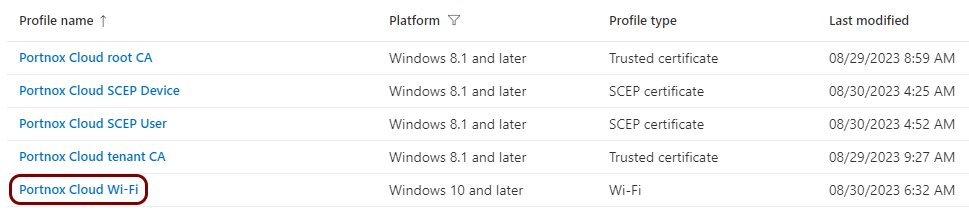
Create a Windows profile for Wi-Fi managed by Portnox Cloud
In this section, you will create a profile in Microsoft Intune for the connection of Windows devices to the Wi-Fi network managed by Portnox™ Cloud.
-
In the left-hand menu, select the Devices option.
-
In the left-hand menu of the Devices pane, select the Configuration
option.
-
In the Devices | Configuration pane, in the Policies tab, click on the
Create button and select the New Policy option.
-
In the Create a profile pane:
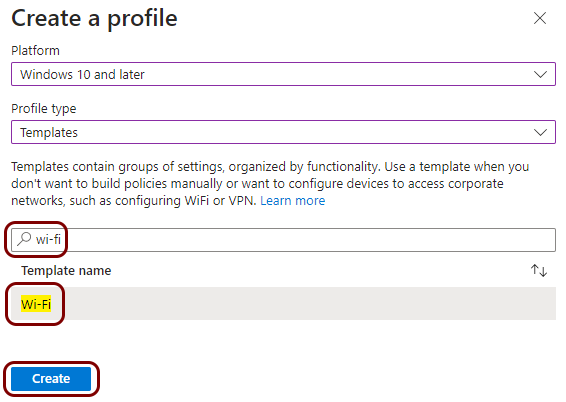
- In the Platform field, select Windows 10 and later.
- In the Profile type field, select Templates
- In the search bar, type wi-fi.
- In the Template name field, click on the Wi-Fi option.
- Click on the Create button.
-
In the Basics step of the Wi-Fi wizard, in the
Name field, type a name for this profile, optionally fill in the
Description field, and click on the Next button.
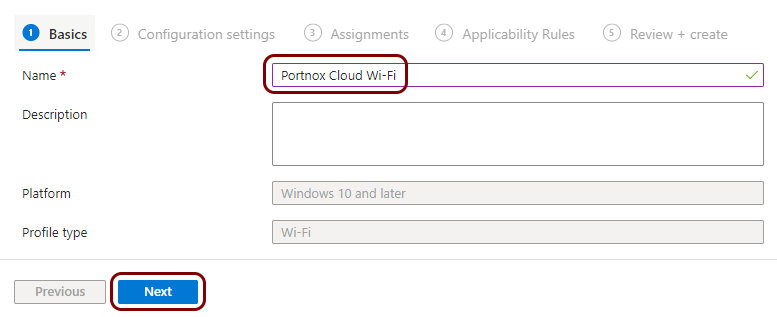
In this example, we used the name Portnox Cloud Wi-Fi, but you can use any name you like.
-
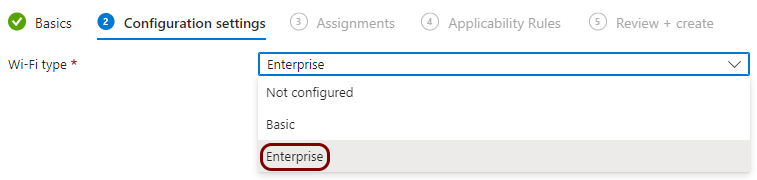
In the Configuration settings step of the wizard, in the Wi-Fi type
field, select the Enterprise option, fill in the following fields, and then click on the
Next button.
Adjust the proposed values to your requirements and your environment, if needed.
-
In the Wi-Fi name (SSID) field, enter the SSID of the Wi-Fi network managed by
Portnox Cloud, and in the Connection name field, enter a friendly name for this
connection.

The Connection name is the name users see when they browse the available connections on their device.
-
In the Authentication mode field, select the authentication mode that matches the
type of SCEP profile you want to use.
- If you want to use the device SCEP profile, select Machine.
- If you want to use the user SCEP profile, select User.
-
In the EAP type field, select the EAP-TLS option.
-
In the Certificate server names field, type
clear-rad.portnox.com.
Note:To learn more about this option, read the following topic: Trusted certificate server names.
-
In the Root certificates for server validation section, click on the
Select one or more certificate profiles link and select the root CA
profile you created in the earlier task.
Note:This root certificate is used to validate the RADIUS server. Do not select the tenant CA certificate here. The tenant CA certificate is used in SCEP profiles to verify the validity of SCEP certificates.
-
In the Client Authentication section, in the Authentication
method field, select the SCEP certificate option.
-
In the Client certificate for client authentication (Identity certificate) section,
click on the Select a certificate profile link and select the profile you created
earlier, which matches the Authentication Mode that you selected in this Wi-Fi
profile.
-
In the Wi-Fi name (SSID) field, enter the SSID of the Wi-Fi network managed by
Portnox Cloud, and in the Connection name field, enter a friendly name for this
connection.
-
In the Assignments step of the wizard, use relevant options to assign this profile to
specific groups or all users/devices, and then click on the Next button.
Result: You created a profile for Windows devices and the Wi-Fi network managed by Portnox Cloud.