Onboard macOS devices with certificates using Addigy and SCEP

In this topic, you will learn how to deploy Portnox™ Cloud SCEP certificates via Addigy, SCEP, and iMazing Profile Editor to manage macOS devices.

Addigy lets you create simple profiles using the cloud user interface but does not let you create profiles with many payloads, which you need to connect to Portnox Cloud using SCEP. However, you can distribute custom profiles using Addigy, so you can create a custom profile and then use Addigy for management.

This topic shows you how to create a custom Apple profile for user-based authentication to connect to Portnox Cloud via Wi-Fi and Ethernet. We recommend that you use a free app called iMazing Profile Editor, but you can create a custom profile using a different tool or edit it manually in XML, if you prefer.

Important: This topic shows the configuration for macOS computers with macOS 12 (Monterey), but the Apple profile payloads Certificate, SCEP, and WiFi, which are used in this configuration, are compatible with the following Apple operating systems: iOS 4.0+, iPadOS 4.0+, macOS 10.7+, tvOS 9.0+, watchOS 3.2+. This means that you can use the same profiles to configure other Apple devices based on these operating systems, for example, iPhones.

Turn on the Portnox Cloud SCEP services

In this section, you will configure Portnox™ Cloud to provide SCEP services to your devices.

If you have previously turned on the Portnox Cloud SCEP services, skip to the later step in which you get the Cloud SCEP URL and password.

Portnox Cloud SCEP services let devices contact the Cloud SCEP server and get a unique certificate for the device or for the specific user of the device.

Important: This topic shows the configuration for macOS computers with macOS 12 (Monterey), but the Apple profile payloads Certificate, SCEP, and WiFi, which are used in this configuration, are compatible with the following Apple operating systems: iOS 4.0+, iPadOS 4.0+, macOS 10.7+, tvOS 9.0+, watchOS 3.2+. This means that you can use the same profiles to configure other Apple devices based on these operating systems, for example, iPhones.
  1. In the Cloud portal top menu, click on the Settings option.

  2. In the right-hand side pane, find and click on the CLEAR GENERAL SETTINGS heading.

    More options appear under the CLEAR GENERAL SETTINGS heading and description.

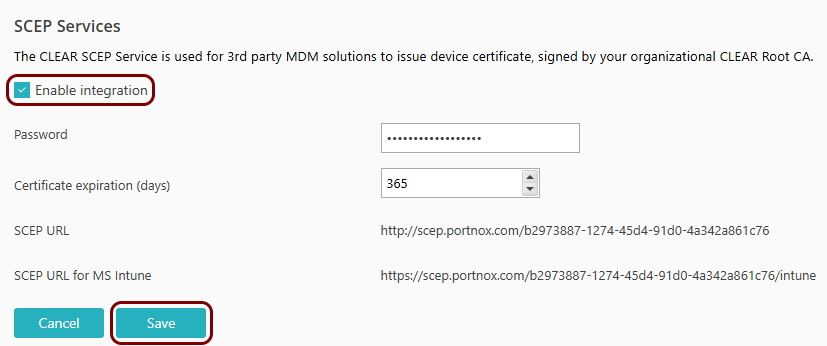
  3. Enable integration with SCEP services.

    1. Scroll down to the SCEP SERVICES section.
    2. Click on the Edit link.
    3. Activate the Enable integration checkbox.
    4. Click on the Save button.

  4. Click on the  ⧉  icon next to the SCEP URL field to copy the SCEP URL, and paste it in a text file for later use.
  5. Click on the  ⧉  icon next to the Password field to copy the SCEP password, and paste it in a text file for later use.

Download the root CA certificate

In this section, you will download the root CA certificate from Portnox™ Cloud, which is needed to create a profile.

  1. In the Cloud portal top menu, click on the Settings option.

  2. In the right-hand side pane, find and click on the CLEAR RADIUS SERVICE heading.

    More options appear under the CLEAR RADIUS SERVICE heading and description.

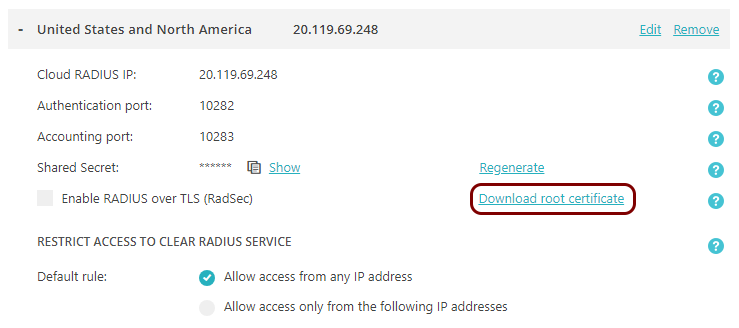
  3. Click on any of the RADIUS servers listed to show its configuration.

  4. Click on the Download root certificate link.

Result: The root CA certificate file is in the Downloads folder on the local disk.

Download the tenant CA certificate

In this section, you will download the Portnox™ Cloud tenant CA certificate from the Cloud portal.

You need the tenant CA certificate from Portnox Cloud so that your managed devices can verify the validity of individual SCEP certificates, which are signed using the tenant CA certificate.

  1. In the Cloud portal top menu, click on the Settings option.

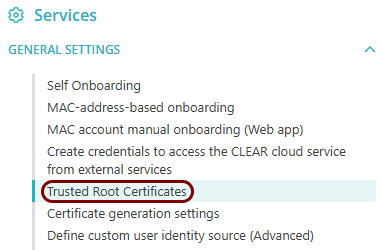
  2. In the right-hand side pane, find and click on the CLEAR GENERAL SETTINGS heading.

    More options appear under the CLEAR GENERAL SETTINGS heading and description.

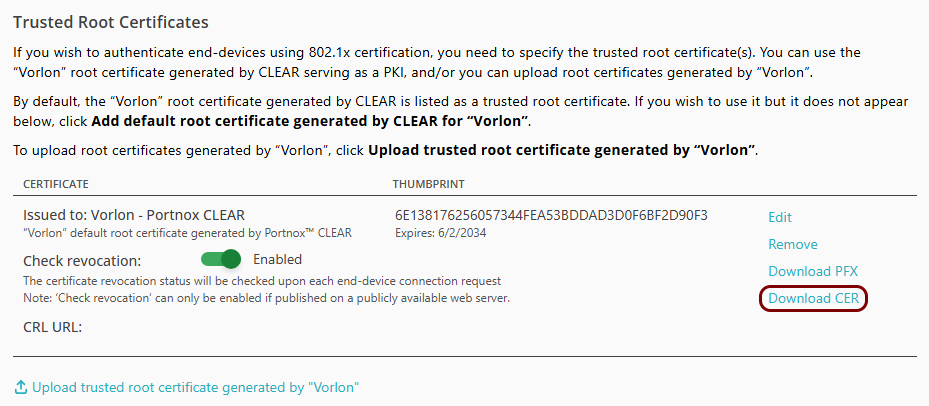
  3. Scroll down to the TRUSTED ROOT CERTIFICATES section and click on the Download link, then save the downloaded file.

    The default name of the file is Your_tenant_name - Portnox CLEAR.pfx, for example, Portnox - Portnox CLEAR.

The downloaded tenant CA certificate is a file in the Personal Information Exchange binary format (PFS, also known as PKCS#12), which you cannot use directly. You need to convert it to the Base-64 encoded X.509 format (sometimes referred to as CER or PEM).

Convert the tenant CA certificate

In this section, you will convert the downloaded tenant CA certificate into the Base-64 encoded X.509 format.

You need this certificate in the Base-64 encoded X.509 format, which is sometimes called the PEM format. Files with this format usually have the .pem or .cer extension, but files in the DER binary format also have the .cer extension.

The following are three recommended ways to convert the PKCS#12 certificate into Base-64 encoded X.509:

  • Convert the tenant CA certificate using Windows certificate management.

    You need to download the certificate to a Windows computer or copy it to a Windows computer.

    1. In Windows, right-click on the PKCS#12 file and select Open from the context menu.

      The file will be opened in the Windows certificate manager.

    2. In the certificate manager window, open the Certificates section in the left-hand pane and then double-click on Portnox - Portnox CLEAR in the right-hand side pane.

    3. In the Certificate window, click on the Details tab and then click on the Copy to File button.

    4. In the first step of the Certificate Export Wizard wizard, click on the Next button.
    5. In the second step of the wizard, select the Base-64 encoded X.509 (.CER) option.

    6. In the third step of the wizard, select a file to save the exported tenant CA certificate, and click on the Next button.

      For example, save the file as tenantCertificate.cer.

    7. In the last step of the wizard, click on the Finish button. Then, close the Certificate window.
  • Convert the tenant CA certificate using OpenSSL.

    If you have OpenSSL installed on your macOS device, you can use it to convert certificates. OpenSSL is not installed by default and the installation requires using a third party package or compiling OpenSSL from source.

    1. Open the Terminal.
    2. Type the following command: # openssl pkcs12 -in "Portnox - Portnox CLEAR.pfx" -out tenantCertificate.cer

      If asked for a certificate password, use an empty password.

  • Convert the tenant CA certificate using a third-party online converter.
    Important: The following converters are not affiliated in any way with Portnox. They were found using web search and verified to support the required conversion. If needed, search the web for other converters.
    • RVSSL (select PFX/PKCS#12 as the input format and Standard PEM as the output format)
    • SSL Shopper (select PFX/PKCS#12 as the input format and Standard PEM as the output format)

Create the custom profile

In this section, you will use the iMazing Profile Editor to create an Apple profile for use in Addigy, which contains the following payloads: the root CA certificate, the tenant CA certificate, the SCEP configuration for user-based authentication, the Wi-Fi configuration, and the Global Ethernet configuration.

Note: This guide shows the configuration on a macOS version of the iMazing Profile Editor, but you can also prepare the profile file using a Windows version of this application.
  1. Install the iMazing Profile Editor and open it from the Launcher.

    To install iMazing Profile Editor, follow the links from the iMazing website and the standard installation procedure in the operating system.

    Note: By default, when you run iMazing Profile Editor, it opens a new profile window and the General section. If not, select File > New from the top menu to open a new profile window.

  2. In the right-hand side pane, in the Name section, enter a name for this profile.

    We used the name Vorlon SCEP but you can use any name you like.

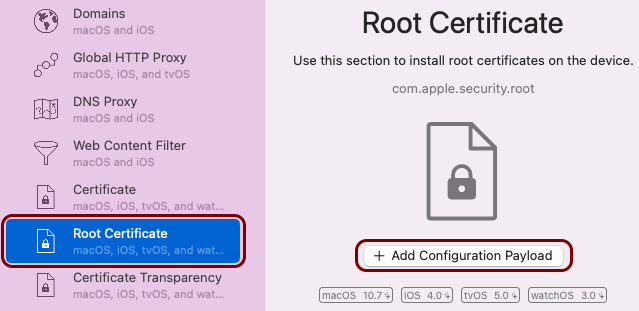
  3. On the left-hand side of the profile window, scroll down to the Root Certificate icon, click on it, and in the right-hand side pane click on the Add Configuration Payload button.

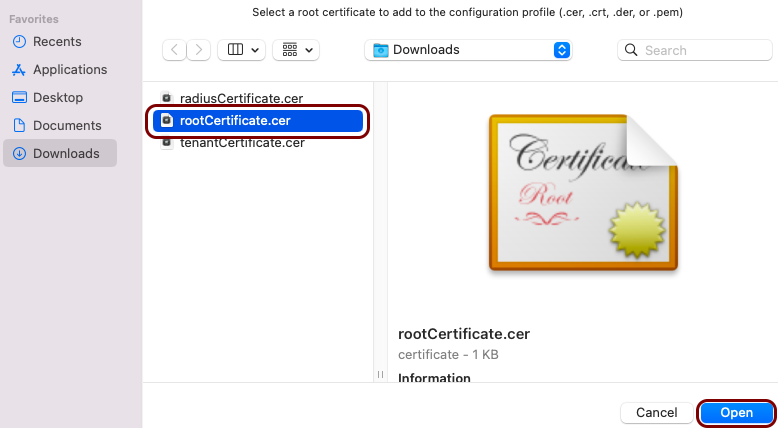
  4. In the file selector, locate and click on the root CA certificate file, downloaded as described in the previous section, and then click on the Open button.

  5. Copy the value of the Payload UUID field and save it for later use.

    You will need to add a reference to this root CA certificate in the Wi-Fi and Ethernet payloads later, so that the device can confirm the identity of the RADIUS server.

    Note: Make a note next to this value that says root CA UUID.
  6. In the top-right corner of the right-hand side pane, click on the  +  button to add another root certificate payload.

  7. In the file selector, locate and click on the tenant CA certificate file, downloaded and converted as described in the previous sections, and then click on the Open button.

  8. Copy the value of the Payload UUID field and save it for later use.

    You will need to add a reference to this tenant CA certificate in the Wi-Fi and Ethernet payloads later, so that the device can confirm the SCEP certificate validity.

    Note: Make a note next to this value that says tenant CA UUID.
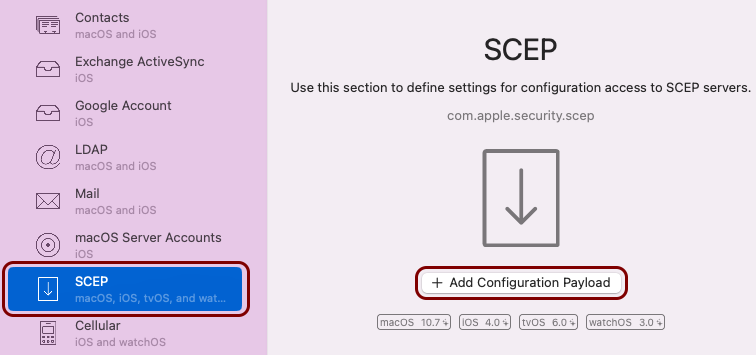
  9. On the left-hand side of the profile window, scroll down to the SCEP icon, click on it, and in the right-hand side pane click on the Add Configuration Payload button.

  10. In the SCEP pane on the right-hand side, configure the following properties:
    1. In the URL section, enter the SCEP URL that you copied earlier from Portnox Cloud.

    2. In the Subject section, enter: CN={{.Fact "current_user"}}.

      Note:

      The .Fact format is specific to Addigy. This tag is processed by Addigy and replaced by the name of the currently logged-in user. The full list of Addigy facts is available in the Addigy documentation. Portnox Cloud then uses the user name from the certificate fields to create or align with an account in Cloud.

      At this time, Portnox Cloud does not support device-based authentication for Addigy. If you try to use Addigy facts related to device identifiers, Cloud will not be able to align this information with information from the authentication repository, and it will create new Cloud accounts for devices instead of aligning them with accounts from the authentication repository.

    3. In the NT Principal Name section, enter: {{.Fact "current_user"}}.

    4. In the Challenge section, enter the SCEP password that you copied earlier from Portnox Cloud.

    5. In the Key Size section, select the key size that you want to use.

      In this example, we used the value 2048 but you can use 1024. Note that while higher values provide more security, they may cause certificate fragmentation problems in some network topologies.

    6. In the Key Usage section, select the Both signing and encryption option.

    7. Copy the value in the Payload UUID and save it for later use.

      You will need to add a reference to this SCEP certificate in the Wi-Fi payload later, so that the device can confirm the SCEP certificate validity.

      Note: Make a note next to this value that says SCEP UUID.
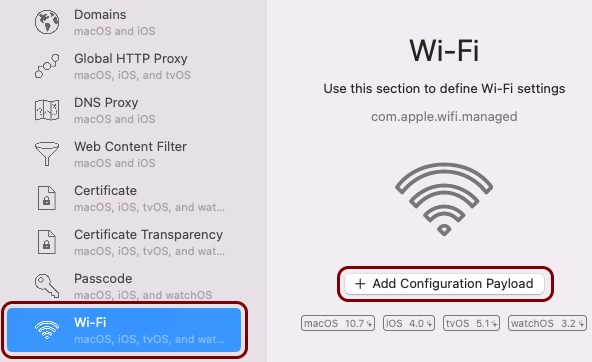
  11. On the left-hand side of the profile window, scroll down to the Wi-Fi icon, click on it, and in the right-hand side pane click on the Add Configuration Payload button.

  12. In the Wi-Fi pane on the right-hand side, configure the following properties:
    1. In the Service Set Identifier (SSID) section, enter the SSID of your Wi-Fi network.

    2. In the Accept EAP Types section, click on the  +  button, click on the added entry, and select TLS.

    3. In the Password field, enter any value (this value is ignored).

      This is necessary due to a bug in the iMazing Profile Editor. When you authenticate using TLS, the password is not used, but iMazing Profile Editor requires that you enter a password anyway.

      Note: The Wi-Fi profile has two Password sections. The one that requires a value is directly under the Accept EAP Types section.
    4. In the Certificate Anchor UUID section, click on the  +  button twice, and in the new entry fields, paste the UUIDs that you copied earlier as root CA UUID and tenant CA UUID.

      You need a reference to the root CA certificate so that the device can confirm that the Portnox RADIUS server is authentic, and you need a reference to the tenant CA certificate so that the device can confirm the validity of the SCEP certificate for the current user or device.

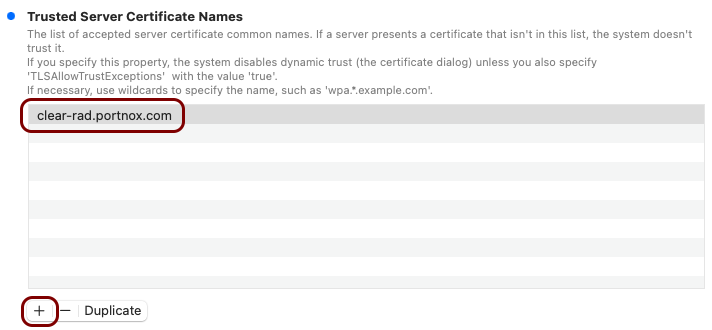
    5. In the Trusted Server Certificate Names section, click on the  +  button and in the new entry field, type clear-rad.portnox.com.

    6. In the Certificate UUID section, paste the UUID that you copied earlier as SCEP UUID.

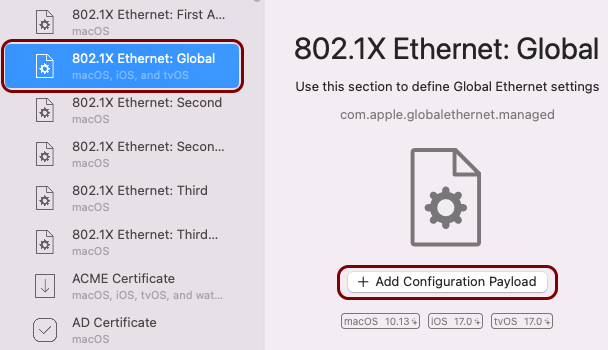
  13. On the left-hand side of the profile window, scroll down to the 802.1X Ethernet: Global icon, click on it, and in the right-hand side pane click on the Add Configuration Payload button.

    Note: Depending on your hardware configurations, you can choose a different 802.1X Ethernet payload, for example, First Active Ethernet. The setup procedure is almost the same for all 802.1X payloads.
  14. In the 802.1X Ethernet: Global pane on the right-hand side, configure the following properties:
    1. In the Accept EAP Types section, click on the  +  button, click on the added entry, and select TLS.

    2. In the Password field, enter any value (this value is ignored).

      This is necessary due to a bug in the iMazing Profile Editor. When you authenticate using TLS, the password is not used, but iMazing Profile Editor requires that you enter a password anyway.

    3. In the Certificate Anchor UUID section, click on the  +  button twice, and in the new entry fields, paste the UUIDs that you copied earlier as root CA UUID and tenant CA UUID.

      You need a reference to the root CA certificate so that the device can confirm that the Portnox RADIUS server is authentic, and you need a reference to the tenant CA certificate so that the device can confirm the validity of the SCEP certificate for the current user or device.

    4. In the Trusted Server Certificate Names section, click on the  +  button and in the new entry field, type clear-rad.portnox.com.

    5. In the Interface section, select the Any Ethernet option.

  15. In the top menu of iMazing Profile Editor, select File > Save, and select a location to save the profile.

Result: The custom profile file (.mobileconfig) is saved on the disk and ready for use in Addigy.

Add the custom profile to Addigy

In this section, you will upload the custom profile file to Addigy and assign it to an existing policy, so that Addigy can distribute it to managed devices.

  1. Log in to your Addigy account by visiting app.addigy.com.
  2. In the main Addigy menu on the left-hand side, click on the Catalog option, and then in the right-hand side pane, click on the MDM Profiles heading.

    You can also open the following URL in your browser: app.addigy.com/catalog/profiles.

  3. Click on the New button on the right-hand side above the list of profiles.

  4. Click on the Custom Profile button in the top-right corner of the right-hand side pane.

  5. In the Custom Profile pane, leave the default values or modify them as needed, and click on the Select .mobileconfig file button. Then, select the custom profile file that you prepared earlier.

  6. Scroll down the pane that contains profile details, and in the bottom-right corner, click on the Create button.

  7. In the list of profiles, click on the  …  menu icon next to the newly created profile name, and select the Assignments option.

  8. In the Item Policies window, select the policies that you want to assign this profile to, and then click on the Save button.

Note: If you configured an Ethernet payload for your profile, and distributed this profile to your managed devices, the first time that the user of the managed device connects to the Ethernet, they may be asked to select the connection profile (to choose between Wi-Fi and 802.1X Global Ethernet) and the certificate to use (to choose between the Addigy certificate and their SCEP certificate). This is a standard behavior for macOS and it cannot be modified by the profile.