Set up Portnox Connect
In this topic, you will learn how to make Portnox™ Connect available for your users.
Note:
Portnox Connect works in connection with the Portnox self-onboarding portal. To make Portnox Connect available for your
users, you must also turn on the self-onboarding portal. That’s why this topic also contains information about turning on
the self-onboarding portal. If you don’t want your users to use the self-onboarding portal, do not share the portal URL with
them, only share the Portnox Connect download URL.
-
In the Cloud portal top menu, click on the Settings option.

-
In the Cloud portal left-hand side menu, click on the option.

-
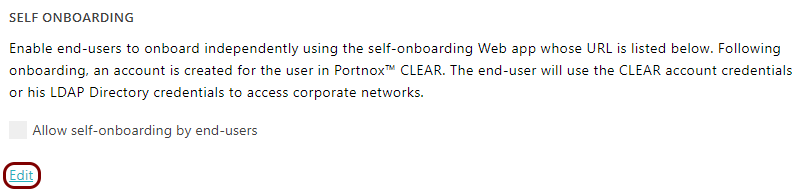
In the Self Onboarding section, click on the Edit link.
- Optional:
If you want Cloud account users to be able to use their existing accounts as well as create new Cloud accounts, in the
Access method section, choose the Any user option.
-
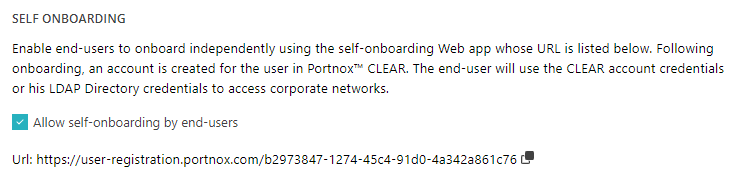
In the Portnox Connect section, activate the Give end users the option to onboard
using Portnox Connect checkbox.
 Note:This will also add a button in the self-onboarding portal, which will let users download and use Portnox Connect.
 -
In the Portnox Connect URL section, click on the ⧉ icon
to copy the URL and share it with your users.
 Note:The URL for downloading Portnox Connect doesn’t change. You can use your company’s link shortening services or redirects to create a URL that is easier for your users to remember and access.
Note:
Network configurations generated by Portnox Connect have MAC randomization
disabled to prevent issues where a single device might consume multiple licenses.
Note:
Portnox Connect does not work with contractor accounts.
If you have external contractors and want them to use Portnox Connect, you must use Portnox accounts.