Integrate with Jamf
In this topic, you will learn how to set up the integration between Portnox™ Cloud and Jamf.
-
In the Cloud portal top menu, click on the Settings option.

-
In the Cloud portal left-hand side menu, click on the Integration Services > JAMF INTEGRATION SERVICE SETTINGS option.

-
Enable Jamf integration
-
Under the JAMF integration service settings heading and description, click on the
Edit link.

-
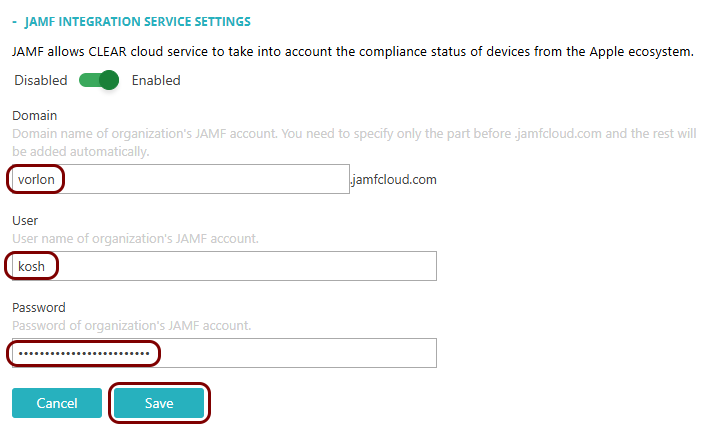
Click on the Disabled/Enabled switch to put it in the Enabled
position.

-
In the Domain field, enter the domain name of your Jamf tenant.
Note:You can enter just the subdomain name, for example, vorlon, or the full domain name, for example, vorlon.jamfcloud.com. If you enter the subdomain name, Portnox Cloud will recognize it and append the default Jamf domain name jamfcloud.com.Important:If your Jamf tenant is configured to be accessed using a custom port, for example, 8443 instead of the standard 443, enter the full domain name and port, for example vorlon.jamfcloud.com:8443.
-
In the User field, enter the name of the administrative user in Jamf that you want to
base this integration on.
Important:Most Jamf tenants use identifiers without a domain part. However, if your Jamf tenant uses identifiers that contain the domain part, make sure to include it with the user name here or else the integration will not work (for example, kosh.naranek@vorlon.com). Also, make sure that the selected user has administrative privileges in Jamf (at least the Computers and Mobile Devices privileges).
- In the Password field, enter the password of that administrative user.
- Optional: If you have both a Jamf integration and an Intune integration, and you want to prioritize Jamf risk management over Intune, activate the Set risk assessment priority for Jamf checkbox.
-
Click on the Save button.

-
Click on the Test link to test your integration settings.
Note:We highly recommend testing this integration before using it in practice.

-
Under the JAMF integration service settings heading and description, click on the
Edit link.
Result: Your Jamf integration is now active.
You can see Jamf-related information for specific devices on the Devices screen by selecting an Jamf-managed device from the list and scrolling the right-hand side pane. There are also Jamf-related conditions in risk assessment policies.
