Integrate with eduroam

In this topic, you will learn how to integrate Portnox™ Cloud with the eduroam service.

In a typical RADIUS setup, NAS devices at your site are configured to contact Portnox Cloud RADIUS servers to authenticate your users. With eduroam, this setup extends to other sites participating in your eduroam environment, such as partner institutions.

For example, if your institution’s network is protected by Portnox Cloud and uses eduroam, and your student visits a partner institution, their user identifier is recognized by the other institution’s RADIUS server as a foreign one, and the request is forwarded to the eduroam hierarchy. The hierarchy recognizes that the domain belongs to you, and the authentication request is routed through it to your Portnox Cloud RADIUS server for validation.

On the other hand, if a student from another eduroam institution visits your site and connects to your Wi-Fi, your Portnox Cloud RADIUS server recognizes that their domain is not yours. It forwards the request to the eduroam hierarchy, which routes it to the RADIUS server of the student’s home institution. The authentication is then completed by their institution’s RADIUS setup.

Request a unique public IP address from Portnox

To work with the eduroam service, your Portnox Cloud RADIUS server must have a unique public IP. In this section, you will learn how to request such an address from Portnox.

  1. Create a cloud RADIUS server with a public shared IP address.

    Follow the steps in this topic: Create cloud RADIUS servers.

    The cloud RADIUS that you just created uses a shared public IP and unique ports. However, the eduroam service requires a unique public IP address. Follow the next steps to request such an address.

  2. Contact your Portnox onboarding or support team, as appropriate.

    Inform your point of contact that you need a unique public IP address for eduroam integration.

  3. Wait until you hear back from us.

    Your onboarding engineer or the support agent assigned to your support case will work together with the Portnox engineering team to create a unique public IP address. You will be notified by your point of contact once this address is ready.

    Note: This process may take a couple of days to complete.
  4. Note down the RADIUS server details.

    Go back to your cloud RADIUS configuration and note down the Cloud RADIUS IP, the Authentication port, and the Shared Secret.

    Note: We recommend that you copy these values to a temporary text file for easy pasting later.

Result: The IP address in your cloud RADIUS configuration is now different than it was when you created the cloud RADIUS server, and it is now a unique public IP address that you can use for eduroam integration.

Configure the RADIUS servers in your eduroam dashboard

In this section, you will learn how to configure your eduroam dashboard to work together with Portnox Cloud for RADIUS authentication.

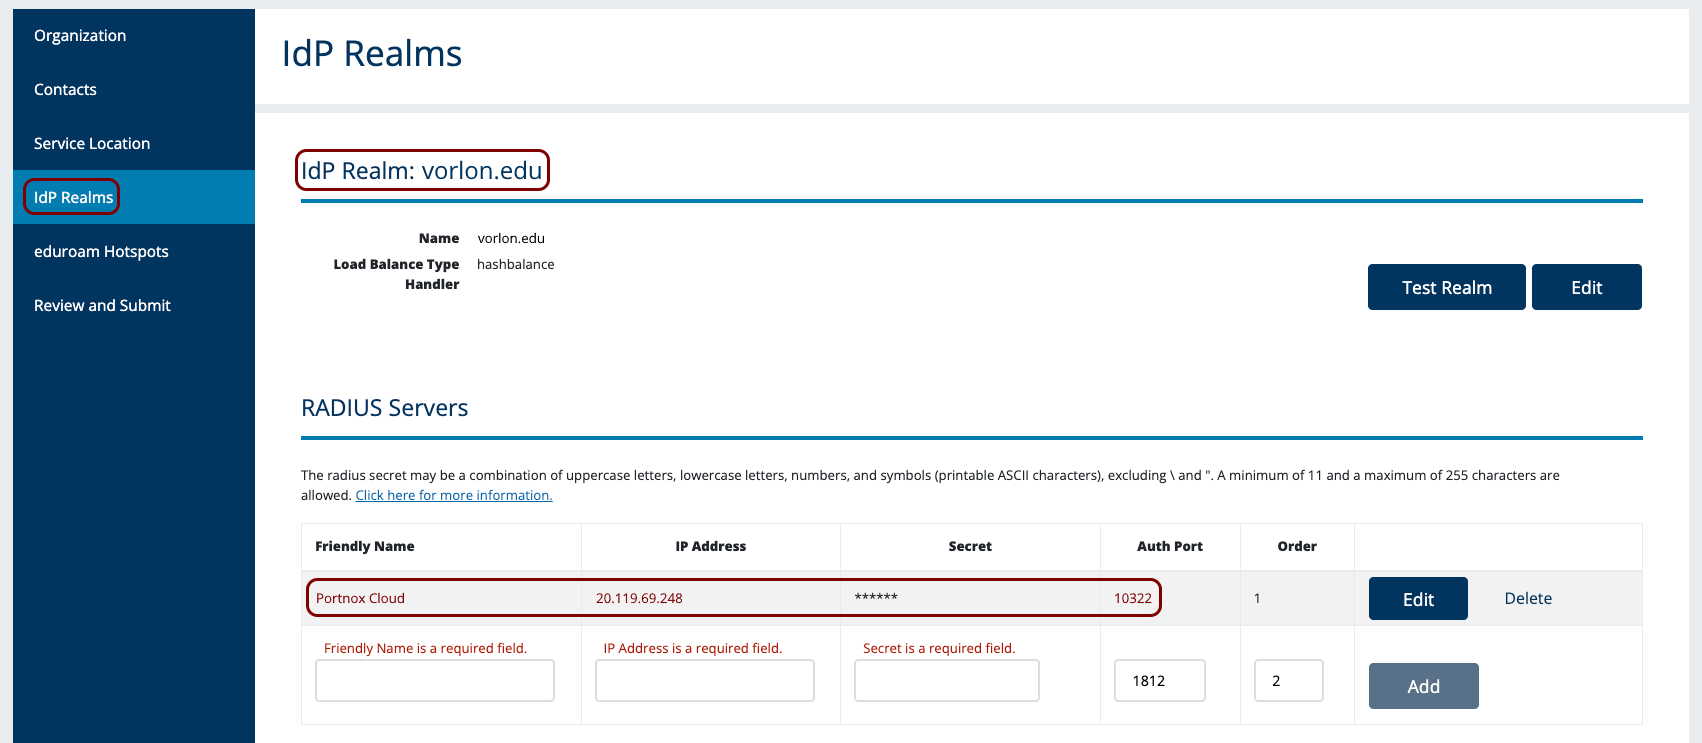
  1. Configure eduroam to know that your institution’s domain is handled by the Portnox Cloud RADIUS server, and provide connection details so that eduroam can forward authentication requests from other partner institutions to that server.

    1. In your eduroam dashboard, in the left-hand side menu, select the IdP Realms option, and then in the right-hand side, select the realm (domain) that you want to configure.
      Note: Your students that use this domain will be able to use Wi-Fi while visiting other partner eduroam institutions. Their requests will be forwarded to the Portnox Cloud RADIUS server that you configure here.
    2. In the Friendly Name field, use any name you like for the Portnox RADIUS server.
    3. In the IP Address field, paste the Cloud RADIUS IP that you copied from Portnox Cloud, as instructed in the previous section.
    4. In the Auth Port field, paste the Authentication port that you copied from Portnox Cloud, as instructed in the previous section.
    5. In the Secret field, paste the Shared Secret that you copied from Portnox Cloud, as instructed in the previous section.
      This is a secret that will be used when eduroam forwards requests from other institutions’ servers to your Portnox Cloud RADIUS server.
    6. Click on the Add button to add your IdP RADIUS server configuration.
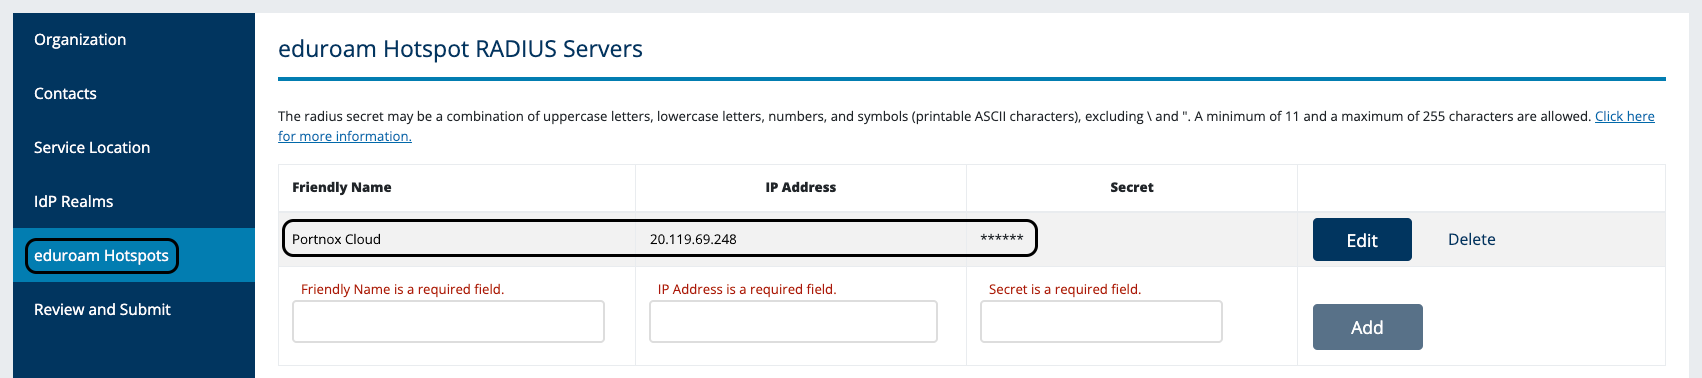
  2. Configure eduroam to accept requests forwarded by the Portnox Cloud server when a student from a partner institution connects to your network.

    1. In your eduroam dashboard, in the left-hand side menu, select the eduroam Hotspots option.
    2. In the Friendly Name field, use any name you like for the Portnox RADIUS server.
    3. In the IP Address field, paste the Cloud RADIUS IP that you copied from Portnox Cloud, as instructed in the previous section.
    4. In the Secret field, enter a secret that will be used when forwarding requests incoming to your Portnox Cloud RADIUS server, which will then be routed through the eduroam hierarchy.
      Important: You must create this secret, and it should be different from the secret used in the IdP Realms section. We recommend using a password generator or other method to create a safe, unique secret. Then, you must note down this secret (for example, in the same temporary text file where you recorded other information), as it will be needed later to configure Portnox Cloud RADIUS forwarding rules.
    5. Click on the Add button to add your hotspot RADIUS server configuration.

Configure RADIUS forwarding in Portnox Cloud

In this section, you will configure Portnox Cloud to forward RADIUS authentication requests for eduroam partner domains to the eduroam hierarchy, and to handle requests locally when they are for your own domain.

Note: For more information about RADIUS forwarding in Portnox Cloud, see the following topic: Configure RADIUS forwarding rules.
  1. Find the eduroam RADIUS server’s IP address.

    Before we can forward the requests to eduroam, we need to know the eduroam RADIUS server’s IP address.

    Note: To find the IP address, you can use the nslookup command on Windows or another operating system. We will show you an example for Windows.
    1. Open the Windows command prompt
    2. Type: nslookup tlrs1.eduroam.us or nslookup tlrs2.eduroam.us and then press the Enter key.
      Note: You can use either of these servers for forwarding.
    3. Note down the IPv4 address shown in the Addresses field.

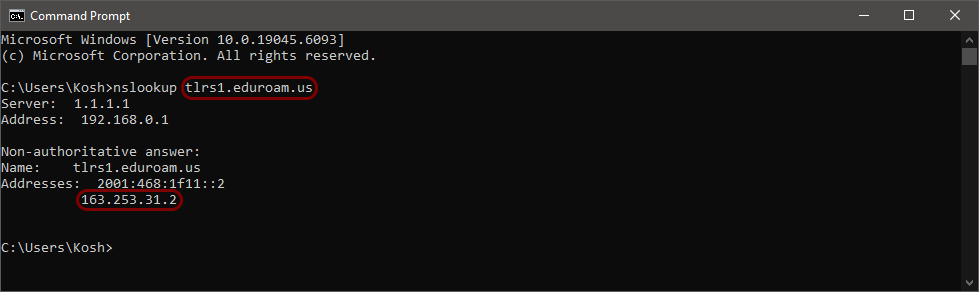
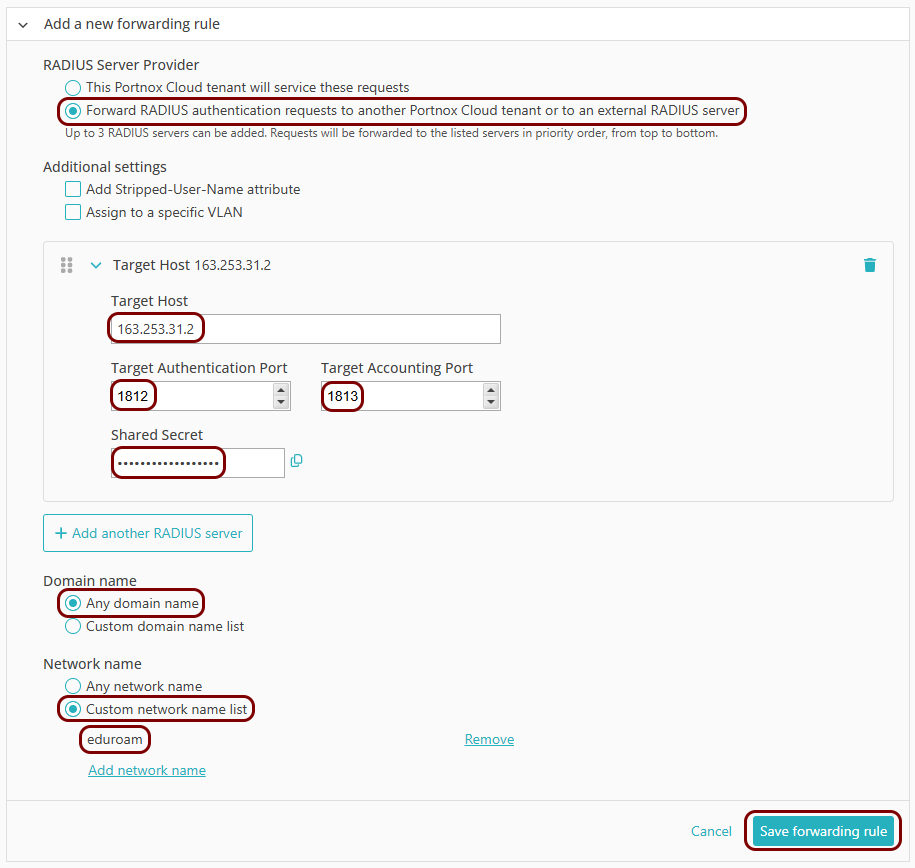
  2. Create a forwarding rule to forward authentication requests for domains that are not yours.

    1. In Portnox Cloud, go to: Settings > CLEAR RADIUS SERVICE > Forwarding rules > Add custom forwarding rule.
    2. In the RADIUS Server Provider field, select the Forward RADIUS authentication requests to another Portnox Cloud tenant or to an external RADIUS server option.
    3. Click on the Add another RADIUS server button.
    4. In the Target Host field, enter the IP address that you noted down in the previous step, for example: 163.253.31.2.
    5. In the Target Authentication Port field, enter: 1812 and in the Target Accounting Port field, enter: 1813.
    6. In the Shared Secret field, paste the shared secret that you created and used on the eduroam Hotspot RADIUS Servers screen.
      Warning: Do not use the secret from the Portnox Cloud RADIUS server configuration. These are different secrets.
    7. In the Domain name field, select the Any domain name option.
    8. In the Network name field, click on the Custom network name list option, then click on the Add network name link, enter: eduroam, and click on the Add button.
    9. Click on the Save forwarding rule button.
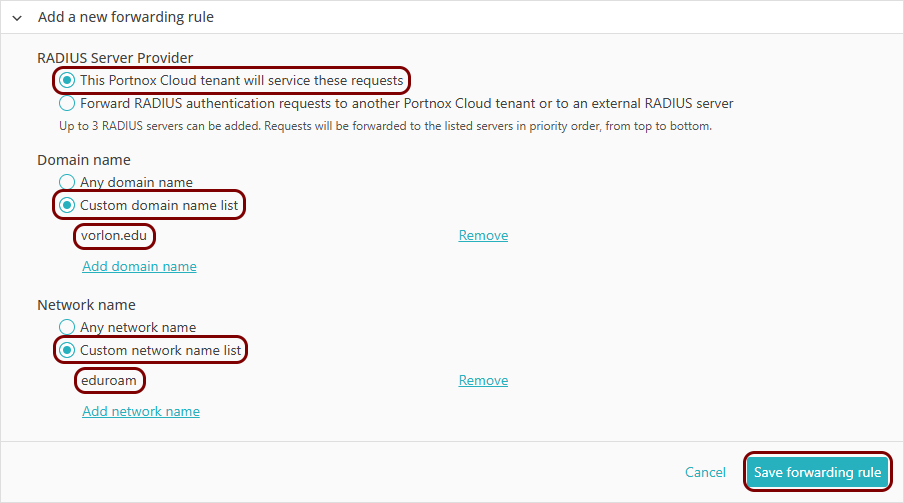
  3. Create a forwarding rule to process authentication requests for your domain locally.

    1. In Portnox Cloud, go to: Settings > CLEAR RADIUS SERVICE > Forwarding rules > Add custom forwarding rule.
    2. In the RADIUS Server Provider field, select the This Portnox Cloud tenant will service these requests option.
    3. In the Domain name field, click on the Custom domain name list option, then click on the Add domain name link, enter your domain name, and click on the Add button.
      Note: Your domain name refers to the domain that your students use when authenticating both on your Wi-Fi networks and on other eduroam partner Wi-Fi networks. This domain is what eduroam uses to recognize and forward the request to your Portnox Cloud RADIUS server.
    4. In the Network name field, click on the Custom network name list option, then click on the Add network name link, enter: eduroam, and click on the Add button.
    5. Click on the Save forwarding rule button.

Result: Your RADIUS server and eduroam configurations are now ready. You can continue with any other tasks required to set up your environment in Portnox Cloud, as described in: Quick start steps with RADIUS/NAC.