Configure a guest Wi-Fi network
In this topic, you will learn how to configure a guest Wi-Fi network in Portnox™ Cloud using a captive portal.
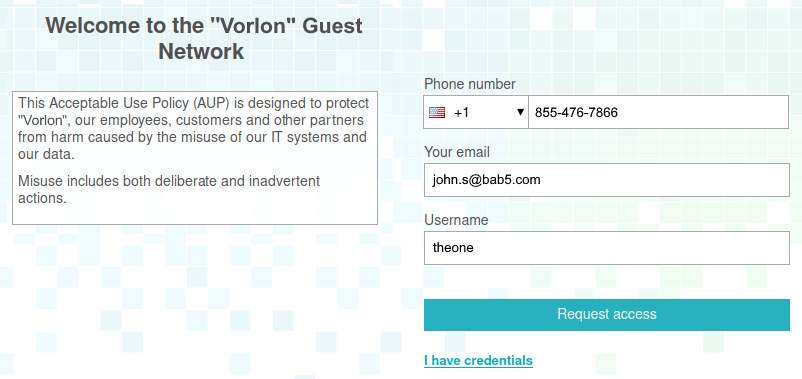
The guest Wi-Fi network is a separate Wi-Fi network with a unique SSID, which lets guests of your organization access the Internet and limited local resources with no connection to the corporate network. When a guest connects to your guest Wi-Fi network using a shared password or no password, they can be redirected to a captive portal. After they complete the steps in the captive portal, the Wi-Fi access point connects them to the Internet and selected local resources.
Most Wi-Fi controllers allow you to create a guest network and let you create a simple captive portal managed by the controller. The Portnox Cloud captive portal gives you some unique choices such as the ability for organization employees to authorize guests. This is possible, because it works together with the RADIUS server.
There is no universal standard or protocol for captive portals. The Portnox Cloud captive portal works only with the following network controllers and their internal standards:
- Cisco Meraki
- Cisco
- HPE Aruba
- RUCKUS Networks
- Juniper Mist
- Extreme WiNG
- Aerohive (legacy, now Extreme)
- Fortinet
- Ubiquiti UniFi
- WatchGuard
To set up a Portnox Cloud guest Wi-Fi network, follow these steps.
-
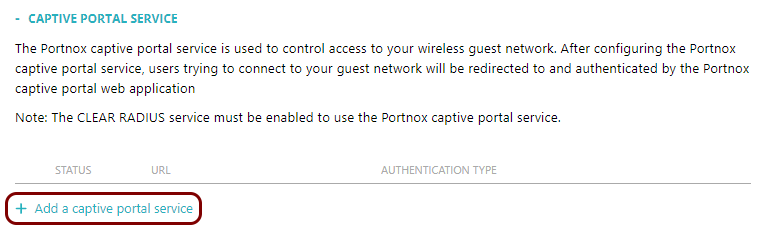
In the Cloud portal top menu, click on the Settings option.

-
In the left-hand side menu, click on the heading.

-
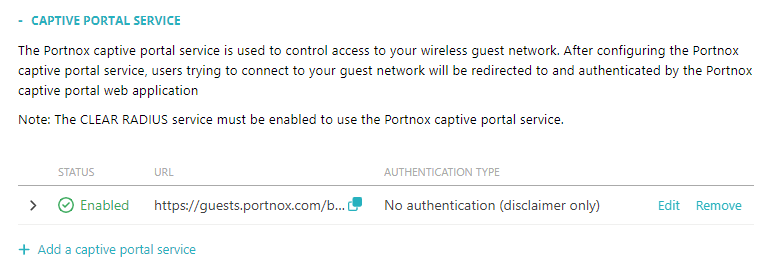
In the right-hand side pane, click on the Add a captive portal service link to add a new captive
portal.
Important:You can create a maximum of 10 captive portals in Portnox Cloud. If you try to add more, you will encounter an error.
-
In the URL field, enter a unique suffix that will identify this captive portal.
All your captive portal URLs have a similar format: https://guests.portnox.com/your_organization_identifier/suffix , where your_organization_identifier is a unique string of characters generated for your organization by Portnox Cloud, and suffix is the value of this field.
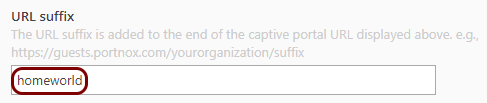 In this example, we used the suffix homeworld but you can use any suffix you like.
 -
In the Authentication type field, select the type of authentication that users will be asked for
when connecting to the captive portal.
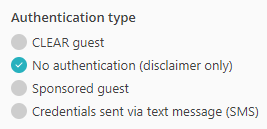
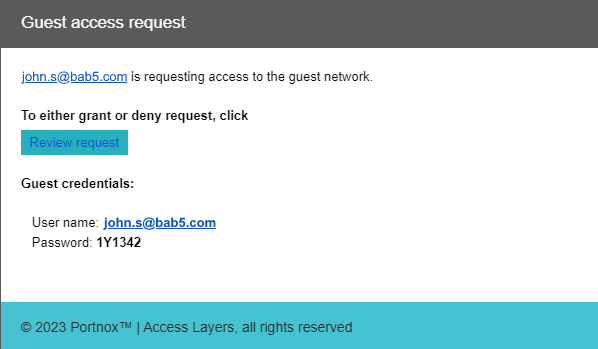
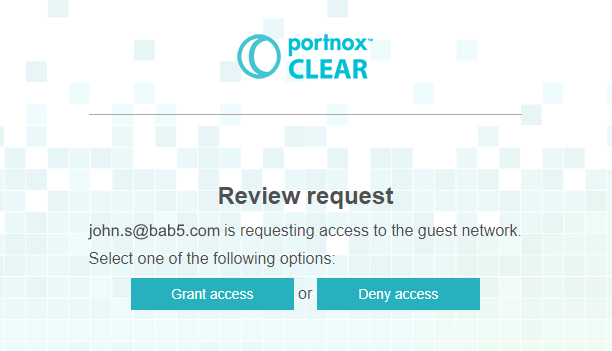
Portnox Cloud Guest: Only guests manually added by the Portnox Cloud administrator () can authenticate. The administrator receives the credentials via email and needs to manually deliver them to the guest user.
No authentication (disclaimer only): Guests do not need to authenticate, only accept the disclaimer or terms of service.
Sponsored Guest: Guests are asked to provide an email address of a sponsor from the organization. Once confirmed, they can create a password for further access. Portnox Cloud administrators can configure a password policy for these passwords.
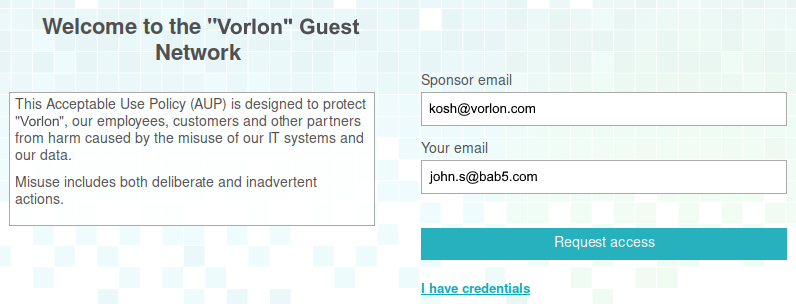
The sponsor receives an email request to confirm.
If the sponsor confirms, the guest receives a one-time passcode valid for 2 hours, and can enter the guest network upon first setting up their password.
SMS authentication: Guests enter their mobile number and then receive a code sent to this number via a text message (SMS). This code lets them set their password and join the guest network.
Note:100 SMS messages are included in the standard license. You can buy additional SMS messages in packs of 1000 per month as needed. For details, see the Pricing page. -
In the Dynamic session timeout field, select the period after which the guest session
expires.
While the session is active, if the guest connects to the guest Wi-Fi network again, they won’t need to provide their credentials (if required) again. After the session expires, if the guest is still connected, they will be disconnected. To reconnect, they must access the captive portal again and provide credentials (if required).
 Important:Dynamic session timeout defines how long a guest account remains valid in Portnox Cloud. Once this period ends, the account is deleted from the Portnox guest network configuration. However, some NAS devices may still cache the guest’s authorization, allowing them to reconnect to the captive portal SSID even after expiration.
For Mist, WatchGuard, and UniFi NAS devices, Portnox Cloud can automatically sync the expiration time with the device, preventing this issue. For other NAS devices, you’ll need to manually configure the session expiration in the NAS settings to match the value set in Portnox Cloud. Refer to your NAS documentation for guidance.
-
In the Captive Portal URL field, click on the ⧉ icon to
copy the unique URL of your captive portal.
Save this value, for example, in a text file. You will need to enter this value in the configuration of your network controller. Refer to your network controller documentation for specific instructions.
 Note:This value is displayed only after saving the configuration of the captive portal.
 -
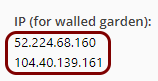
In the IP (for walled garden) field, copy the IP addresses of the captive portal.
Save these values, for example, in a text file. You will need to enter these IP addresses in the configuration of your network controller as a walled garden. This means: the IP addresses that the guest can connect to before they authenticate in the captive portal. If not, the guest device will not be able to access the captive portal.
 Note:This value is displayed only after saving the configuration of the captive portal.Warning:The NAS device must be able to communicate with the walled garden IP addresses at all times. If this communication is blocked in any way, the captive portal will not work, and guest devices will be unable to connect to the network. Before you proceed, verify that all firewalls, ACLs, and any other security measures that could interfere with this communication are configured to explicitly allow the walled garden IP addresses.
 -
In the Shared Secret field, enter the shared secret specific for the controller.
Ruckus: Enter the NBI password generated in Ruckus ZoneDirector.
Mist: Enter the API secret value from the guest portal configuration in the Mist management console.
WatchGuard: Enter the shared secret that you entered or will enter in the WatchGuard XTM.
For other brands of controllers, you do not need to enter a shared secret.

Result: You have added a captive portal service.
Portnox Cloud counts the number of concurrently connected guests devices. If a device remains connected, the count will be reduced by one on the following day. However, if a guest device gets disconnected, and if the duration of the previous connection has not exceeded the value specified in the Session Expiration property, the next connection from the same device will be allowed without authentication in the Captive Portal. Otherwise, the connection will be counted as a new device, so the count will increase by one.
For specific instructions on setting up guest Wi-Fi access on specific network controllers, see the following topic: Configure wireless devices to work with Portnox Cloud.