Set up a local TACACS+ server using a virtual machine
In this topic, you will learn how to install and run local TACACS+ servers that work together with Portnox™ Cloud using virtual machines.
For information about how the Portnox Cloud TACACS+ service works, see the following topic: How does the Portnox Cloud TACACS+ service work?.
-
In the Cloud portal top menu, click on the Settings option.

-
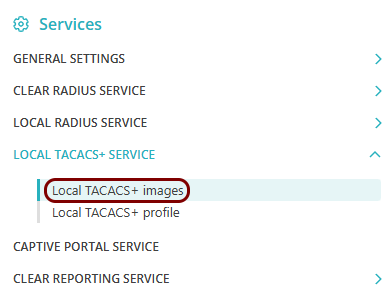
In the Cloud portal left-hand side menu, click on the option.
-
In the right-hand side pane, click on the relevant link to download the local TACACS+ server virtual machine
file:
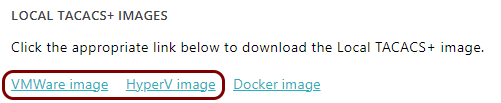
- Click on the VMware image link, if you use one of the following hypervisors: VMware Workstation, VMware Fusion, VMware ESXi.
- Click on the HyperV image link, if you use one of the following hypervisors: Microsoft Hyper-V, Oracle VirtualBox, Citrix Hypervisor, Proxmox Virtual Environment, Xen Project.
Save the downloaded file locally, you will use it later, after you prepare the configuration.
-
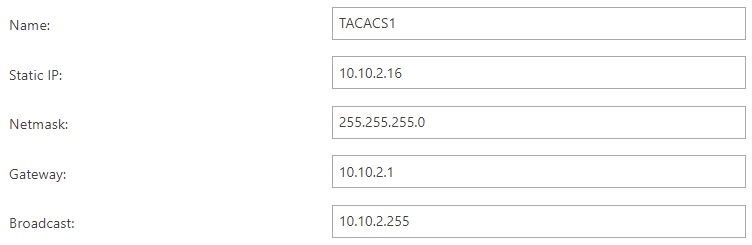
In the Broadcast field, enter the broadcast IP address for the subnet of the entered static IP
address.
-
Add DNS servers:

-
Click on the 👁 icon and hold it to note down the value of the Shared
Secret field to use it when configuring NAS devices to contact this local TACACS+ server.

If you want to generate a different shared secret, click on the Regenerate link on the right-hand side.
Note:After you save the server settings and view them, you can use the ⧉ icon to copy the value to the clipboard. - Optional:
In the Syslog Destination field, enter the IP and port of a local syslog server, if you want to
stream logs from the virtual machine to a syslog server.

If you leave this field empty, Portnox Cloud will not send syslog streams. If you omit the port number, Cloud will use the default port 514.
- Optional:
In the SNMP CONFIGURATION section, click on the Enable SNMP v1 and v2c
checkbox to enable support for SNMP v1/v2 protocols on the local TACACS+ server.
-
In the Community string field, enter the community string for this local TACACS+
server.

Write down this community string, so you can use it later to configure other devices. The community string acts like a password/shared secret and lets other devices authenticate via SNMP v1 or v2 with the local TACACS+ server.
-
In the Community string field, enter the community string for this local TACACS+
server.
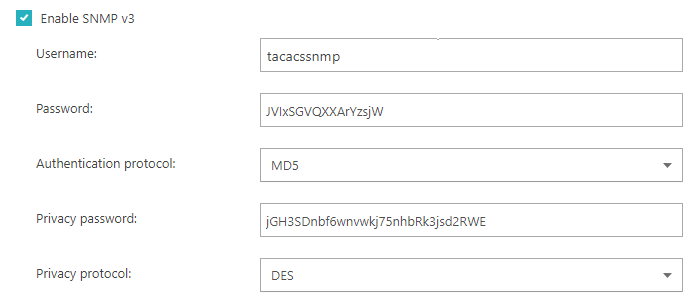
- Optional:
In the SNMP CONFIGURATION section, click on the Enable SNMP v3 checkbox
to enable support for the secure SNMP v3 protocol on the local TACACS+ server and provide the configuration
information.
- Optional:
If you want to access the local TACACS+ instance using SSH, click on the Enable SSH
checkbox.
 Note:To learn how to troubleshoot the local TACACS+ instance using the PuTTY application and Linux commands, see the following topic: How to access virtual machine logs using SSH.
 -
Click on the Save and Download button to save the configuration and download the configuration
ISO image.
Important:The downloaded ISO image is required to configure the virtual machine file downloaded earlier.
