Set up multi-factor authentication for TACACS+

In this topic, you will learn how to set up multi-factor authentication (MFA) for the Portnox™ Cloud TACACS+ service with AgentP, Okta Verify, or Cisco Duo.

Before you begin:

  • Set up the local TACACS+ service (see the following topic: Quick start steps with TACACS+).

  • Assign a TACACS+ policy to the group. The policy must match your NAS devices (see the following topic: Assign policies to a group).

  • Make sure that users can authenticate with a password through your authentication repository. TACACS+ doesn’t work with accounts that are based only on external IdPs or certificates, because TACACS+ itself is credential-based.

Important:
Set the TACACS+ timeout on your NAS devices to the same value as the Push-to-access notification timeout in the group (see the following topic: Configure NAS devices to access the TACACS+ server). If the NAS timeout is shorter, the login fails before the user can approve the MFA request.

Use AgentP for TACACS+ MFA

In this section, you will learn how to configure Portnox Cloud to send TACACS+ MFA requests to the AgentP installations of users in a group.

Note:
Users in the group must have AgentP installed and enrolled with their account.
  1. In the Cloud portal top menu, click on the Groups option.

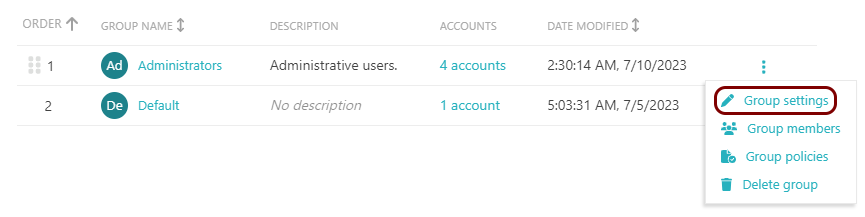
  2. Click on the  ⋮  icon next to the group name and select the Group settings option.
  3. In the TACACS+ access section, configure MFA:
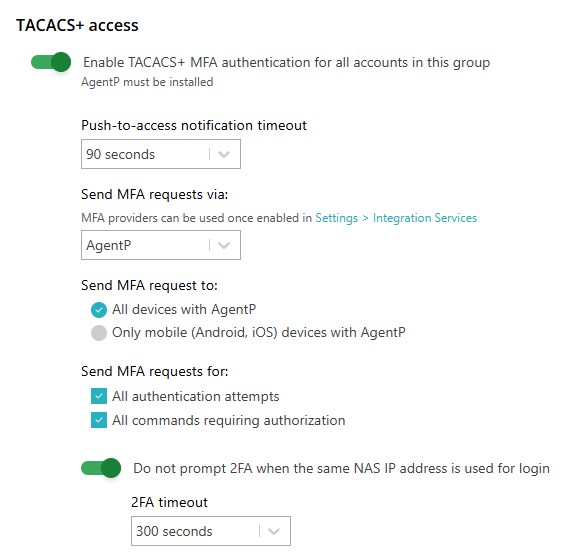
    1. Activate the Enable TACACS+ MFA authentication for all accounts in this group switch.
    2. In the Push-to-access notification timeout field, select how long the user has to confirm the MFA request.
    3. In the Send MFA requests via field, select AgentP.
    4. In the Send MFA request to section, select which AgentP installations receive the MFA request:
      • All devices with AgentP: users can confirm the request on any device with AgentP, including computers.

      • Only mobile (Android, iOS) devices with AgentP: users can confirm the request only on their phones or tablets.

    5. In the Send MFA requests for section, select when Portnox Cloud sends an MFA request:
      • All authentication attempts: each time the user logs in to a NAS device.

      • All commands requiring authorization: each time the user runs a command that the NAS device sends to TACACS+ for authorization.

    6. Optional: To reduce the number of MFA requests, activate the Do not prompt 2FA when the same NAS IP address is used for login switch. Then, in the 2FA timeout field, select how long Portnox Cloud trusts the NAS IP address after the user confirms an MFA request.

      During the 2FA timeout, Portnox Cloud doesn’t send new MFA requests for logins from the same NAS device. Use this option if administrators often open several sessions to the same device in a short time. A shorter timeout is more secure.

  4. To save your group settings, click on the Save button on the bottom right of the page.
Use Okta Verify for TACACS+ MFA

In this section, you will learn how to configure Okta and Portnox Cloud to send TACACS+ MFA requests as Okta Verify push notifications to users in a group.

Before you begin:

  • Integrate Okta as your authentication repository (see the following topic: Integrate with Okta Workforce Identity). Only Okta users can use this option.

  • Make sure users have Okta Verify enrolled on their Android or iOS devices.

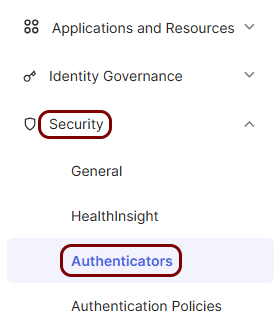
  1. In the Okta Admin Console, in the left-hand menu, click on Security > Authenticators.

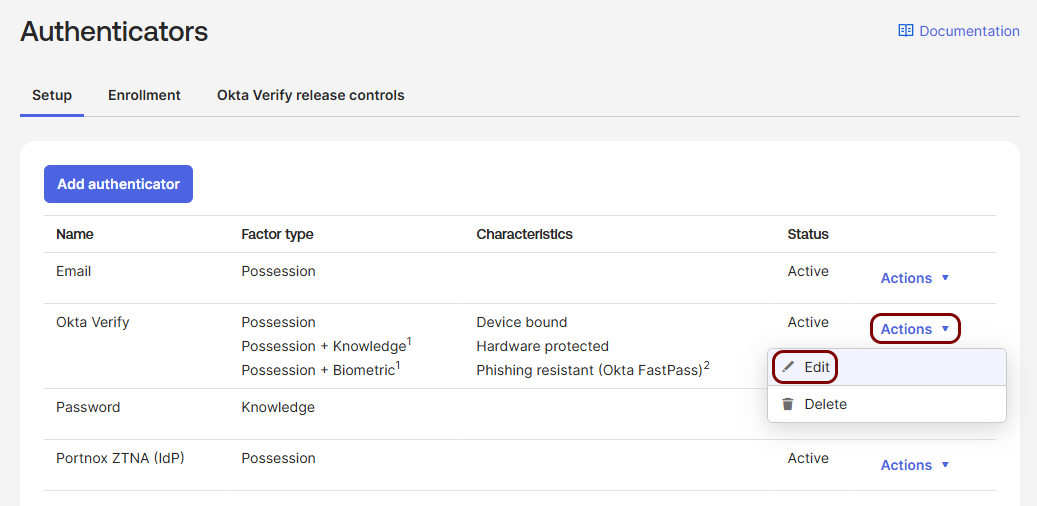
  2. In the Authenticators page, in the Okta Verify row, click on Actions > Edit.

  3. In the Okta Verify pane, turn on push notifications:
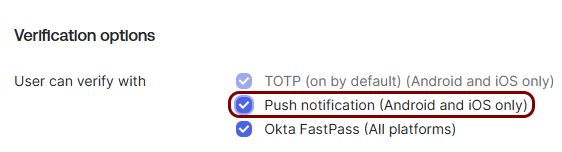
    1. In the Verification options section, select the Push notification (Android and iOS only) checkbox.

      If push notifications are off, no push reaches the user and the login fails with an MFA timeout.

    2. Click on the Save button at the bottom of the pane.
  4. In the Cloud portal top menu, click on the Groups option.

  5. Click on the  ⋮  icon next to the group name and select the Group settings option.

  6. In the TACACS+ access section, configure MFA:
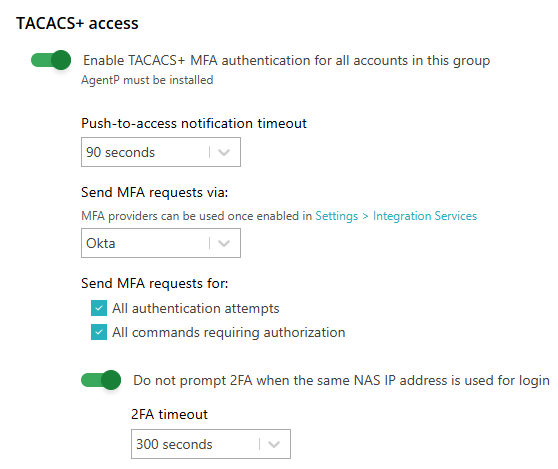
    1. Activate the Enable TACACS+ MFA authentication for all accounts in this group switch.
    2. In the Push-to-access notification timeout field, select how long the user has to confirm the MFA request.
    3. In the Send MFA requests via field, select Okta.
    4. In the Send MFA requests for section, select when Portnox Cloud sends an MFA request:
      • All authentication attempts: each time the user logs in to a NAS device.

      • All commands requiring authorization: each time the user runs a command that the NAS device sends to TACACS+ for authorization.

    5. Optional: To reduce the number of MFA requests, activate the Do not prompt 2FA when the same NAS IP address is used for login switch. Then, in the 2FA timeout field, select how long Portnox Cloud trusts the NAS IP address after the user confirms an MFA request.

      During the 2FA timeout, Portnox Cloud doesn’t send new MFA requests for logins from the same NAS device. Use this option if administrators often open several sessions to the same device in a short time. A shorter timeout is more secure.

  7. To save your group settings, click on the Save button on the bottom right of the page.

Use Cisco Duo for TACACS+ MFA

In this section, you will learn how to configure Cisco Duo and Portnox Cloud to send TACACS+ MFA requests as Duo push notifications to users in a group.

Before you begin:

  • You need a Cisco Duo account with access to the Duo Admin Panel.

  • Add all users who will use TACACS+ MFA to Duo. Each Duo username must match the user’s TACACS+ username exactly, for example kosh@vorlon.com. If it doesn’t, Portnox Cloud reports that the account is not a Cisco Duo account.

  • Make sure each user has a phone or tablet added in Duo and activated in the Duo Mobile app.

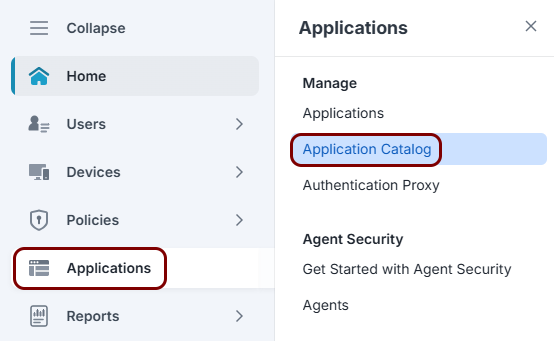
  1. In the Duo Admin Panel, in the left-hand menu, click on Applications > Application Catalog.

  2. In the Application Catalog page, search for auth api and click on the Add button on the Auth API tile.
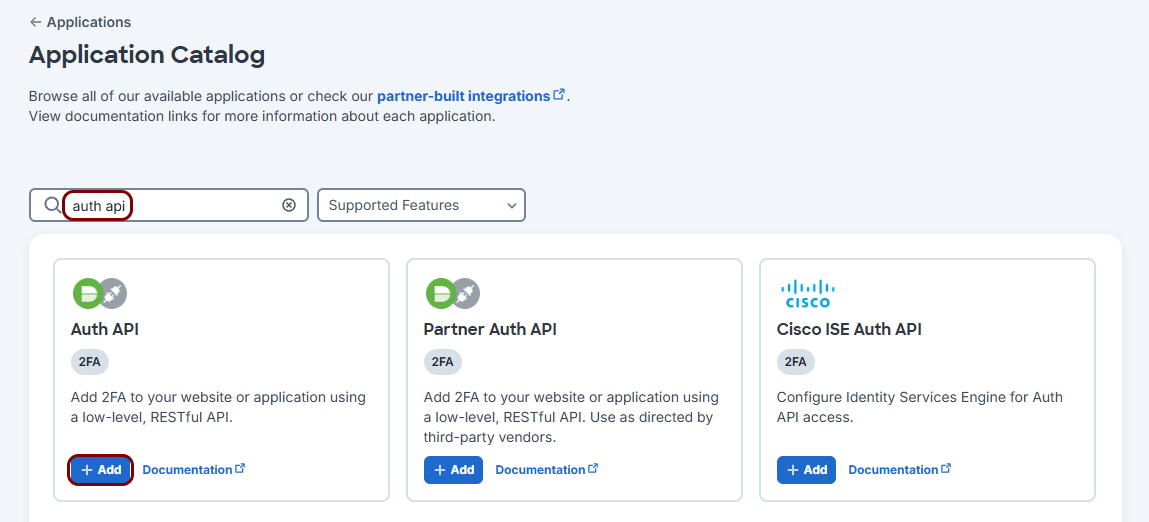
  3. In the Auth API page, configure the application:
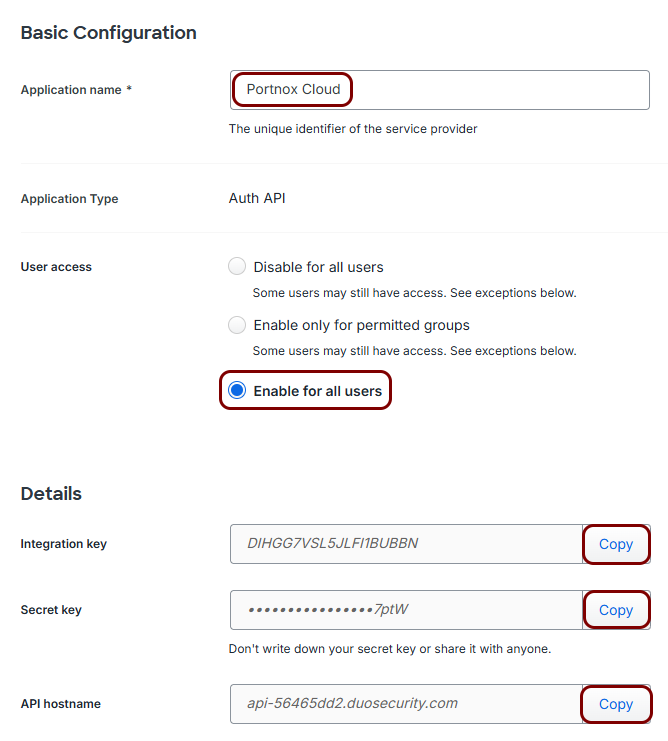
    1. Optional: In the Application name field, enter a name, for example Portnox Cloud.
    2. In the User access section, select Enable for all users or Enable only for permitted groups.

      With the default Disable for all users setting, Duo denies all requests. Portnox Cloud then reports that the Cisco Duo account is locked or disabled.

    3. In the Details section, copy the Integration key, Secret key, and API hostname values to a temporary text file.

      You need these values in the next step.

    4. Click on the Save button at the bottom of the page.
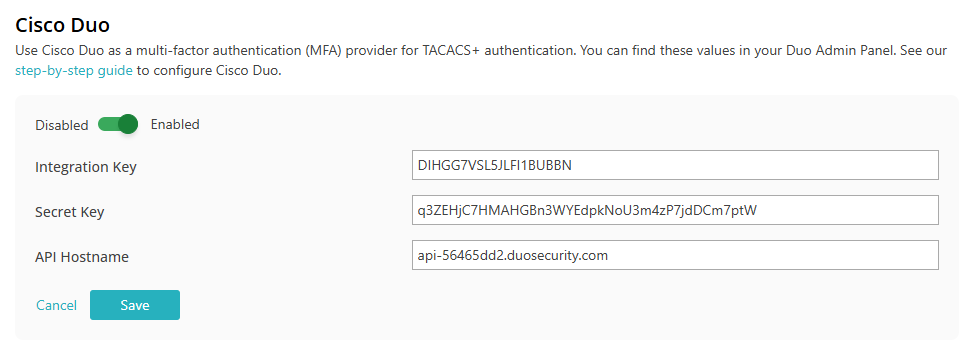
  4. In Portnox Cloud, go to Settings > Integration Services > CISCO DUO and configure the integration:

    1. Click on the Edit link and activate the switch.
    2. Paste the values from Duo into the Integration Key, Secret Key, and API Hostname fields.
    3. Click on the Save button.
  5. In the Cloud portal top menu, click on the Groups option.

  6. Click on the  ⋮  icon next to the group name and select the Group settings option.

  7. In the TACACS+ access section, configure MFA:
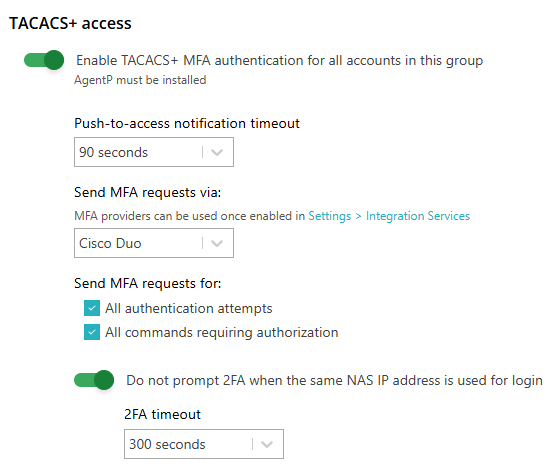
    1. Activate the Enable TACACS+ MFA authentication for all accounts in this group switch.
    2. In the Push-to-access notification timeout field, select how long the user has to confirm the MFA request.
    3. In the Send MFA requests via field, select Cisco Duo.
    4. In the Send MFA requests for section, select when Portnox Cloud sends an MFA request:
      • All authentication attempts: each time the user logs in to a NAS device.

      • All commands requiring authorization: each time the user runs a command that the NAS device sends to TACACS+ for authorization.

    5. Optional: To reduce the number of MFA requests, activate the Do not prompt 2FA when the same NAS IP address is used for login switch. Then, in the 2FA timeout field, select how long Portnox Cloud trusts the NAS IP address after the user confirms an MFA request.

      During the 2FA timeout, Portnox Cloud doesn’t send new MFA requests for logins from the same NAS device. Use this option if administrators often open several sessions to the same device in a short time. A shorter timeout is more secure.

  8. To save your group settings, click on the Save button on the bottom right of the page.