Turn on MAC address spoofing protection by IoT fingerprinting
In this topic, you will learn how to turn on and use MAC address spoofing protection in Portnox™ Cloud.
MAC spoofing is a malicious attack method in which the attacker modifies an Ethernet interface’s MAC address on their device to correspond with another device’s MAC address. If certain devices on your network are authorized based only on their MAC addresses, the attacker can unplug the approved device from the network and connect their own device, gaining the same level of network access as the original device.
Portnox Cloud MAC-based authentication detects such attacks and can either raise an alert or disconnect the rogue device. Portnox Cloud functionality called IoT fingerprinting records the device DHCP fingerprint, which is unique, and then checks if the device has the same fingerprinting when connecting again.
For IoT fingerprinting to work, the device must use DHCP to request an IP address, and you must have a DHCP forwarder on the same subnet. When the device connects to the network, it broadcasts its DHCP request in the subnet. The DHCP forwarder picks up the broadcast and forwards it to the Portnox Cloud IoT fingerprinting servers.
Turn on IoT fingerprinting
In this section, you will turn on the IoT fingerprinting functionality in Portnox Cloud™, which is necessary for MAC spoofing protection to work.
-
In the Cloud portal top menu, click on the Settings option.

-
In the Cloud portal left-hand side menu, click on the option.

-
In the right-hand side pane, under the Agentless IoT Device Fingerprinting heading, click on
the Edit link.

-
Click on the Enable Agentless IoT Device Fingerprinting checkbox to activate it, and then
click on the Save button to save the configuration.

Turn on MAC spoofing protection
In this section, you will turn on the MAC spoofing protection for a specific Portnox Cloud™ MAC-based account.
-
In the Cloud portal top menu, click on the Devices option.

-
Click on the row that represents a MAC-based account and then click on the Edit button above
to edit the account settings.

To learn how to create a MAC-based account, read the following topic: Create a MAC-based account.
-
On the account settings screen, scroll down to the IoT Device Trust section, activate the
Enable IoT Device Trust checkbox, and then click on the Save
account button in the top-right corner of the screen.

The IoT Device Trust (MAC spoofing protection) functionality can function in one of two different modes:
- Send a warning alert if this account is suspected of being the victim of MAC spoofing. Devices under this account will still be allowed access to the corporate network.
- Block devices from accessing the corporate network and send an alert if this account is the victim of MAC spoofing.
In this example, we’re using alerts only. To use the second option and block devices from accessing the network, you need to enable the RADIUS Change of Authorization feature by following the steps in this topic: Enable the RADIUS Change of Authorization feature.
Set up the DHCP forwarder
In this section, we will set up a DHCP forwarder to forward DHCP broadcasts to the Portnox™ Cloud IoT fingerprinting servers.

You have two options to set up a DHCP forwarder:
-
If you have a Layer 3 device such as a router and this device has DHCP forwarder functionality, you can set this device to forward DHCP broadcasts to the Cloud IoT fingerprinting servers. The device must be connected to the same subnet as the devices to be fingerprinted. If you choose this option, follow the device manufacturer instructions to set up DHCP forwarding and forward all DHCP requests to one or both of the following IP addresses on port 67:
- 20.241.131.45 if you use the United States RADIUS server
- 20.4.128.229 if you use the Europe RADIUS server
Note:The device that acts as a DHCP forwarder cannot act as a DHCP server at the same time. -
If you do not have a Layer 3 device that can be used for DHCP forwarding, you can set up a physical or virtual machine on the same subnet to act as a forwarder. Portnox provides a Docker container with all the necessary functionality.
You can also use the Portnox DHCP forwarder if your firewall blocks port 67. The forwarder communicates with the Portnox Cloud servers on port 167 instead.
In this example, we show you how to configure the Portnox DHCP forwarder Docker container on an Ubuntu virtual machine in Oracle VirtualBox.
- Optional:
Monitor the Portnox DHCP forwarder logs.
$ sudo docker logs portnox-dhcp-relay -f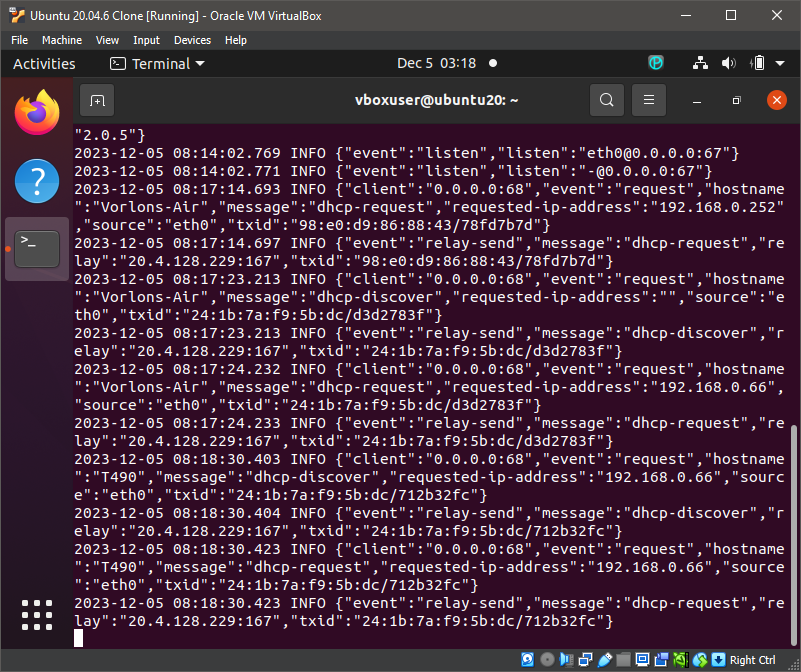
Test the forwarder connection
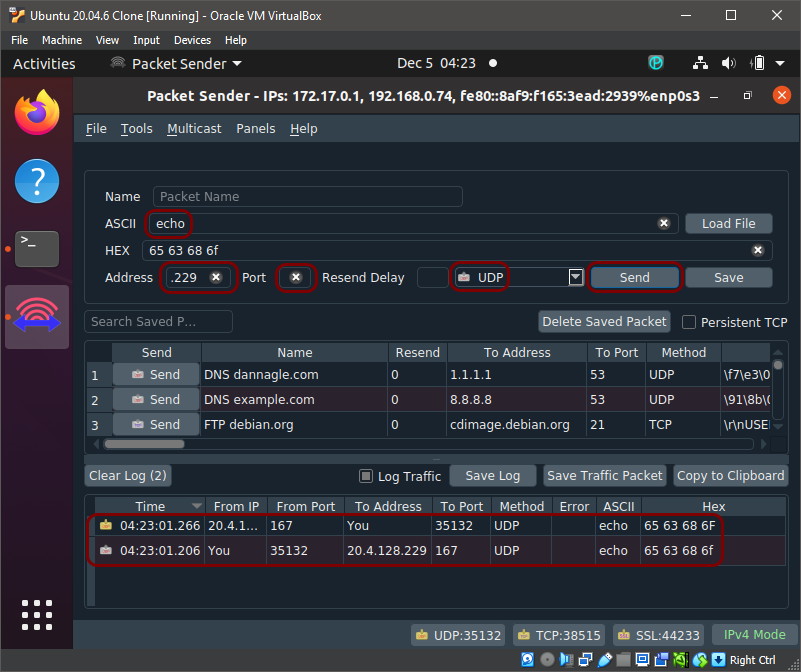
In this section, you will use the Packet Sender application to test the connection between the forwarder and Portnox Cloud IoT fingerprinting servers.
To make sure that your forwarder can connect to the Portnox Cloud servers, or to troubleshoot IoT fingerprinting problems, we recommend that you test if the UDP packets are reaching their destination. For this, we recommend that you use the open-source Packet Sender application.
In this example, we will install the Packet Sender application on the Ubuntu virtual machine in Oracle VirtualBox. This is the same machine that is running the DHCP forwarder.
-
Send an echo UDP packet to the Portnox Cloud IoT fingerprinting server.
Test the MAC spoofing protection
In this section, you will attempt MAC spoofing to test if Portnox MAC spoofing protection is working correctly.
To test MAC spoofing protection, you need two devices and you need to know how to change the MAC address of the second device to mimic the MAC address of the first device. In this example, we used a macOS laptop as the original device, and a Windows laptop as the spoofed device.
-
Connect the first device to the switch and check for an alert on the Portnox Cloud
Alerts screen.

-
Connect the spoofed device to the switch and check for an alert on the Portnox Cloud
Alerts screen.
