Wi-Fi employee access – Arista CV-CUE

In this topic, you will learn how to configure Arista™ CloudVision Cognitive Unified Edge (CV-CUE) to work together with Portnox™ Cloud and 802.1X RADIUS authentication for Wi-Fi connections.

Important:
This guide gives general instructions for integrating Portnox Cloud with specific third-party devices. We try to provide useful examples for common models, but settings can differ between manufacturers, models, and environments. Because of this, we cannot guarantee these steps will work in every case. For questions or problems with RADIUS setup – which is an industry standard and not specific to Portnox – or with device-specific settings and troubleshooting, we recommend checking the device manufacturer’s documentation and contacting their support team. Portnox Support can help when possible, but detailed setup of third-party devices is usually best handled by the manufacturer. We also recommend updating your NAS device firmware to the latest version, as old firmware can cause issues.
Important:
All values in this configuration are examples. Make sure to adjust the configuration to your individual profile names, RADIUS server addresses, ports, and keys by replacing the values that are presented as underlined italics.
Note:
This topic assumes that you already have at least one Arista access point registered and assigned to your Arista Cloud tenant. To access CV-CUE, log in to Arista Launchpad and click on the CV-CUE tile under Dashboard. CV-CUE opens in a new tab.
Important:
CV-CUE organizes configuration by locations (a tree of folders and floors). A location inherits its parent’s configuration, but a child location can have a customized configuration of its own. If a child location is customized, an SSID that you create at the parent is not automatically active there – you must turn it on, or configure it directly, at that location too. If Wi-Fi clients cannot see an SSID that you configured, check whether their location has a customized configuration.
Note:
This configuration was tested on Arista CV-CUE build 2026.08.31.1. The capabilities and the user interface on other versions of the platform may differ.

Create RADIUS server entries

In this section, you will create RADIUS server entries for the Portnox™ Cloud RADIUS servers. You will use these servers later when you configure your SSIDs.

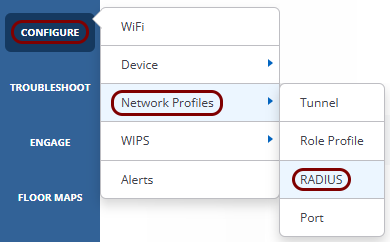
  1. In the left-hand side menu of CV-CUE, click on the following menu options: Configure > Network Profiles > RADIUS.

  2. Click on the Add RADIUS Server button in the top-right corner.
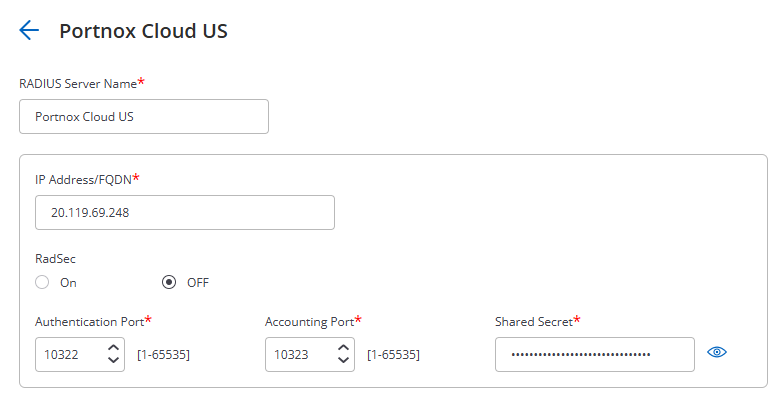
  3. Configure the new RADIUS server:

    1. In the RADIUS Server Name field, enter a display name for this server, for example, the name of the corresponding Portnox Cloud RADIUS server.
    2. In the IP Address/FQDN field, enter the Cloud RADIUS IP value from Portnox Cloud.
    3. In the Authentication Port and Accounting Port fields, enter the Authentication Port and Accounting Port values from Portnox Cloud.
    4. In the Shared Secret field, enter the Shared Secret value from Portnox Cloud.
    5. Click on the Save button.
  4. If you use two Cloud RADIUS servers in both regions, repeat the above steps for the second RADIUS server.
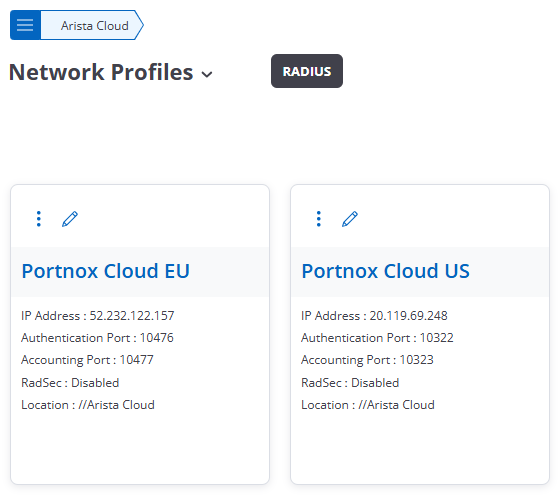
    The above screenshot shows an example configuration with two added RADIUS servers, one for each Cloud RADIUS region. Adjust the names, IP addresses, and port numbers to your tenant configuration.

Optional: Create RadSec server entries

This is an optional task. Follow this task only if you want to connect to Portnox Cloud RADIUS servers using RadSec.

Before you begin, in Portnox Cloud, go to Settings > Services > CLOUD RADIUS SERVICE > Cloud RADIUS instance, select the relevant RADIUS instance, select  ⋮  > Edit, activate the Enable RADIUS over TLS (RadSec) option, and disable the Validate NAS Client Certificate (RadSec) option. Then, click on the Save button.

Note:
Only Arista APs with the TPM module support RadSec. Check Arista documentation for your AP model to check if RadSec is supported. Some known supported models are: C-200, C-230, C-230E, C-330, C-360, C-460, C-460E, W-318, O-235, O-235E. Some unsupported models are: C-250, C-260, Wave 2 APs (1xx series of APs).
Note:
This task creates a one-way RadSec connection: the access point verifies Portnox Cloud, but Portnox Cloud does not verify the access point. For a mutually authenticated (mTLS) connection instead, you have two options:
  • Open a support ticket with Arista and request the certificate that signs the access point’s default device certificate (issued by CN=WiFi-TPM-Authority, O="Arista Networks, Inc.").

  • Generate a certificate signing request (CSR) for a new certificate tag in CV-CUE, sign it with your own self-signed certificate authority, and upload the resulting device certificate and CA certificate back into CV-CUE. Then, assign this new tag as the Certificate Tag for the RadSec server. For more information, see Arista documentation.

Whichever certificate authority you use, upload its certificate in Portnox Cloud under Settings > Services > GENERAL SETTINGS > Trusted Root Certificates. Then, under Settings > Services > CLOUD RADIUS SERVICE > Cloud RADIUS instance, edit the relevant instance and activate the Validate NAS Client Certificate (RadSec) checkbox.
  1. In the left-hand side menu of CV-CUE, click on the following menu options: Configure > Network Profiles > RADIUS.

  2. Click on the Add RADIUS Server button in the top-right corner.

  3. Configure the new RADIUS server:

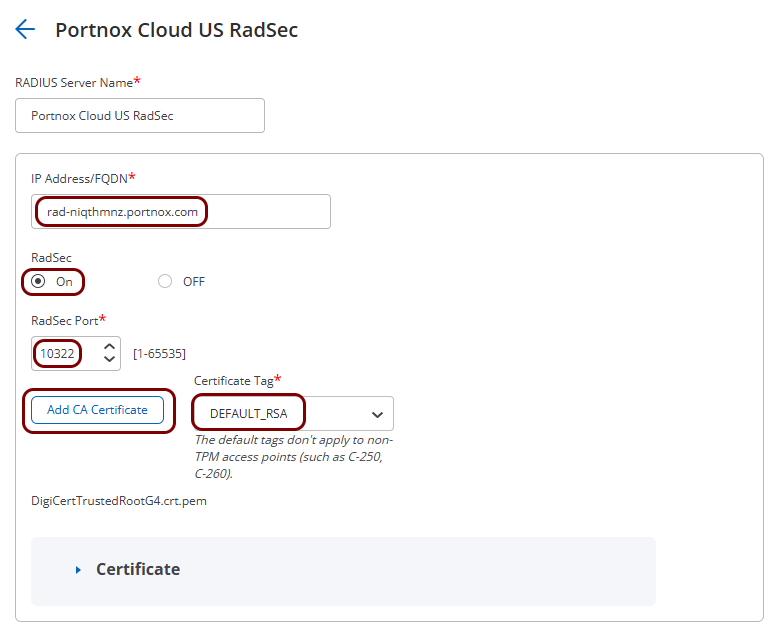
    1. In the RADIUS Server Name field, enter a display name for this server, for example, the name of the corresponding Portnox Cloud RADIUS server with a RadSec suffix, so you can tell it apart from a non-RadSec entry for the same server.
    2. In the IP Address/FQDN field, enter the FQDN (fully qualified domain name) of the Portnox Cloud RADIUS server, not its IP address.
      Warning:
      If you use the IP address, this configuration will not work.

      To find the FQDN of your Cloud RADIUS server, see the following topic: What are the fully qualified domain names (FQDNs) of Cloud RADIUS servers.

    3. Activate the On option next to RadSec.
    4. In the RadSec Port field, enter the authentication port value from Portnox Cloud.
    5. Download the DigiCert Trusted Root G4 certificate in PEM format: https://cacerts.digicert.com/DigiCertTrustedRootG4.crt.pem.
    6. Click on the Add CA Certificate button, and upload the certificate that you downloaded.
    7. In the Certificate Tag field, select the certificate tag that matches a valid certificate on your access point, for example DEFAULT_RSA for a TPM-equipped access point.
      Note:
      To check which certificate tags are valid for a specific access point, go to Monitor > WiFi, click on the Access Points tab, right-click the row representing the access point, and select Certificate > Manage Certificates. The default tags do not apply to access points without a TPM module (for example, the C-250 and C-260).
    8. Click on the Save button.
  4. If you use two Cloud RADIUS servers in both regions, repeat the above steps for the second RADIUS server.

Result: You created a RadSec-enabled RADIUS server entry. When you configure an SSID, activate the RadSec checkbox in the RADIUS Settings section to select this entry, instead of a non-RadSec entry, as described in the following topics.

Note:
To confirm that the RadSec tunnel is stable, go to Monitor > WiFi > Access Points, select the access point, and check the Event Logs tab for repeated established/down/reconnecting entries for the RadSec IP address. A healthy tunnel shows a single established entry that is not followed by a down/reconnecting cycle.

Create an SSID for 802.1X authentication

In this section, you will create a new SSID and configure it for WPA2 Enterprise authentication, using the RADIUS servers that you created earlier.

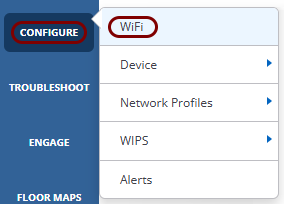
  1. In the left-hand side menu of CV-CUE, click on the following menu options: Configure > WiFi.

  2. Click on the Add SSID button in the top-right corner.
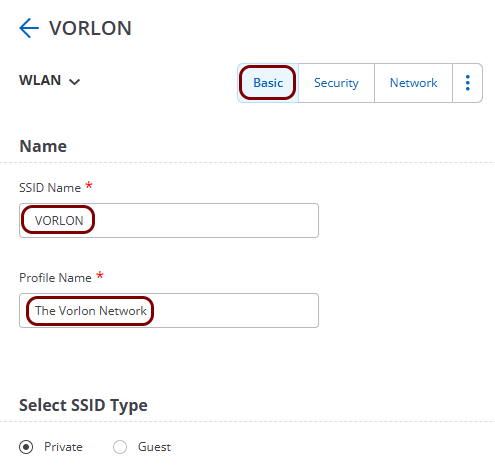
  3. On the Basic tab, in the SSID Name field, enter the network name that devices see when they search for Wi-Fi networks, in the Profile Name field, enter a name for this profile that is only used internally by CV-CUE, and leave Private selected under Select SSID Type.
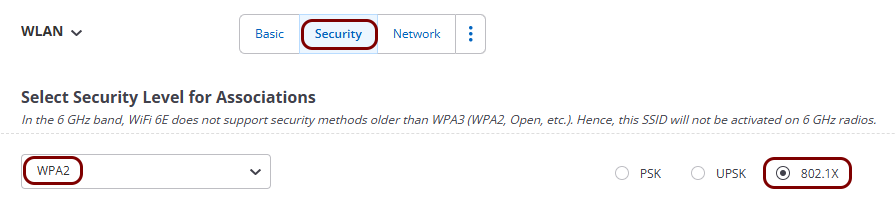
  4. On the Security tab, in the Select Security Level for Associations, section, select the WPA2 option, and then select the 802.1X option.
    Note:
    You can also select WPA3 or WPA/WPA2 Mixed Mode instead of WPA2. The RADIUS configuration is identical for every security level that offers the 802.1X option, so choose the protocol that matches the capabilities of devices on your network.
  5. In the RADIUS Settings section:
    1. Leave the RADIUS Pooling checkbox cleared.
      Note:
      Activate RADIUS Pooling only if you want CV-CUE to send authentication requests to a pool of up to four RADIUS servers instead of using a primary and a secondary server only. Whether to use pooling depends on how you want to manage RADIUS failover in your environment. This option may be useful, for example, if you want to run a pool of local RADIUS servers instead of using the Cloud RADIUS servers.
    2. Leave the RadSec checkbox cleared, unless you want this SSID to use only RadSec RADIUS servers.
      Note:
      If you activate this checkbox, the Authentication Server and Accounting Server fields list only the RADIUS server entries that you configured for RadSec.
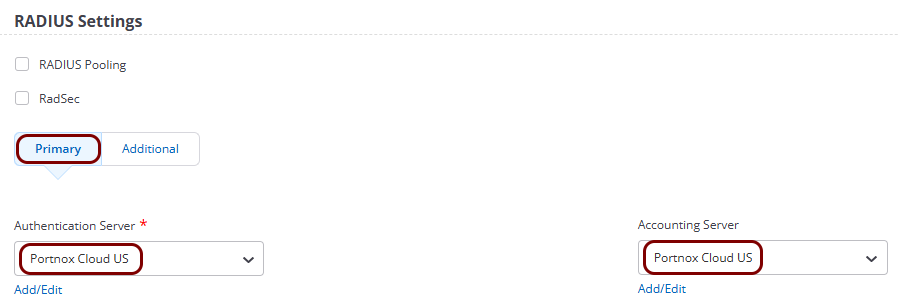
  6. On the Primary tab, in the Authentication Server and Accounting Server fields, select the relevant RADIUS server that you created earlier.
    Note:
    If you use two Cloud RADIUS servers, click on the Additional tab and select the second RADIUS server there.
  7. On the Network tab, leave the settings at their default values unless your environment requires otherwise, and click on the Save & Turn SSID On button.

Result: You created an SSID that authenticates employee Wi-Fi devices using 802.1X and the Portnox Cloud RADIUS servers.

Optional: Create an SSID for MAC-based authentication

This is an optional task. Follow this task only if you want to authenticate devices, such as IoT devices, that do not support 802.1X, using their MAC address instead. Skip this task if you do not need MAC-based authentication.

Important:
CV-CUE does not let you combine 802.1X and MAC-based authentication on the same SSID. If you already selected the 802.1X option on the Security tab of an SSID, CV-CUE grays out the RADIUS MAC Authentication option on the Access Control tab, since 802.1X is already a RADIUS-based mechanism. Create a separate SSID for MAC-based authentication instead, as described in this section.
  1. In the left-hand side menu of CV-CUE, click on the following menu options: Configure > WiFi.

  2. Click on the Add SSID button in the top-right corner.

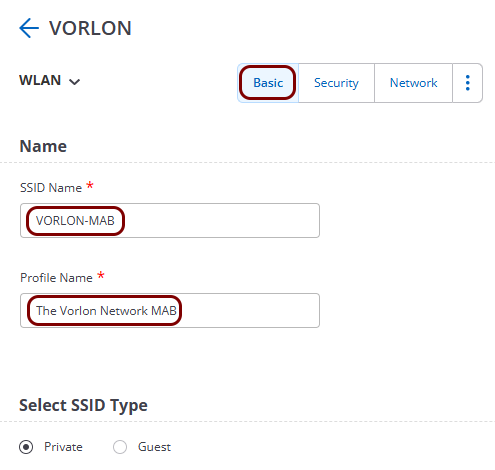
  3. On the Basic tab, in the SSID Name field, enter the network name that devices see when they search for Wi-Fi networks, in the Profile Name field, enter a name for this profile that is only used internally by CV-CUE, and leave Private selected under Select SSID Type.
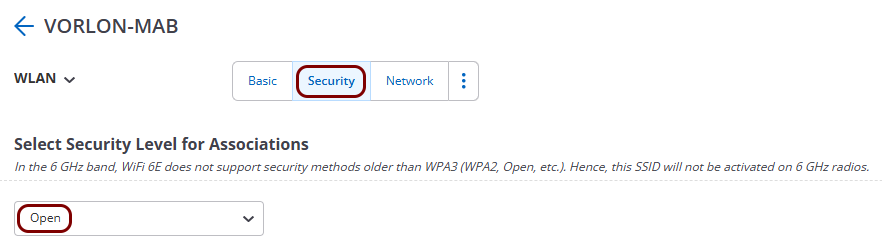
  4. On the Security tab, in the Select Security Level for Associations section, leave the option Open selected.
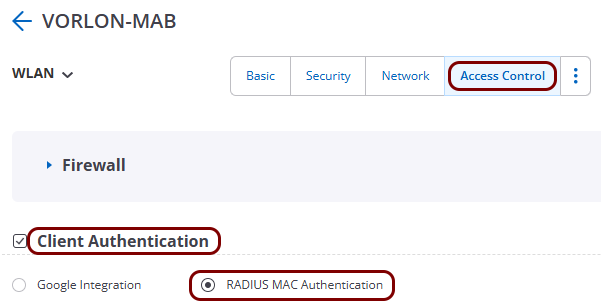
  5. Click on the  ⋮  icon next to the Network tab, and select the Access Control option from the list to open the Access Control tab. On this tab, activate the Client Authentication checkbox, and select the RADIUS MAC Authentication option.
  6. In the RADIUS Settings section:
    1. Leave the RADIUS Pooling checkbox cleared.
      Note:
      Activate RADIUS Pooling only if you want CV-CUE to send authentication requests to a pool of up to four RADIUS servers instead of using a primary and a secondary server only. Whether to use pooling depends on how you want to manage RADIUS failover in your environment. This option may be useful, for example, if you want to run a pool of local RADIUS servers instead of using the Cloud RADIUS servers.
    2. Leave the RadSec checkbox cleared, unless you want this SSID to use only RadSec RADIUS servers.
      Note:
      If you activate this checkbox, the Authentication Server and Accounting Server fields list only the RADIUS server entries that you configured for RadSec.
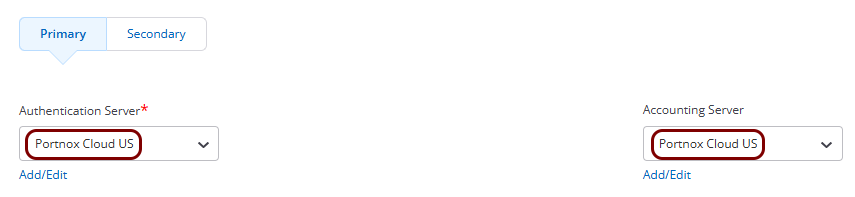
  7. On the Primary tab, in the Authentication Server and Accounting Server fields, select the RADIUS server that you created earlier.
    Note:
    If you use two Cloud RADIUS servers, click on the Secondary tab and select the second RADIUS server there.
  8. Deactivate the Change of Authorization (CoA) checkbox (activated by default).
    Warning:
    Cloud RADIUS servers do not support Change of Authorization (CoA), so deactivate this checkbox unless you use a local RADIUS server. If you want to use CoA, you must configure a local RADIUS server instead of, or in addition to, the Cloud RADIUS servers. For details, see the following topic: Enable the RADIUS Change of Authorization feature.
  9. Leave the remaining settings at their default values unless your environment requires otherwise, and click on the Save & Turn SSID On button.

Result: You created a separate SSID that authenticates IoT devices by their MAC address using the Portnox Cloud RADIUS servers on the basis of MAC-based accounts.