Wi-Fi employee access – Mist
In this topic, you will learn how to configure the Mist Cloud to work together with Portnox™ Cloud and 802.1X RADIUS authentication for Wi-Fi connections.
WPA2/WPA3 Enterprise
In this section, you will configure your Mist Cloud AP to work with WPA2/WPA3 Enterprise and Portnox Cloud RADIUS servers.
-
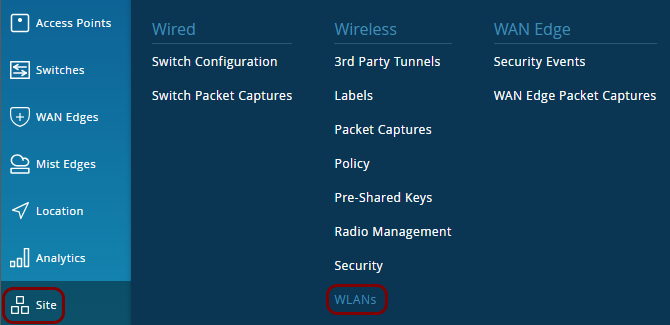
In the Mist Cloud, navigate to
.
-
In the WLANs pane, click on the Add WLAN button in the top-right
corner.
-
In the New WLAN pane, in the SSID field, type the SSID of your new
WLAN.
-
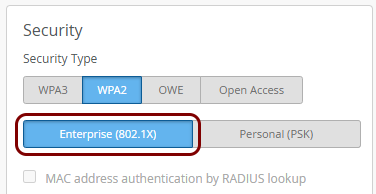
In the Security section, click on either the WPA3 or the
WPA2 tile, and then click on the Enterprise (802.1X) tile
below.
-
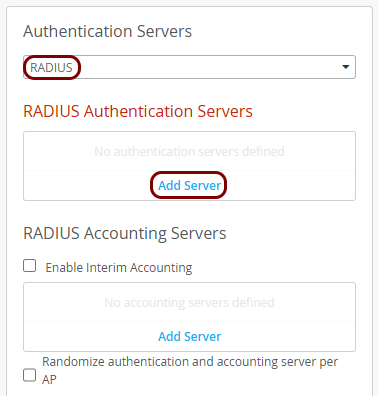
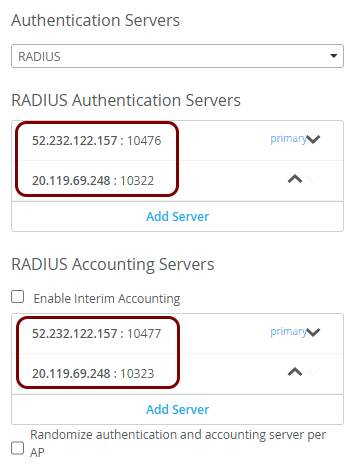
In the Authentication Servers section, select the RADIUS option, and
then in the RADIUS Authentication Servers section, click on the Add
Server link.
-
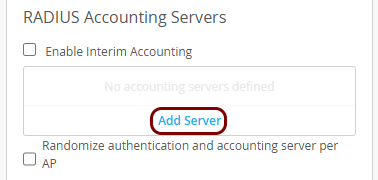
In the RADIUS Accounting Servers section, click on the Add Server
link.
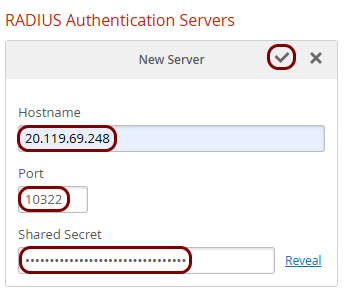
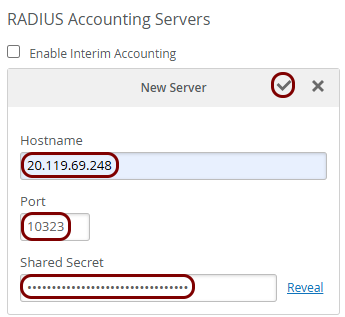
- In the Hostname field in Mist Cloud, enter the Cloud RADIUS IP value from Portnox Cloud.
- In the Port field in Mist Cloud, enter the Accounting Port value from Portnox Cloud.
- In the Shared Secret field in Mist Cloud, enter the Shared Secret value from Portnox Cloud.
- Optional:
Repeat the above steps for the other cloud RADIUS server, if necessary, or for both cloud RADIUS servers if you
added your local RADIUS server as the primary server.
- In all other sections of the New WLAN pane, either leave the default values or configure the values as required for your WLAN environment. These fields are not related to Portnox Cloud or RADIUS authentication.
-
Click on the Create button in the top-right corner of the New WLAN pane
to create the new WLAN.
Identity PSK (IPSK)
In this section, you will configure your Mist Cloud AP to work with identity pre-shared keys (IPSK) and Portnox Cloud.
-
In the Mist Cloud, navigate to
.
-
In the WLANs pane, click on the Add WLAN button in the top-right
corner.
-
In the New WLAN pane, in the SSID field, type the SSID of your new
WLAN.
Important: You cannot use the same SSID for both WPA2/WPA3 Enterprise authentication and IPSK authentication, so you need to create separate SSIDs.
-
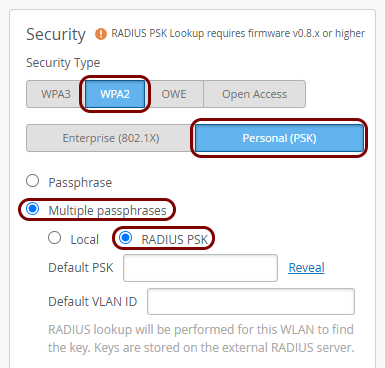
In the Security section, click on the WPA2 tile, then click on the
Personal (PSK) tile below, then select the Multiple passphrases
option, and select the RADIUS PSK option.
-
In the Authentication Servers section, select the RADIUS option, and
then in the RADIUS Authentication Servers section, click on the Add
Server link.
-
In the RADIUS Accounting Servers section, click on the Add Server
link.
- In the Hostname field in Mist Cloud, enter the Cloud RADIUS IP value from Portnox Cloud.
- In the Port field in Mist Cloud, enter the Accounting Port value from Portnox Cloud.
- In the Shared Secret field in Mist Cloud, enter the Shared Secret value from Portnox Cloud.
- Optional:
Repeat the above steps for the other cloud RADIUS server, if necessary, or for both cloud RADIUS servers if you
added your local RADIUS server as the primary server.
- In all other sections of the New WLAN pane, either leave the default values or configure the values as required for your WLAN environment. These fields are not related to Portnox Cloud or RADIUS authentication.
-
Click on the Create button in the top-right corner of the New WLAN pane
to create the new WLAN.