
Wi-Fi employee access for Zyxel Nebula
In this topic, you will learn how to configure access points managed by Zyxel Nebula Control Center to work together with Portnox™ Cloud for 802.1X and MAC-based authentication of Wi-Fi connections.
Create an SSID for 802.1X authentication
In this section, you will create a new SSID and configure it for WPA2 or WPA3 Enterprise authentication, using the Portnox™ Cloud RADIUS servers.
-
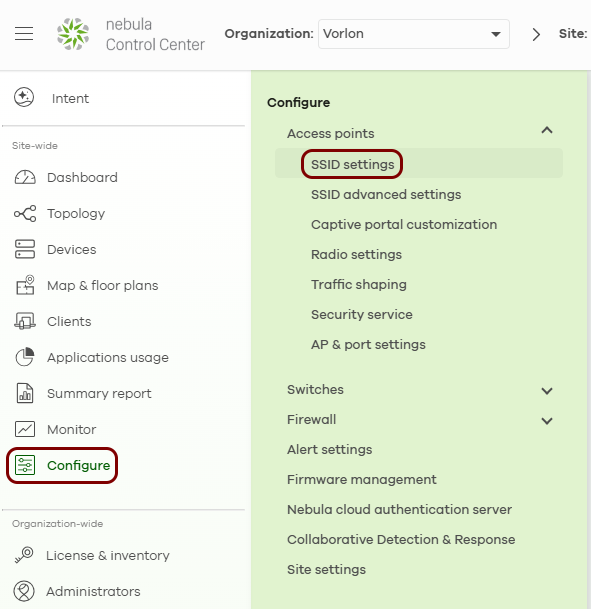
In Nebula Control Center, in the left-hand side menu, click on the following menu options: .
-
In the SSID settings pane, activate the Advanced mode switch, and then
click on the Add SSID network button.
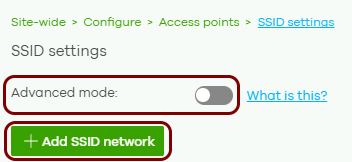 Note:Without advanced mode, the pane shows a simplified view with only the Open and Password security options. Advanced mode changes only which fields are visible. It does not change your configuration.
Result: A new SSID column appears to the right of the existing SSIDs.
-
In the new SSID column, click on the Edit link in the SSID settings
row.
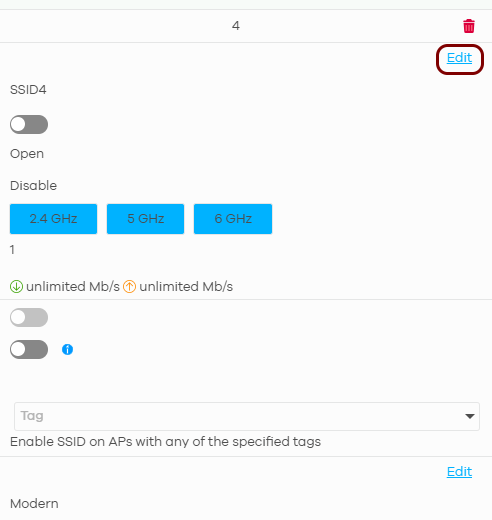
Result: The SSID advanced settings screen opens.
-
In the Basic Info section, in the SSID name field, enter the network
name that devices see when they search for Wi-Fi networks, and activate the Enabled
switch.

-
In the Network access section, next to the Security options
label:
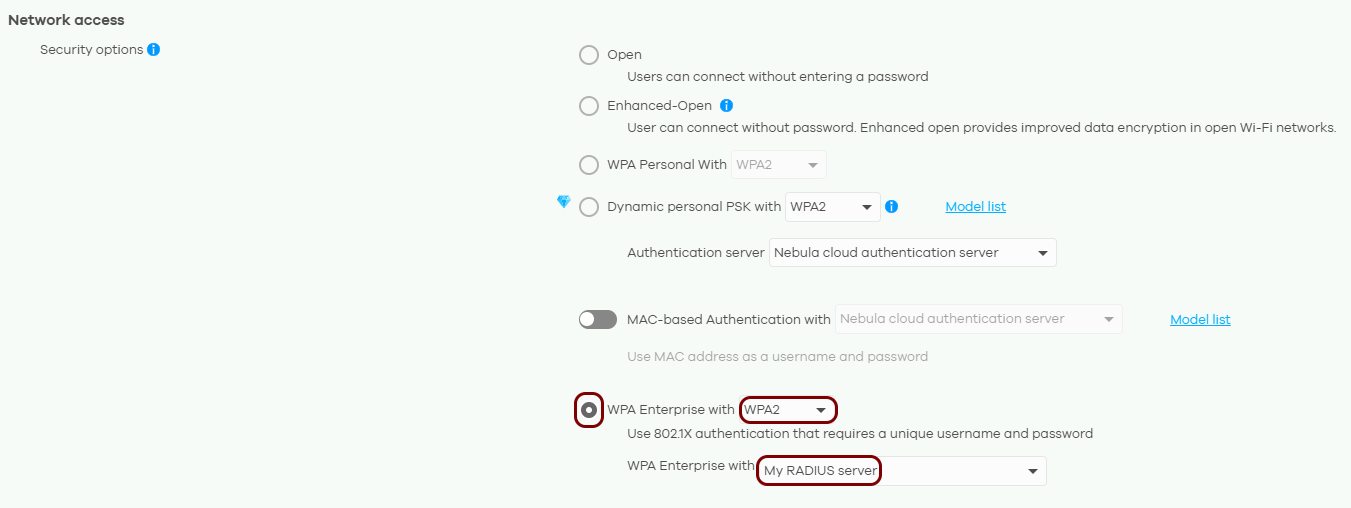
Result: The RADIUS server section appears below.
-
In the RADIUS server section, enter the details of the Portnox Cloud RADIUS server that you created earlier:

-
In the RADIUS accounting field, select the RADIUS accounting enabled
option. Then, in the RADIUS accounting servers table that appears, enter the same details as
in the previous step, but in the Port field, enter the Accounting port
value from Portnox Cloud.

-
In the SSID settings pane, click on the Save button.
 Important:If you leave the SSID settings pane without clicking on the Save button, you lose all changes made on the SSID advanced settings screen.
The access points receive the new configuration within 1 to 2 minutes.
Result: You created an SSID that authenticates employee Wi-Fi devices using 802.1X and the Portnox Cloud RADIUS servers.
Optional: Create an SSID for MAC-based authentication
This is an optional task. Follow this task only if you want to authenticate devices, such as IoT devices, that do not support 802.1X, using their MAC address instead. Skip this task if you do not need MAC-based authentication.
-
In Nebula Control Center, in the left-hand side menu, click on the following menu options: .
-
In the SSID settings pane, activate the Advanced mode switch, and then
click on the Add SSID network button.
Note:Without advanced mode, the pane shows a simplified view with only the Open and Password security options. Advanced mode changes only which fields are visible. It does not change your configuration.
Result: A new SSID column appears to the right of the existing SSIDs.
-
In the new SSID column, click on the Edit link in the SSID settings
row.
Result: The SSID advanced settings screen opens.
-
In the Basic Info section, in the SSID name field, enter the network
name that devices see when they search for Wi-Fi networks, and activate the Enabled
switch.

-
In the Network access section, next to the Security options
label:
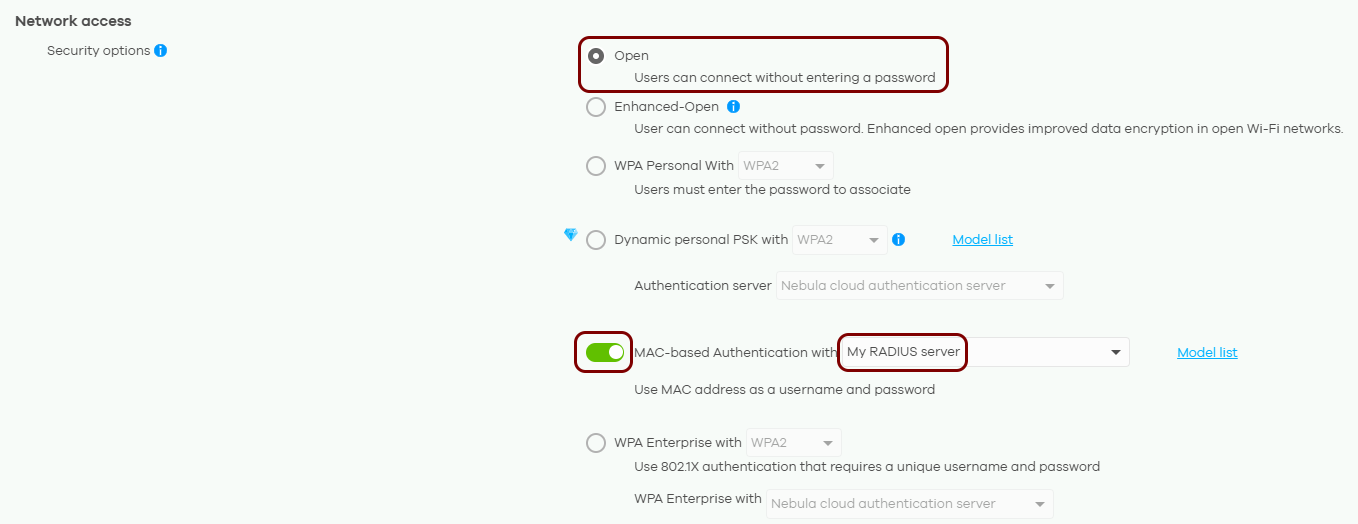
- Select the Open option.
- Activate the MAC-based Authentication with switch, and in the field next to it, select the My RADIUS server option.
Result: The RADIUS server section appears below.
-
In the RADIUS server section, enter the details of the Portnox Cloud RADIUS server that you created earlier:

-
In the RADIUS accounting field, select the RADIUS accounting enabled
option. Then, in the RADIUS accounting servers table that appears, enter the same details as
in the previous step, but in the Port field, enter the Accounting port
value from Portnox Cloud.
-
In the SSID settings pane, click on the Save button.
Important:If you leave the SSID settings pane without clicking on the Save button, you lose all changes made on the SSID advanced settings screen.
The access points receive the new configuration within 1 to 2 minutes.
Result: You created a separate SSID that authenticates IoT devices by their MAC address using the Portnox Cloud RADIUS servers on the basis of MAC-based accounts.