Onboard an iPhone to a Wi-Fi network with credentials and a custom profile
In this topic, you will learn how to onboard using credentials, an iPhone with iOS, a Wi-Fi network managed by Portnox™ Cloud, and a custom profile created with the iMazing Profile Editor.
Download the root CA certificate
In this section, you will download the root CA certificate from Portnox™ Cloud, which is needed to create a profile.
-
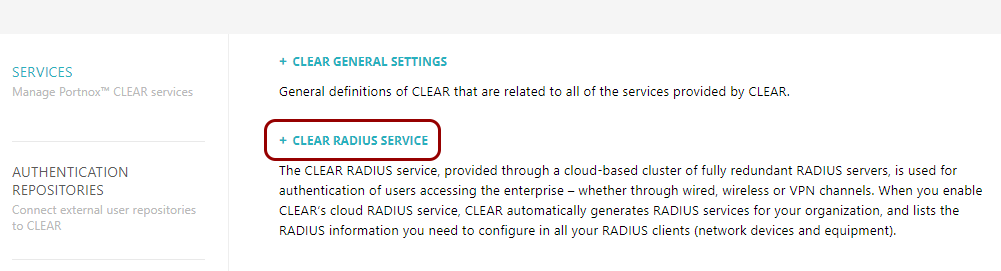
In the Cloud portal top menu, click on the Settings option.

-
In the Cloud portal left-hand side menu, click on the option.
-
Click on any of the RADIUS servers listed in the right-hand pane to show its configuration.

-
Click on the Download root certificate link.
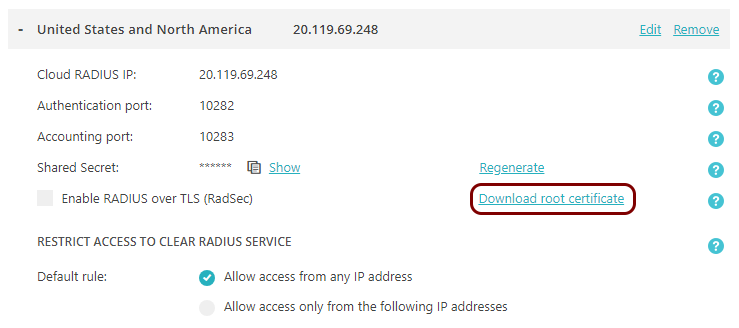
Result: The root CA certificate file is in the Downloads folder on the local disk.
Create the custom profile
In this section, you will use the iMazing Profile Editor to create an Apple profile for use with your iOS devices, which contains the following payloads: the root CA certificate and the Wi-Fi configuration.
-
Install the iMazing Profile
Editor and open it from the Launcher.
To install iMazing Profile Editor, follow the links from the iMazing website and the standard installation procedure in the operating system.
Note:By default, when you run iMazing Profile Editor, it opens a new profile window and the General section. If not, select from the top menu to open a new profile window.
-
In the right-hand side pane, in the Name section, enter a name for this profile.

We used the name Vorlon iOS but you can use any name you like.
-
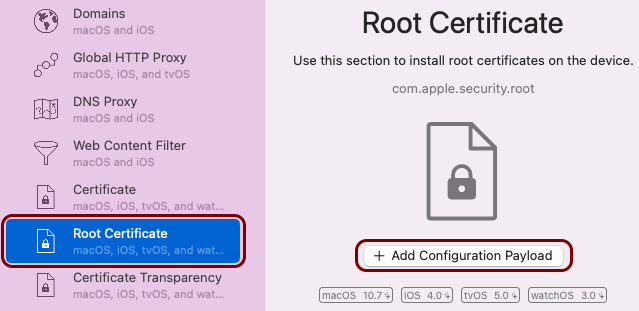
On the left-hand side of the profile window, scroll down to the Root Certificate icon, click
on it, and in the right-hand side pane click on the Add Configuration Payload button.
-
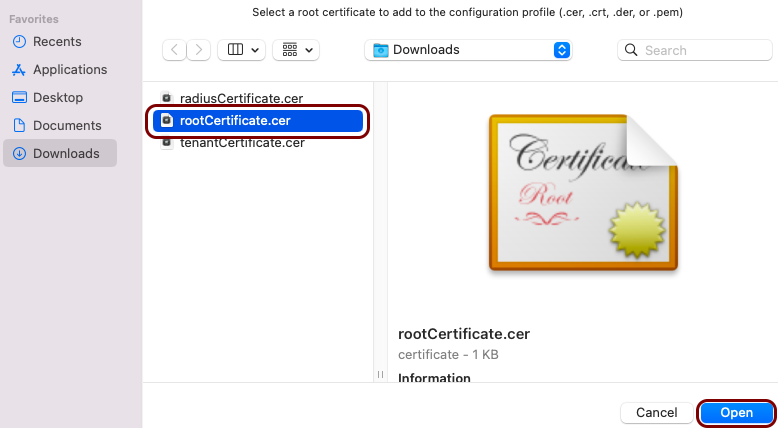
In the file selector, locate and click on the root CA certificate file, downloaded as described in the previous
section, and then click on the Open button.
-
Copy the value of the Payload UUID field and save it for later use.

You will need to add a reference to this root CA certificate in the Wi-Fi payload later, so that the device can confirm the identity of the RADIUS server.
Note:Make a note next to this value that says root CA UUID. -
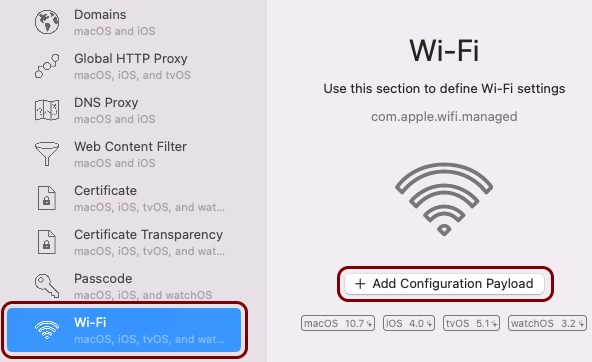
On the left-hand side of the profile window, scroll down to the Wi-Fi icon, click on it, and
in the right-hand side pane click on the Add Configuration Payload button.
-
In the Wi-Fi pane on the right-hand side, configure the following properties:
-
In the Service Set Identifier (SSID) section, enter the SSID of your Wi-Fi
network.

-
In the Accept EAP Types section, click on the + button, click on the added entry, and select
TTLS.

-
In the Username field, enter your username.
 Note:You can leave this field empty. If so, iOS will ask for the username when joining the enterprise network. This way you can prepare one profile that can later be used by many users.
 -
In the Password field, enter your password.
 Note:You can leave this field empty. If so, iOS will ask for the password when joining the enterprise network. This way, you can prepare a profile for another user.
 -
In the Certificate Anchor UUID section, click on the + button, and in the new entry field, paste the UUID that you copied
earlier as root CA UUID.
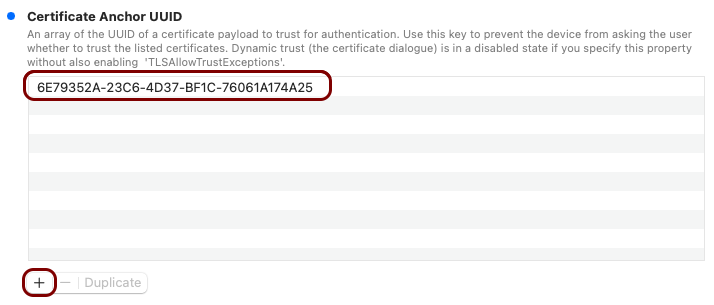
You need a reference to the root CA certificate so that the device can confirm that the Portnox RADIUS server is authentic.
-
In the Trusted Server Certificate Names section, click on the + button and in the new entry field, type
clear-rad.portnox.com.
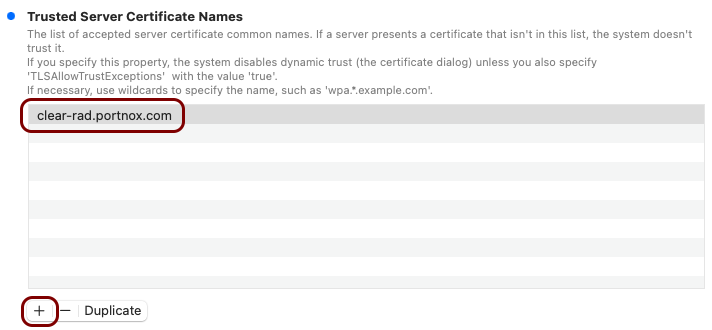 Note:To learn more about this option, read the following topic: Trusted certificate server names.
 -
In the Inner Authentication section, select the EAP
authentication method.
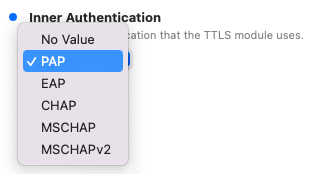 Note:The authentication method is the method used to communicate with internal or external authentication repositories. Different repositories may support different methods. For example, cloud-based repositories like Microsoft Entra ID, Google Workspace, and Okta supports PAP only, but AD supports MSCHAP. If you don’t know the correct method for your user repository, try different ones to see which one works. We also recommend that you read the following topic about the security of different authentication methods: EAP methods and their security.
-
In the Service Set Identifier (SSID) section, enter the SSID of your Wi-Fi
network.
Result: The custom profile file (.mobileconfig) is saved on the disk and ready to be copied to your iOS device.
Install the custom profile
In this section, you will learn how to install the custom profile on your iOS device.
Before you can install your custom profile, you need to copy it to your iOS device. For example, you can send the profile file using email, instant messaging, upload it to cloud storage, or transfer it using Bluetooth..
-
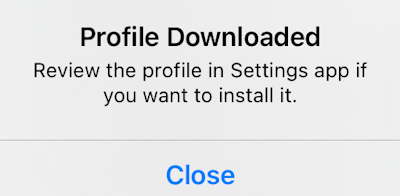
Open the profile that you copied from your macOS or Windows device. You will see a Profile
Downloaded pop-up. Press Close.
-
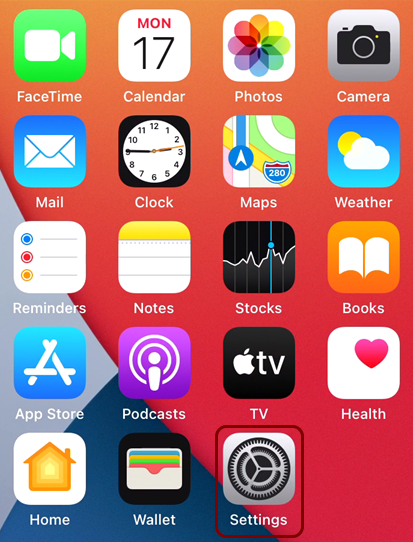
Press the Home button and press the icon of the Settings app.
-
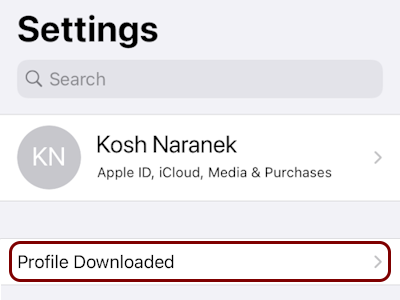
In the Settings app, press the Profile Downloaded row.
-
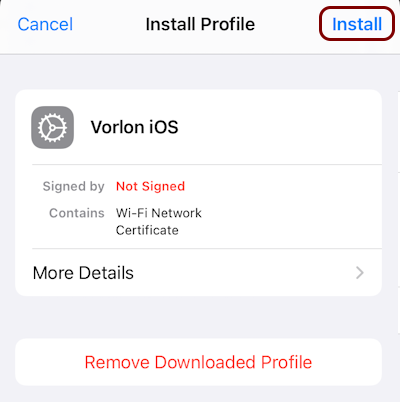
In the Install Profile pane, press Install.
-
Enter your passcode.

-
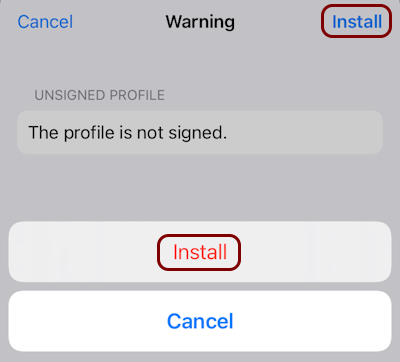
In the Warning pane, press Install in the top-right corner, and then
press Install below.
Result: You downloaded and installed the profile and can now connect to the enterprise network.
Troubleshooting information: See the following topic: How to troubleshoot typical device onboarding issues.