Onboard Windows devices with AgentP in unattended or kiosk mode

In this topic, you will learn how to run Portnox™ AgentP in unattended mode or kiosk mode.

Note: To learn about different AgentP operating and installation modes, see the following topic: AgentP working and installation modes.

Install AgentP on Windows in unattended mode

In this section, you will learn how to install AgentP in unattended mode. User interaction is only necessary if AgentP cannot be onboarded automatically.

Important: Standard AgentP unattended enrollment is only possible if the Windows device is a member of Active Directory or Azure (Entra ID), and Portnox Cloud is integrated with Active Directory or Azure.

If you run AgentP in unattended enrollment mode, AgentP checks if the device is a member of Active Directory or Azure, and then sends AD/Azure identification data to Portnox Cloud (for example, the tenant ID, device ID, domain, user name, computer name). If the identification data matches the data in Cloud, AgentP can onboard in Portnox Cloud automatically using this data with no need of user interaction.

  1. Download the AgentP installation file from the download page.
    curl -o agentp.msi "https://clear.portnox.com/enduser/DownloadAgentPForOsAndPackageType?osType=2&packageType=Windows_x64"

    Replace Windows_x64 with Windows_x86 if you have a 32-bit architecture.

  2. Run the installation from the command prompt with a parameter for unattended installation.
    msiexec /i agentp.msi /qn

When the onboarding window appears, one of two things can happen:

  • If AgentP finds that the device/user are already onboarded, the onboarding window disappears after 5 to 20 seconds (after enrollment is complete), and AgentP is automatically enrolled.
  • Otherwise, you must follow the steps in the onboarding window to enroll the current user manually. Until then, AgentP will not be enrolled.

Install AgentP on Windows in unattended mode with no user interaction

In this section, you will install AgentP in unattended mode using the logged-in Windows user. This procedure assumes that the computer was onboarded using UEM/MDM software and already has access to the secure network.

  1. Download the AgentP installation file from the download page.
    curl -o agentp.msi "https://clear.portnox.com/enduser/DownloadAgentPForOsAndPackageType?osType=2&packageType=Windows_x64"

    Replace Windows_x64 with Windows_x86 if you have a 32-bit architecture.

  2. Optional: Configure the Windows registry settings for AgentP to hide the icon from the notification area (system tray).
    1. Create a .reg file with the following content.
      Windows Registry Editor Version 5.00
                                      
      [HKEY_LOCAL_MACHINE\SOFTWARE\WOW6432Node\Portnox AgentP]
      "TrayIcon"="hide"
      
      
    2. Import the .reg file that you just created.
      regedit.exe /s your_reg_file.reg
  3. Run the installation from the command prompt with parameters for unattended installation and unattended enrollment.
    msiexec /i agentp.msi /qn UI_LAUNCH=1
  4. Optional: Check the AgentP logs to confirm that AgentP is running in unattended mode.

    The log file will contain an entry: Running in unattended mode.

    To learn how to access AgentP logs, see the following topic: How to collect AgentP logs for support.

Note: If AgentP cannot recognize the user/device as onboarded, it will show the onboarding window after it’s installed, even if you follow all the steps above. To make sure that no onboarding window is shown, ensure that your endpoint management software first onboards the user/device, and only then run AgentP installation. If the user/device is onboarded (can connect to the company network), and the onboarding window still appears, examine the AgentP logs for an underlying cause.

Switch to unattended enrollment mode on Windows

If you already installed Agent in interactive mode, you can change its configuration so that it runs in unattended mode (without user interaction).

  1. Change the Windows registry settings for AgentP to enable unattended enrollment.
    1. Create a .reg file with the following content.
      Windows Registry Editor Version 5.00
                                          
      [HKEY_LOCAL_MACHINE\SOFTWARE\WOW6432Node\Portnox AgentP]
      "Mode"="umode"
      
      
    2. Import the .reg file that you just created.
      regedit.exe /s your_reg_file.reg
  2. Restart the AgentP service.
    net stop PortnoxAgentP
    net start PortnoxAgentP
Important: If AgentP is already enrolled manually, before you switch to unattended mode, you must manually unenroll it by clicking on the Deactivate button in the AgentP user interface. Otherwise, AgentP will remain enrolled with the manually onboarded user and will not automatically switch to the current Active Directory or Azure user.

Switch to kiosk mode on Windows

If you already have AgentP installed in default (single-user) mode, you can change its configuration so that it runs in kiosk mode.

Important: This mode works only with authentication repositories that support computer accounts: Microsoft Azure (Entra ID) and Active Directory. This mode cannot be used with Okta Workforce Identity or Google Workspace.
  1. Configure the Windows registry settings for AgentP to work in kiosk mode.
    1. Create a .reg file with the following content.
      Windows Registry Editor Version 5.00
                                          
      [HKEY_LOCAL_MACHINE\SOFTWARE\WOW6432Node\Portnox AgentP]
      "Etype"="computer_account"
      
      
    2. Import the .reg file that you just created.
      regedit.exe /s your_reg_file.reg
  2. Restart the AgentP service.
    net stop PortnoxAgentP
    net start PortnoxAgentP

Install AgentP on Windows in unattended mode based on SCEP certificates

In this section, you will learn how to install AgentP in unattended mode if your Windows is not enrolled in Entra ID or Active Directory. However, this process requires UEM software.

The only way to achieve unattended AgentP user enrollment on a Windows computer not enrolled in Entra ID or Active Directory is by first installing a SCEP certificate on the computer. Then, install AgentP with a specific flag (registry key), which makes it enroll based on the data in the SCEP certificate. This allows you to install AgentP in unattended mode even with other authentication repositories like Okta and Google Workspace. However, the only way to get a SCEP certificate is by using UEM software.

  1. Install SCEP certificates on clients.

    Create a suitable configuration profile in your UEM software that makes the clients request SCEP certificates from the Portnox Cloud SCEP server.

  2. Install registry keys for AgentP on clients.

    The most common way that UEM software distributes registry keys is through PowerShell scripts (see: this external example). Consult your UEM documentation to learn how to distribute Windows registry keys.

    You need to distribute the following keys:

      • string value: EnrollmentIdentity
      • data: certificate
      • string value: EnrollmentCertificate
      • data: issuer:your_organization - Portnox CLEAR, which is the CN value in the Subject of your tenant CA certificate (Example: issuer:Vorlon - Portnox CLEAR).
    Note: To check the Subject of your tenant CA certificate, open the certificate on Windows, go to the Details tab, scroll down and click on the Subject entry, and note down the value after CN = in the text box below.

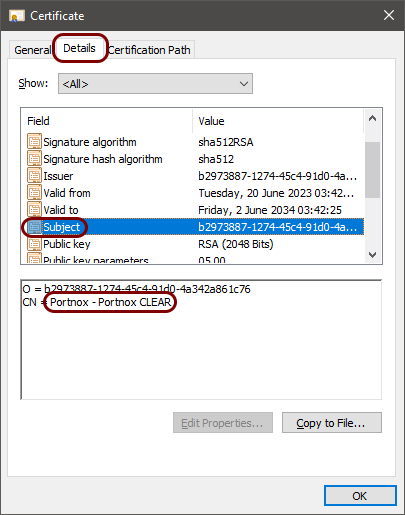
    Alternatively, you can find this value in Portnox Cloud: open the Settings menu, click on the CLEAR GENERAL SETTINGS heading, scroll down to the TRUSTED ROOT CERTIFICATES section, and in the table in this section, note down the value next to the Issued to label.

  3. Distribute AgentP to clients.

    Once the client Windows machines have the SCEP certificate installed and the required registry keys, you can now distribute AgentP. AgentP will detect the registry keys, use their values to select the correct certificate installed on the computer, and then use this certificate for unattended enrollment.

Install AgentP on macOS in unattended mode based on SCEP certificates

In this section, you will learn how to install AgentP in unattended mode on macOS. However, this process requires UEM software.

The only way to achieve unattended AgentP user enrollment on macOS is by first installing a SCEP certificate on the computer. Then, install AgentP with a specific configuration file, which makes it enroll based on the data in the SCEP certificate. However, the only way to get a SCEP certificate is by using UEM software.

  1. Install SCEP certificates on clients.

    Create a suitable configuration profile in your UEM software that makes the clients request SCEP certificates from the Portnox Cloud SCEP server.

  2. Install a configuration script on clients.

    You need to distribute the following configuration script, which creates the unattended.cfg and uipreferences.cfg files in the /var/agentp directory before the installation of AgentP:

    mkdir -p /var/agentp
    json='{"Mode":"certificate","Certificate":"issuer:issued_to","User":"[current]","AutoSwitch":true,"UseCertificateSerialNumberAsDeviceId":true,"Domain":"your_domain","profileInstallationNeeded":false}'
    echo $json > /var/agentp/unattended.cfg
    chmod a+rw /var/agentp
    chmod a+rw /var/agentp/unattended.cfg
    Note: For explanation of configuration options in this script, see the following topic: AgentP configuration/installation options.
    1. As issued_to, paste the CN value of your tenant CA certificate: your_organization - Portnox CLEAR.

      You can get this value by opening the certificate and checking the Subject field, or in Portnox Cloud: open the Settings menu, click on the CLEAR GENERAL SETTINGS heading, scroll down to the TRUSTED ROOT CERTIFICATES section, and in the table in this section, note down the value next to the Issued to label.

      For example:
      json='{"Mode":"certificate","Certificate":"issuer:Vorlon - Portnox CLEAR","User":"[current]","AutoSwitch":true,"UseCertificateSerialNumberAsDeviceId":true,"Domain":"your_domain","profileInstallationNeeded":false}'
    2. As your_domain, use the domain serviced by Portnox Cloud (the domain configured in your authentication repository integration).
      For example:
      json='{"Mode":"certificate","Certificate":"issuer:Vorlon - Portnox CLEAR","User":null,"AutoSwitch":true,"UseCertificateSerialNumberAsDeviceId":true,"Domain":"vorlon.com","profileInstallationNeeded":false}'
    Note: If you are using user-based certificates, not device-based certificates, you can remove the User value from the configuration string. Then, AgentP will use the certificate UPN or Subject as the user name.
  3. Distribute AgentP to clients.

    Once the client machines have the SCEP certificate and the configuration file, you can now distribute AgentP. AgentP will parse the configuration file, use the values from that file to select the correct SCEP certificate installed on the computer, and then use this certificate for unattended enrollment.

Examples: