
Onboard Chromebooks with certificates using Google Workspace and Google Cloud
In this topic, you will learn how to deploy Portnox™ Cloud certificates to Chromebook (ChromeOS) devices using Google Workspace and Google Cloud.
Before you can deploy Portnox Cloud certificates via Google Workspace and Google Cloud, you must complete the following steps:
-
If you plan to use device-based certificates, make sure your Chromebooks are running ChromeOS 138 or later.
-
Make sure that the Google administrator account that you will use for this configuration has the Shared Device Settings privileges.
-
Make sure your organization has an active Chrome Enterprise Upgrade (or Chrome Education Upgrade) license.
-
Have access to a Google Cloud project – either an existing one or a new one you create for this purpose – and administrative (Owner or equivalent) permissions on it. A billing account must be linked to the project; this does not mean you will be charged, but Google requires it to enable APIs. This process generates a small amount of traffic and stays well within Google’s free monthly usage tier even at high volume.
Download the root CA certificate from Portnox Cloud
In this section, you will download the Portnox™ Cloud root CA certificate from the Cloud portal and convert it to the Base-64 encoded X.509 format using a Windows computer.
You need the root CA certificate so that your managed devices can verify the validity of Cloud RADIUS servers, which have certificates signed by this root CA certificate. If the root CA certificate is not distributed to managed devices, some devices may show a security warning each time that the user connects to networks managed by Portnox Cloud.
-
In the Cloud portal top menu, click on the Settings option.

-
In the Cloud portal left-hand side menu, click on the option.
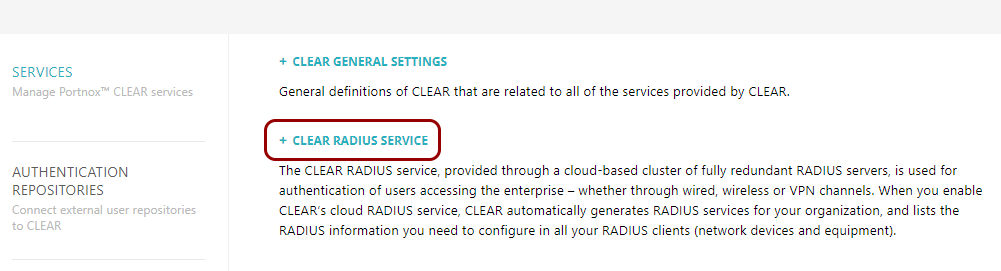
The right-hand pane shows the list of active servers.

-
Click on the Download root certificate link to download the root CA certificate.
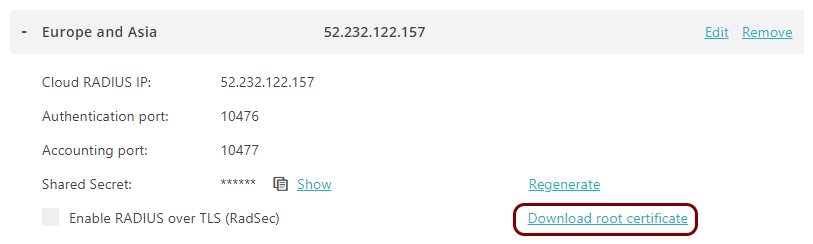
Save the file on your disk. The default name of the file is rootCertificate.cer.
-
In Windows, double-click on the downloaded file. In the Open File - Security Warning window,
click on the Open button.
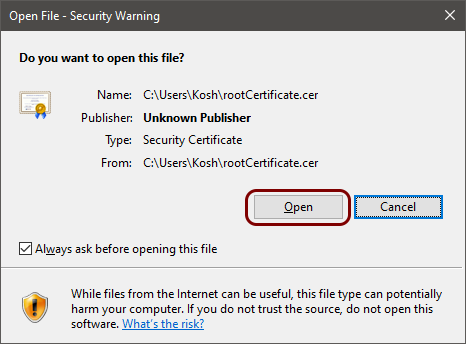
The file will be opened in the Windows certificate manager.
-
In the Certificate window, click on the Details tab and then click on
the Copy to File button.

-
In the Certificate Export Wizard, export the certificate in base-64 encoded format.
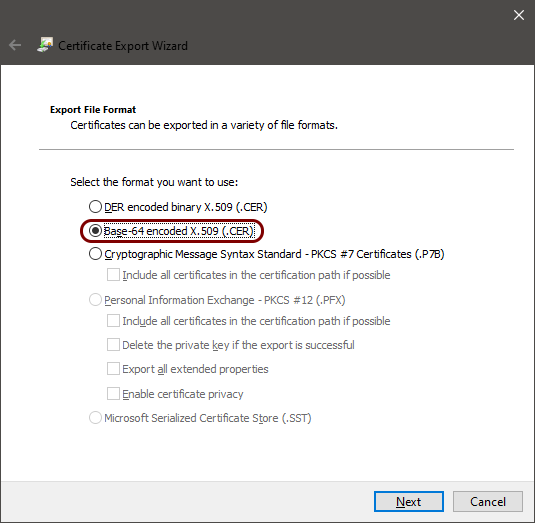
openssl x509 -inform der -in input_file.cer -outform pem -out output_file.cerOptional: Hand over information from the Portnox Cloud team to the Google team
In this section, you will learn what information was collected in previous steps from Portnox Cloud, which is needed to configure Google Workspace and Google Cloud to work with Portnox Cloud.
If different people are responsible for managing Portnox Cloud and Google Cloud/Google Workspace, here is the information you need to hand over:
Configure the Google Cloud project
In this section, you will create or select a Google Cloud project, enable the Chrome Management API, create a Pub/Sub topic, create a service account for Portnox Cloud, and download a key for this service account.
-
At the top-left corner of the page, next to the Google Cloud logo, click on the project name to open the
Select a resource window. Then, select the project that you want to use for this
configuration.
Note:If you have not yet created a project for this purpose, click on the New project link in the top-right corner of the Select a resource window, give it a descriptive name (for example, chromebook-cert-provisioning), and click on the Create button. Wait a few moments for Google Cloud to finish creating it, then click on the Select Project link.Note:Existing setups with GCCC: Select the project that you used for the previous process.

-
Open the Chrome Management API page. Then, click on the
Enable button.
 Note:The link opens the page for whichever project is currently selected in the Google Cloud console. Check the project name shown at the top of the page and make sure it matches the project you selected in the previous step.Note:If this is the first time you are enabling an API in this project, Google Cloud may prompt you to link a billing account before it lets you continue. This does not mean you will be charged – see the note in the prerequisites section at the beginning of this topic.Note:Existing setups with GCCC: The API is already enabled, so skip this step.
-
In the Search for resources, docs, products, and more field at the top of the page, type
pub/sub, then click on the Pub/Sub result.
 Note:Existing setups with GCCC: The Pub/Sub API is already active, so this step only opens the Pub/Sub page.
This activates the Pub/Sub API for the project. This process may take a while. A notification at the bottom of the page shows the message: Enabling Cloud Pub/Sub API for this project...
-
In the left-hand side pane, click on the Topics menu option.
 Note:Existing setups with GCCC: Your existing topic appears in the list, so skip the steps that create a topic and grant the Pub/Sub Publisher role.
-
Click on the Create topic button in the top-left corner of the Topics
pane.

This opens the Create topic pane.
-
In the Create topic pane, in the Topic ID field, enter a name for the
topic.

In this example, we used the name certificate-provisioning-topic, but you can use any name you like.
-
In the Create topic pane, make sure that the Add a default subscription
checkbox is activated.
 Note:A subscription is required for Portnox Cloud to be able to read messages from this topic. You can create a non-default subscription later instead, if you prefer.Note:The default subscription ID is the topic ID followed by
-sub. You will need this value when you configure Portnox Cloud.In this example, the default subscription ID is certificate-provisioning-topic-sub.
-
In the info panel on the right-hand side of the page, click on the Permissions tab.
Note:The info panel is titled with the name of your topic. If the info panel is not visible, click on the Show info panel link in the top-right corner of the page.

-
Click on the Add principal button.

This opens the Grant access to pane.
-
In the Grant access to pane, in the New principals field, enter the
following account name:
cert-provisioning-api-pubsub-publisher@system.gserviceaccount.com Note:This is a well-known service account belonging to Google’s own back-end infrastructure – not one you create yourself. Google uses it to publish certificate-request messages into your topic.Warning:If your organization enforces the Domain Restricted Sharing organization policy, this step will fail, because that policy blocks granting access to principals outside your own domain – including Google’s own service account above. This is not a concern for most organizations, since Domain Restricted Sharing is not enforced by default on a new Google Cloud project. If your organization does enforce it (typically set up deliberately by whoever manages your Google Cloud organization policies), you will need to add an exception for this specific service account before you can complete this step. See Google’s documentation on Domain Restricted Sharing for how to configure exceptions.
-
In the Select a role field, select the option.

-
Click on the project name for the project that you are using for this configuration.

-
In the top-left corner of the Service accounts pane, click on the Create service
account button.
 Note:Existing setups with GCCC: Your existing service account works with Portnox Cloud, so skip the steps that create a service account and continue with the step where you copy its email address.
This opens the Create service account pane with a three-step wizard.
-
In the Create service account step of the wizard, in the Service account
name field, enter a name for the service account, then click on the Create and
continue button.

In this example, we used the name scep-prov-service-account, but you can use any name you like.
-
In the Permissions step of the wizard, in the Select a role field,
select the option.
 Note:Optional: to grant a more granular scope, you can restrict this role to only the specific Pub/Sub topic and subscription you created earlier, using an IAM condition on this service account.
-
Click on the Continue button.

-
In the Principals with access (optional) step of the wizard, click on the
Done button.

-
On the Service accounts pane, find the service account that you just created, and copy the
value of its Email column into a text file for later use.

In this example, the value is scep-prov-service-account@chromebook-cert-provisioning.iam.gserviceaccount.com.
-
Click on the name of the service account that you created earlier in this task.
 Note:Existing setups with GCCC: You can reuse the key.json file from the Google Cloud Certificate Connector installation folder on your Windows server instead of creating a new key.
-
In the Service account details pane, click on the Keys tab.

-
Click on the Add key button, then click on the Create new key menu
option.

This opens the Create private key window.
-
In the Create private key window, make sure that the JSON option is
selected, then click on the Create button.

This downloads a JSON key file to your computer.
Optional: Hand over information from the Google team to the Portnox Cloud team
In this section, you will learn what information was collected in previous steps from Google Cloud, which is needed to configure Portnox Cloud.
If different people are responsible for managing Portnox Cloud and Google Cloud/Google Workspace, here is the information you need to hand over:
Configure Portnox Cloud
In this section, you will turn on certificate provisioning in your Portnox™ Cloud Google Workspace integration, so that Portnox Cloud receives certificate requests from your Pub/Sub subscription.
-
In the Cloud portal top menu, click on the Settings option.
-
In the Cloud portal left-hand side menu, click on the option.
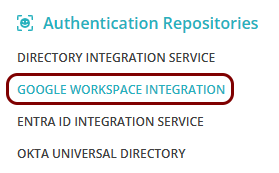
-
Turn on certificate provisioning in your Google Workspace integration.
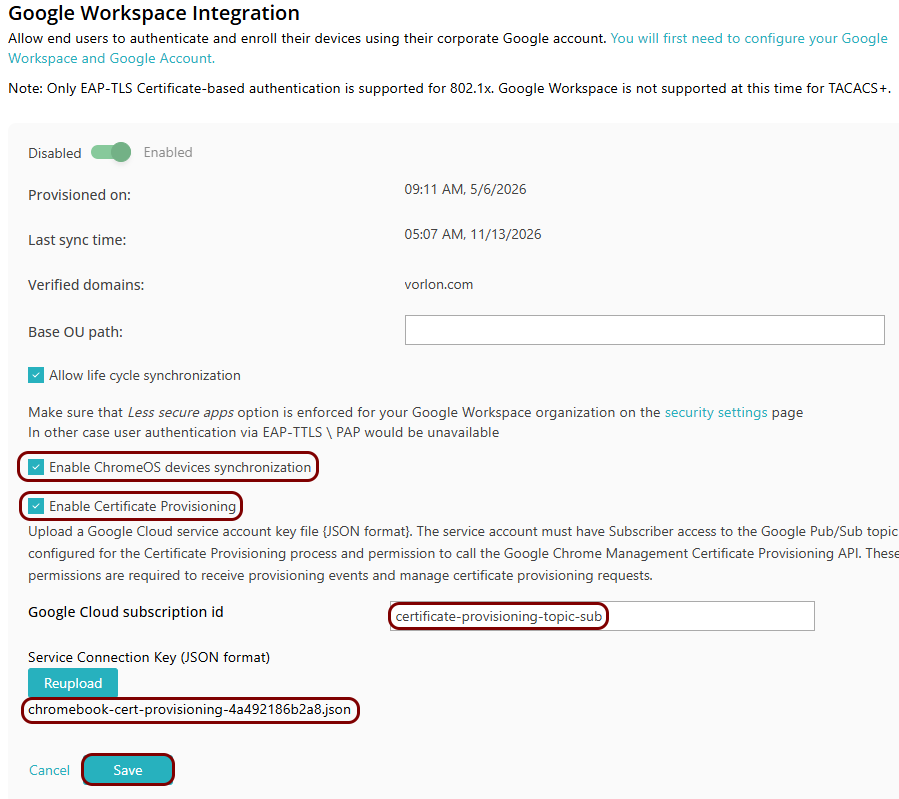
Portnox Cloud starts to receive certificate requests from the Pub/Sub subscription within about one minute.
Configure Google Admin
In this section, you will create a generic Certificate Authority connection and a certificate provisioning profile in the Google Admin console.
-
Open the Google Admin console and access the pane by visiting the following URL: admin.google.com/ac/networks/certificates/ca-connections.
 Note:Existing setups with GCCC: Leave your existing SCEP connection in place for now and create a new connection in the following steps.
-
Click on the ADD CONNECTION button.

This will open the Add Certificate Authority connection screen.
-
On the Add Certificate Authority connection screen, fill in the connection details as
follows:

-
Open the Certificate provisioning profiles page.
Alternatively, from the page, click on the Certificates breadcrumb link at the top of the page, then click on the Certificate provisioning profiles tile in the right-hand side pane.
 Note:Existing setups with GCCC: Leave your existing provisioning profile in place for now and create a new profile in the following steps.
-
Click on the ADD PROFILE button.

This opens the Certificate provisioning profile screen.
-
On the Certificate provisioning profile screen, fill in the profile details as follows:

Optional: Turn on Google Verified Access
In this section, you will enable Google Verified Access to let network services cryptographically verify that connecting Chromebooks are genuine and policy-compliant.
Google Verified Access lets a network service cryptographically confirm that a connecting Chromebook is genuine, enrolled, and running an unmodified, policy-compliant version of ChromeOS. Setting it up involves two parts: enabling an API in your Google Cloud project and configuring a policy in Google Admin. The matching option in Portnox Cloud (Enable ChromeOS devices synchronization) is already activated if you followed the Portnox Cloud configuration task earlier in this topic.
-
Open the Chrome Verified Access API page. Then, click on the Enable
button.
 Note:The link opens the page for whichever project is currently selected in the Google Cloud console. Check the project name shown at the top of the page and make sure it matches the project you used earlier in this topic.
-
In the right-hand side pane, in the Enrollment and access table, click on the
Verified access setting.

-
In the Configuration field, check that the value is set to Enable for content
protection. This is the Google default, so it should already be selected. If it is set to
Disable for content protection instead, click on the field and select the
Enable for content protection option, then click on the Save
button.

-
Click on the Device option in the breadcrumb trail on top of the screen to go back to the
previous pane, and then in the Enrollment and access table, click on the Verified
mode setting.

-
In the Configuration field, select the Require verified mode boot for verified
access option.
 Note:If you select this option, devices in Developer mode will always fail the verified access check. If you have a business reason to allow Developer mode devices to pass verification, select the Skip boot mode check for verified access option instead.
-
In the Services with full access or Services with limited access
field, enter the email address of the service account that you decided to use earlier in this task.
 Note:Google documentation does not specify the exact difference in capabilities between full and limited access. Choose the option that matches your organization’s risk tolerance – full access if you are unsure, or limited access if you prefer to grant the minimum access necessary and can confirm it meets your needs during testing.
In this example, using the service account created earlier in this topic, the value would be scep-prov-service-account@chromebook-cert-provisioning.iam.gserviceaccount.com.
Result: Portnox Cloud can now validate Google Verified Access policy attributes against Google Workspace during device authentication for ChromeOS risk assessment policies.
Create a profile for the root CA certificate
In this section, you will create a profile in Google Workspace for the downloaded Portnox™ Cloud root CA certificate.
-
Click on the ADD CERTIFICATE link.

The Add certificate pane opens.
-
In the Add certificate pane, enter the name for the profile and then click on the
UPLOAD button. Then, select the root CA certificate downloaded and converted
earlier.
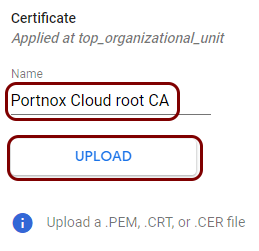
In this example, we used the name Portnox Cloud root CA, but you can use any name you like.
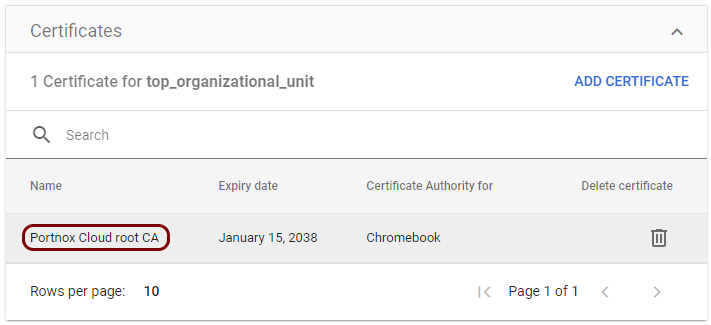
You will see basic information about the root CA certificate.

-
In the Certificate Authority section of the Add certificate pane,
select Chromebook and optionally all other managed device platforms that you will use this
certificate with, and then click on the Add button.

Result: You created a profile for the Portnox Cloud root CA certificate.
Create a Wi-Fi profile
In this section, you will create a Wi-Fi profile in Google Workspace for Chromebooks managed by Portnox™ Cloud.
-
Click on the ADD WI-FI link.

The Add Wi-Fi pane opens.
-
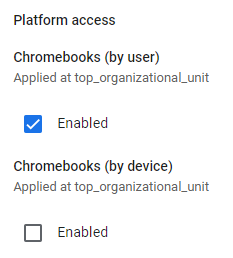
In the Platform access section of the Add Wi-Fi pane, activate the
Enabled checkbox in the Chromebooks (by user) section if you are
using user profiles, or in the Chromebooks (by device) section if you are using device
profiles.
-
In the Details section, enter a friendly name for the Wi-Fi profile in the
Name field, enter the network SSID in the SSID field, and activate
the Automatically connect checkbox.
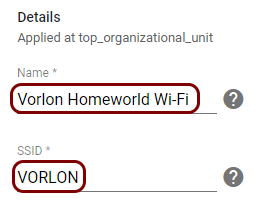 Note:The value of the Name field is used only in Google Workspace for organizational purposes. Users see the network SSID in their Chromebooks network configuration.Important:If you do not activate the Automatically connect checkbox, Chromebook users may have to manually connect to the network.
-
In the Security settings section, in the Security Type field, select
the WPA/WPA2/WPA3 Enterprise (802.1X) option and in the Extensible Authentication
Protocol field that appears, select the EAP-TLS option.

-
In the Server Certificate Authority field, select the root CA profile you created in
the earlier
task.
 Note:This root certificate is used to validate the RADIUS server.
-
In the Server Certificate Domain Suffix Match field, enter
portnox.com.

-
In the Provisioning Type field, select the Certificate profile
option, and in the Certificate profile field, select the certificate provisioning profile
that you created in the
earlier task.
 Note:Existing setups with GCCC: In the Certificate profile field, replace your old provisioning profile with the new one, then save the Wi-Fi profile.
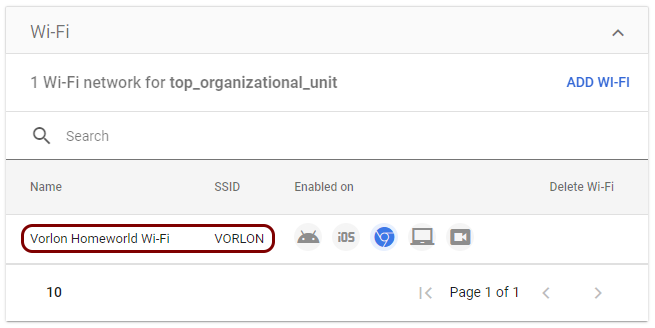
Result: You created a Wi-Fi profile for the network managed by Portnox Cloud.
Optional: Disable the legacy Secure SCEP configuration
In this section, you will remove the legacy Secure SCEP profile from Google Workspace, so that Chromebooks stop using the older, poll-based certificate enrollment method before you configure the new process.
-
In the Secure SCEP pane, click on the trash can icon next to the existing profile.

Result: Devices in the selected organizational unit will no longer enroll for certificates using the legacy Secure SCEP method.
Optional: Remove the previous configuration with the Google Cloud Certificate Connector
In this section, you will remove the elements of the previous process with the Google Cloud Certificate Connector after you confirm that the process described in this topic works.
Result: Your configuration no longer contains any elements of the previous process.
Test your configuration on a managed Chromebook
In this section, you will test the configuration you created by connecting a Chromebook to the network managed by Portnox™ Cloud.
Result: The Chromebook connects automatically, using the certificate issued by Portnox Cloud through Google Cloud and Google Workspace.
If the Chromebook does not connect, check the following:
-
Open chrome://certificate-manager, click on the Your certificates tab, and confirm a certificate was issued.
-
On the Chromebook, open chrome://policy and check that the cert_profile_id value in the RequiredClientCertificateForUser policy matches the ClientCertRef value in the OpenNetworkConfiguration policy. If they don’t match, select the certificate provisioning profile in the Wi-Fi profile again and save it.
-
In Portnox Cloud, check that the Enable Certificate Provisioning checkbox is activated, and that the subscription ID and the key file come from the same Google Cloud project.
-
Check that the Certificate Authority connection configuration identifier and the Certificate provisioning profile config reference values in Google Admin match exactly.
-
Existing setups with GCCC: Check that the GoogleCloudCertificateConnector service on your Windows server is stopped.
-
If you use both user and device certificates, see this KB entry.